April's Kitchen Counter

  • About
  • Recipes
    • Wide Awake
    • In Between
    • Great Salads
    • Soup and Bread
    • Dinner Table
    • Sugar and Spice
    • Pantry
    • Roaming
    • 20 Questions
  • Blog
  • Shop
  • Events

Croissants from Scratch, Sunshine on a Snowy Day

February 12, 2016 by April Hamilton in Wide Awake, Soup and Bread

We interrupt the regularly scheduled simple recipes for everyday blog posts to bring you this. Anything but simple, a muscle-building, thought-provoking multi-day baking event. Croissants, from scratch. 

Looking out the window, the air is vibrating with fresh snow, falling an inch an hour into a beautiful landscape that locks everyone indoors and hopefully safe inside their well-stocked kitchens. When the Governor’s mandate comes to ‘stay home!’ I celebrate, break out the recipes from the ‘baking events’ file, and pick one. 

Croissants have been on my list since the moment my sister gave me the TARTINE cookbook ten years ago. I told her we should make them. She only laughed at me and boasted she could drive her car from Santa Cruz to San Francisco, search for a parking spot, wait with the dozens of bakery-goers, at the famed Tartine, and drive back to Santa Cruz in the time it would take to make them.

Now that I have made the leap into quasi-croissant master, I can declare her wrong. She could do this two days in a row, possibly three, and still have me ‘beat.’ I’m claiming victory, though. I conquered something outside my comfort zone without having to play in the snow, decoding a task that’s been on my list for an entire decade.

Before diving in to the croissant project, I studied the recipe, all eight pages, and pondered. I had enough butter, 5 1/2 sticks. My courage wavered. I consulted my friend Libby, our local bakery rockstar, and she answered in three words.

“Go for it!” I broke a sweat just thinking about the endeavor. I hoped that Libby would steer me away, but no such luck.

My adventure-seeking husband escaped ahead of the storm, racing to the mountains for a weekend of fresh powder. I opted to stay behind and flex my muscles in the kitchen.

Saturday afternoon, I brewed a pot of espresso and mixed the preferment, a combination of flour, yeast, and not-cold milk. It was a grapefruit sized jagged ball of dough. The book referred to it as a batter which made me question if mine was right. I stashed it in the fridge downstairs for an overnight rest and proceeded with my day, periodically inspecting my little ball of dough. I thought it might flow out of the bowl considering the amount of yeast, but it just stared back at me, unchanged.

IMG_1137.JPG
IMG_1153.JPG

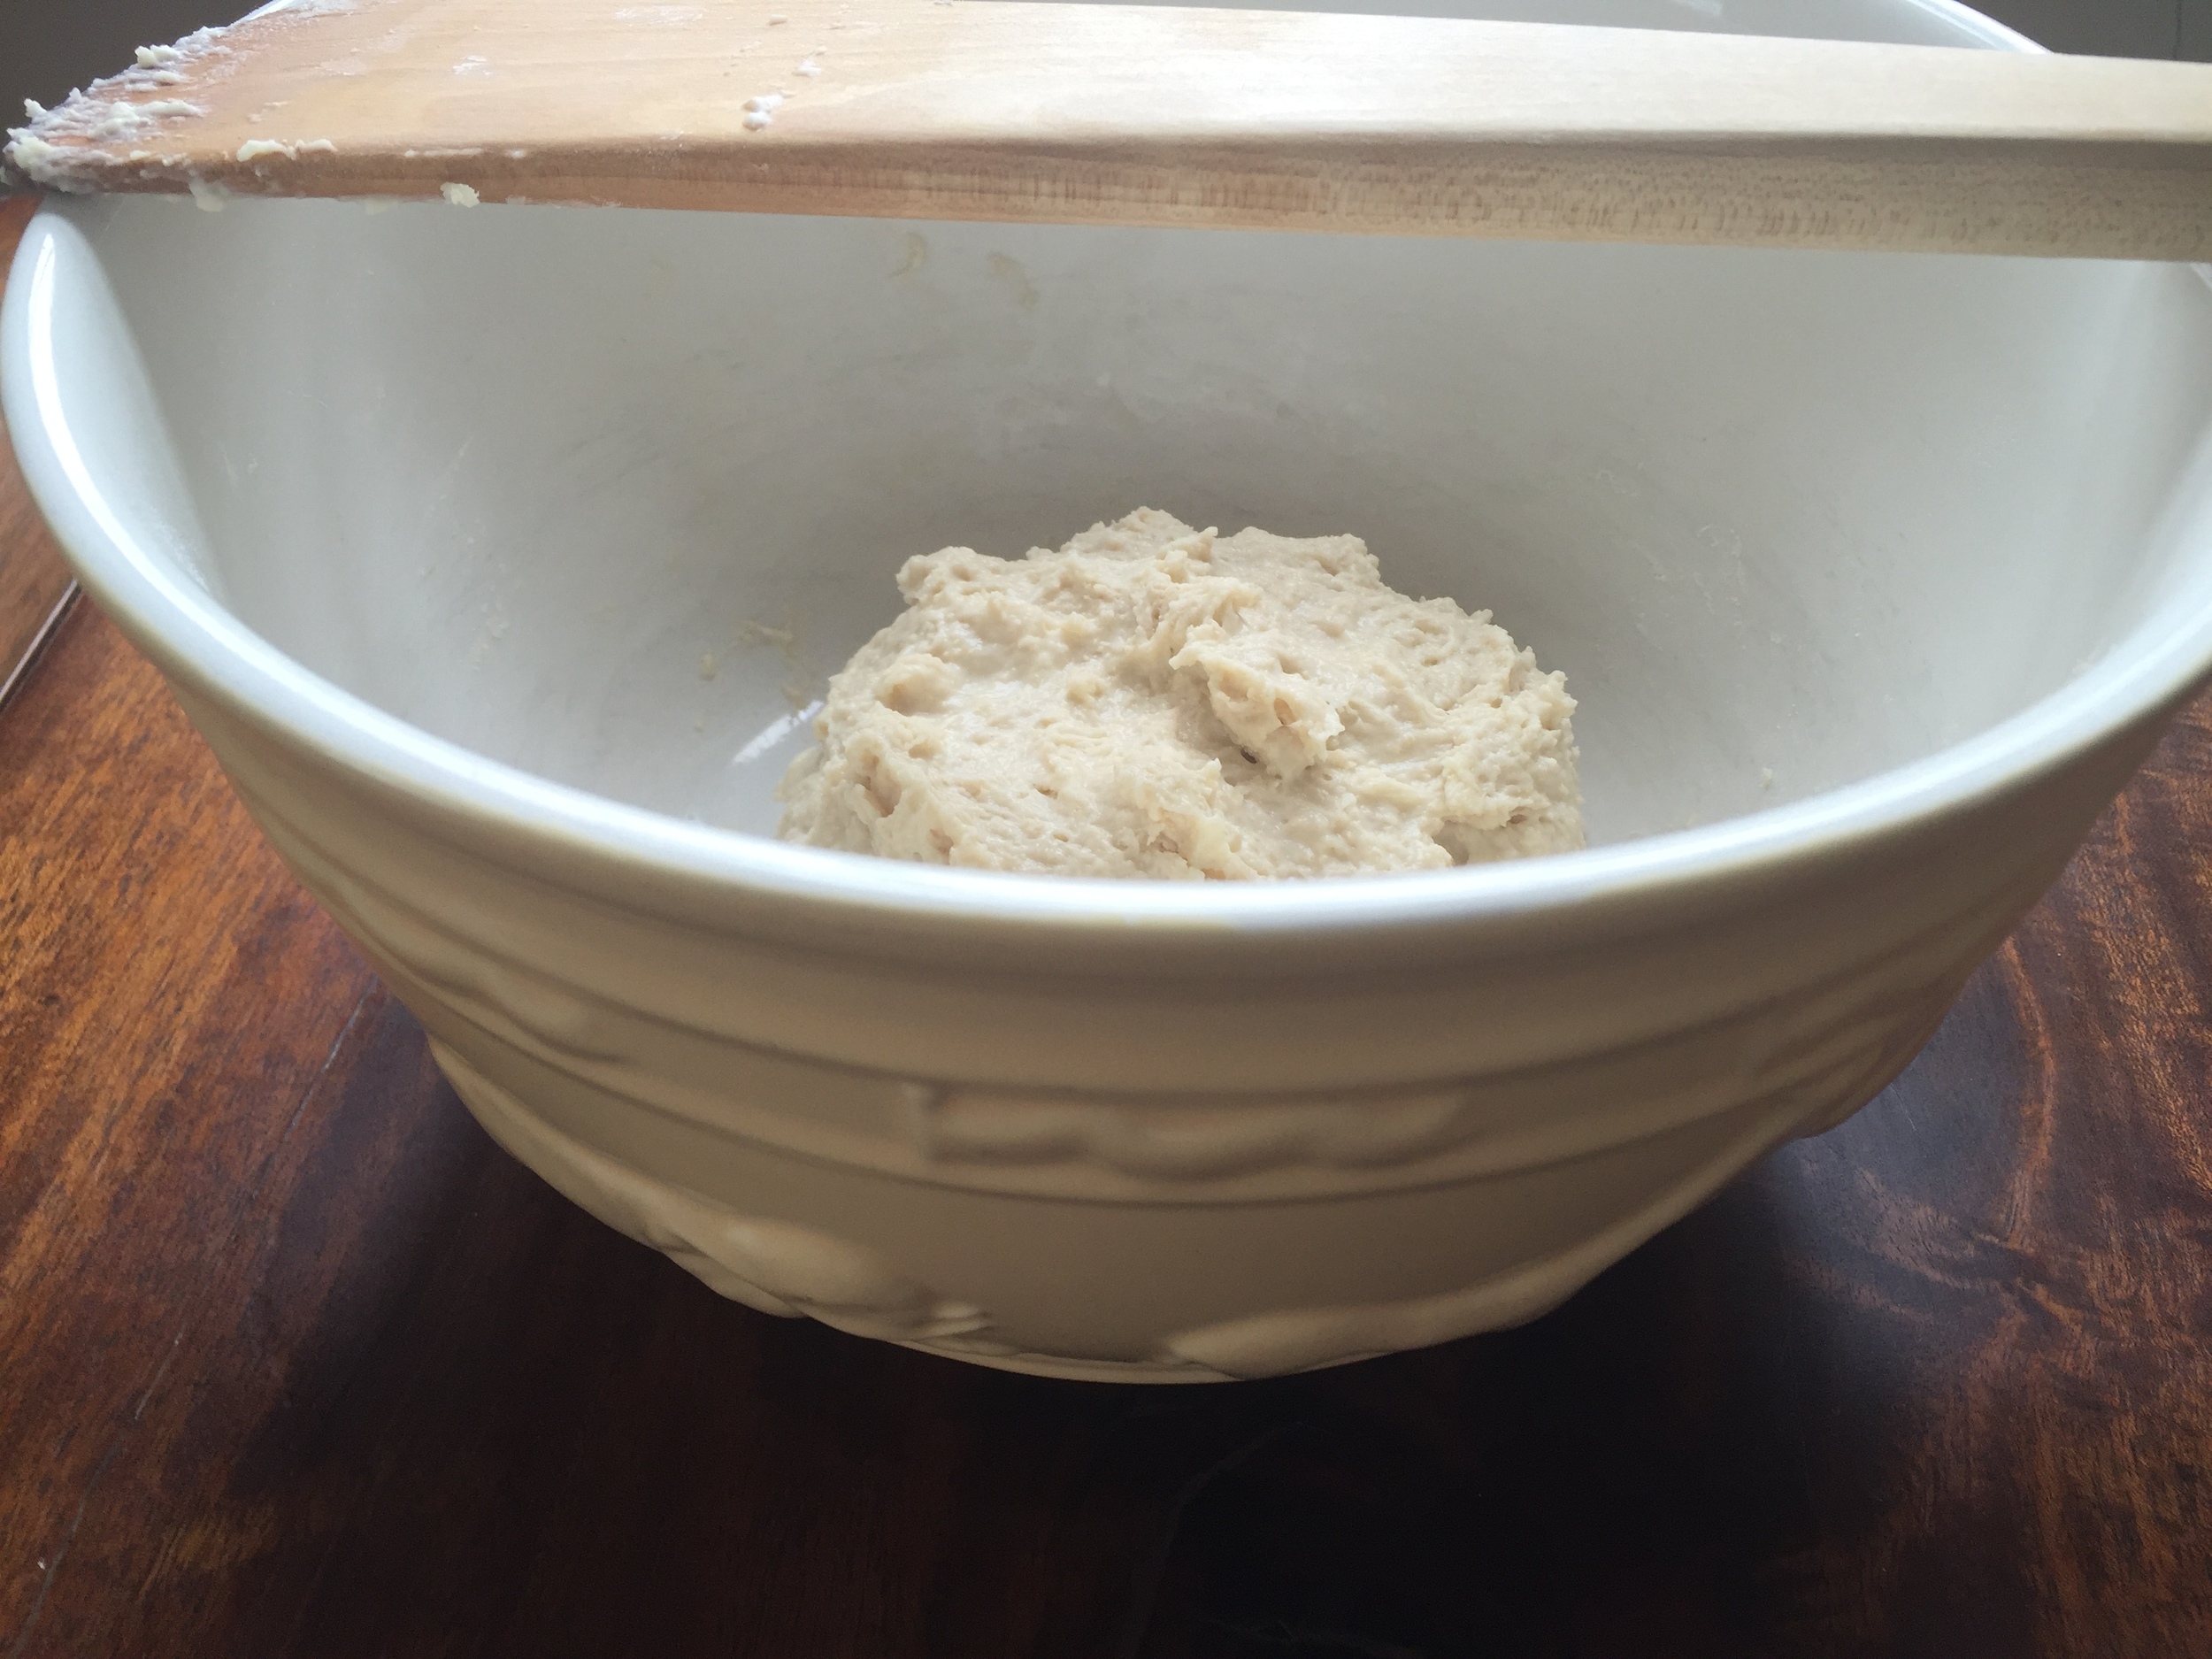
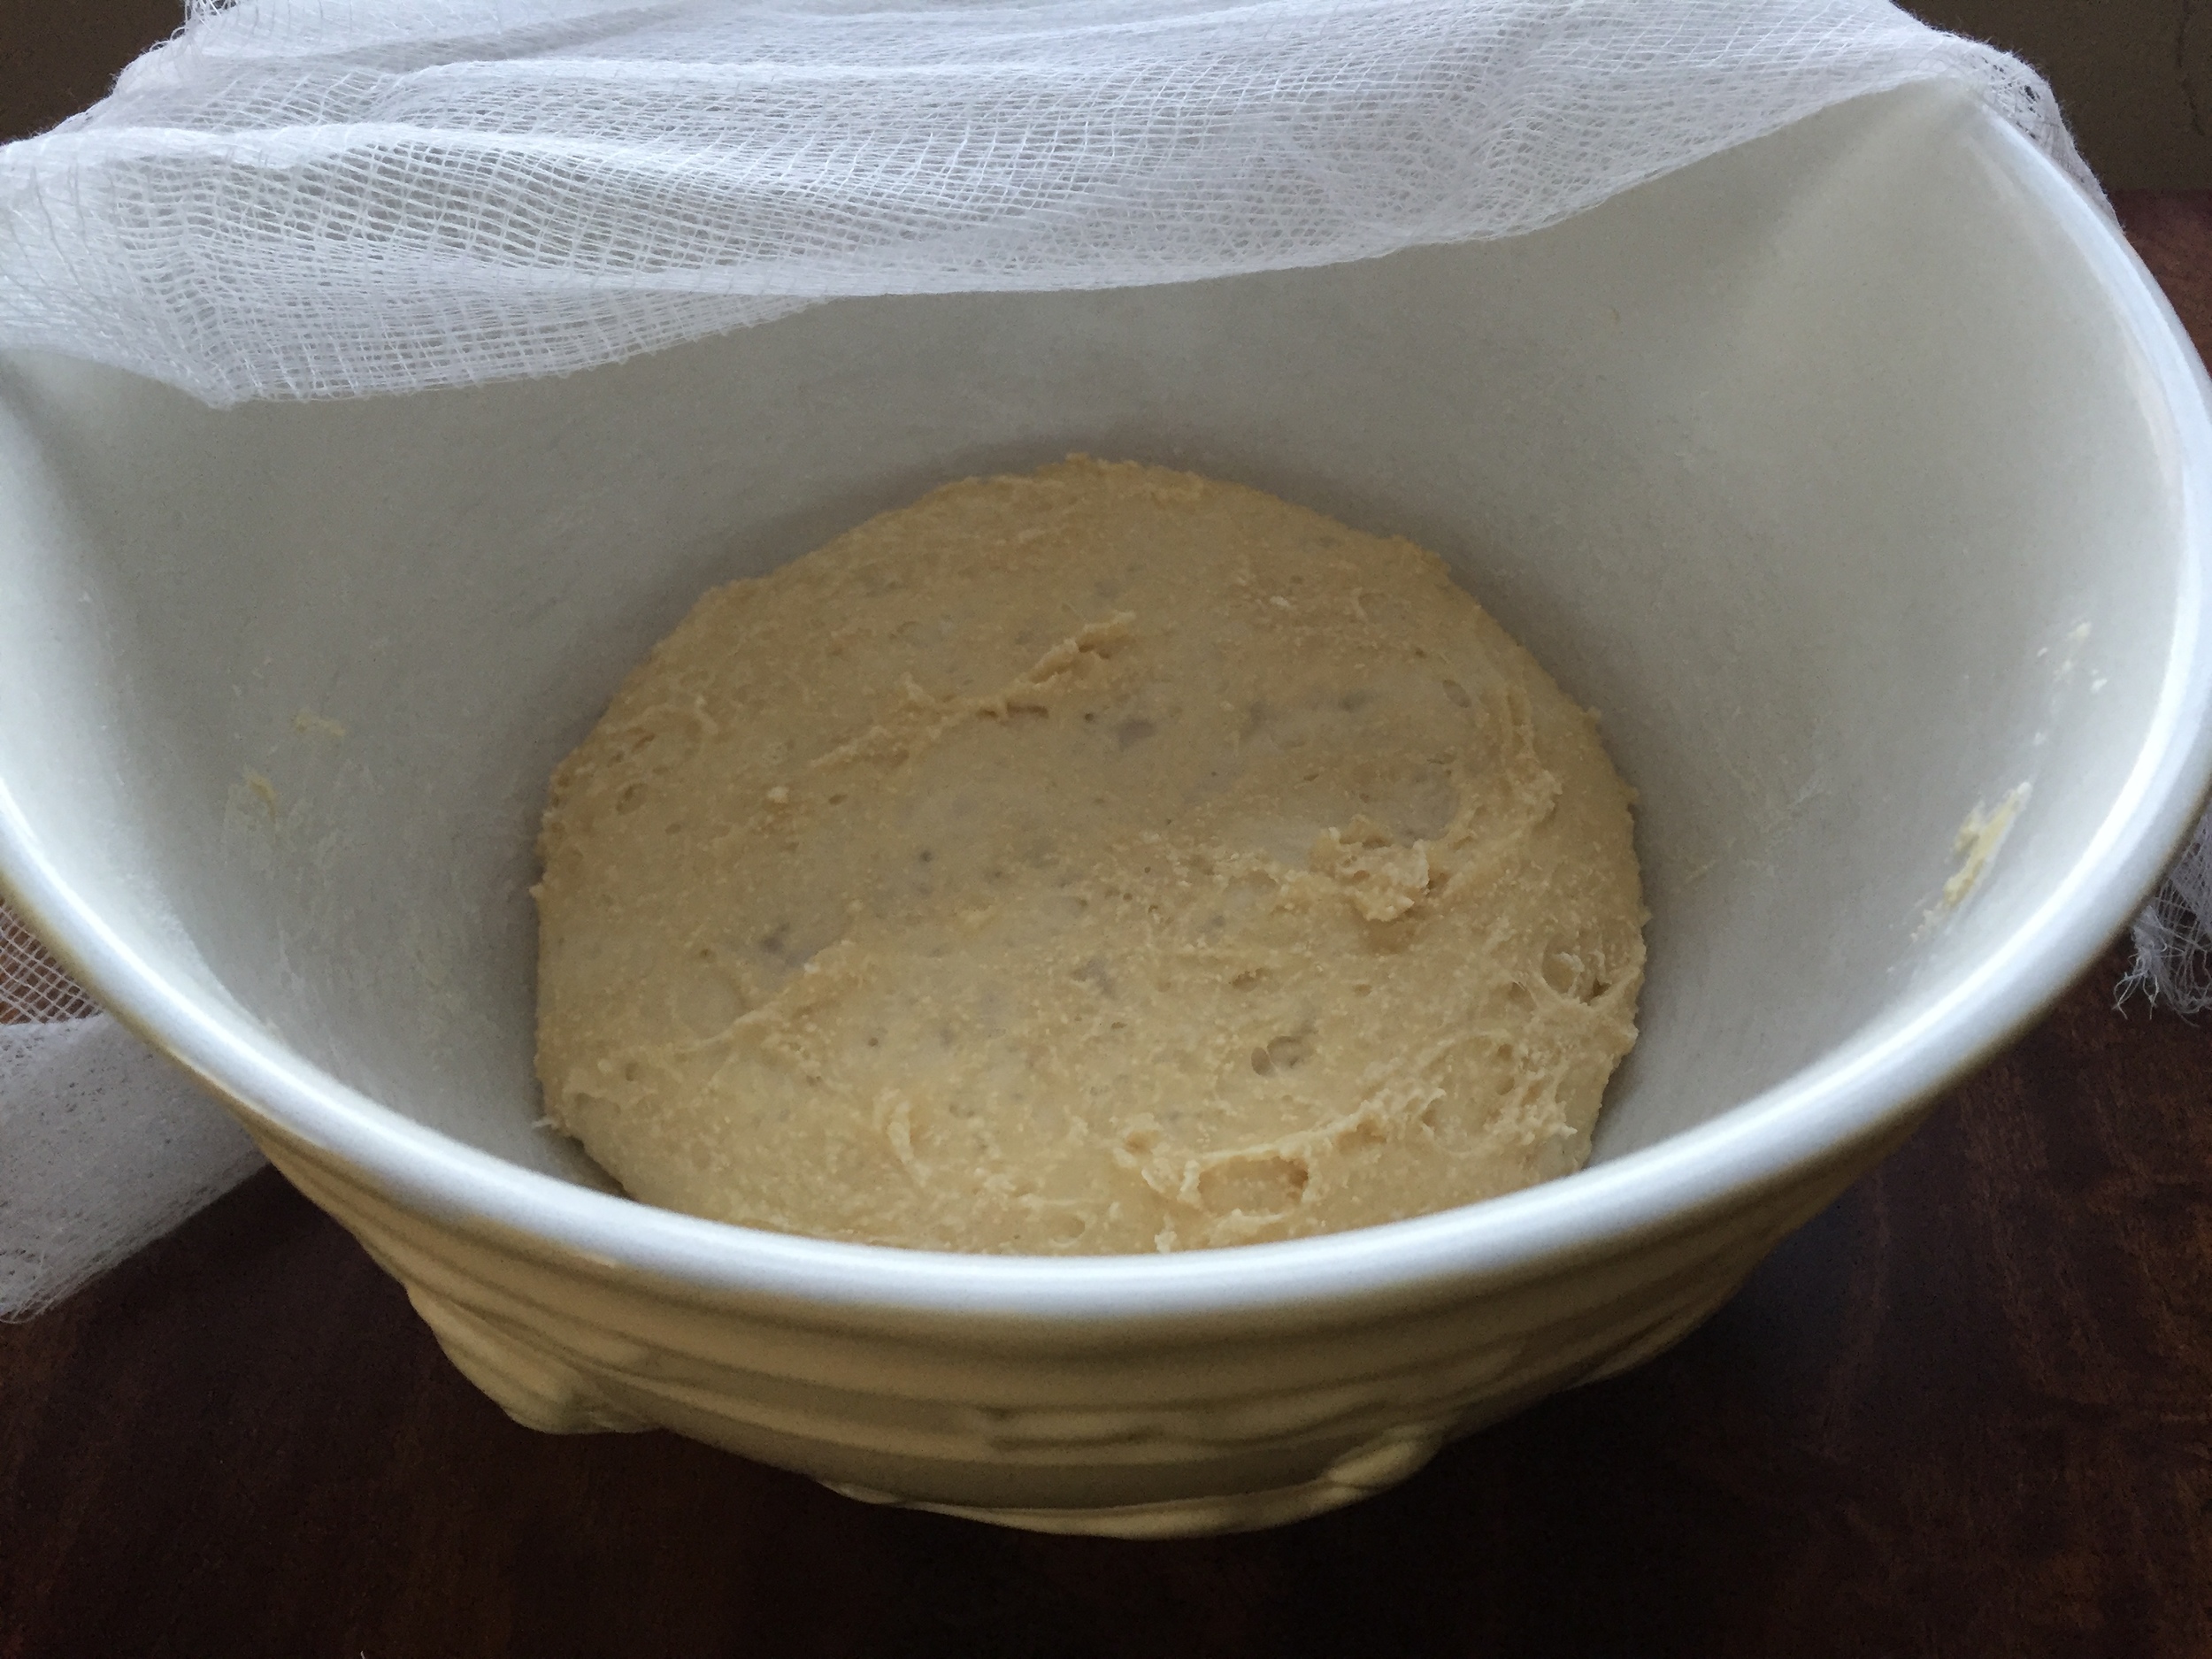
Sunday morning brought sunshine! and with it, the temptation to head outdoors. The snow shovel outside my kitchen door caught my eye with a wink, reminding me to keep cozy inside. My mind returned to the preferment. Surely it had ballooned into an unruly mass. It was time to face my fears. Descending one step at a time to the basement, thinking about my husband winding his way down the powder-packed slopes, I reached the fridge to peek at my dough. This was the moment of truth, I might be off the hook if I discovered a disaster instead of a puffy pillow of starter.  I lifted the cover from the bowl, relieved. Just as the recipe promised, I had a soft dough that had doubled in volume. Confidence restored, I forged ahead. 

‘Mix the preferment with yeast, add half the milk...’ the instructions continue for three paragraphs which I followed to the letter, until I had a satiny ball of stretchy dough. After the yeast works its magic, the dough gets pressed out into a rectangular shape and chills again for a 4 to 6 hour rest. I had to do some math here. The steps that follow would require more hours of hands-on and off and I had somewhere to be at 6:00 and 20 inches of snow obscuring the truck and driveway (Tickets to Mountain Stage, the phenomenal radio show that is performed and recorded just minutes from my home. This one featuring The Westies, Robert Earl Keen, Rhett Miller, and Guster. Nothing was going to keep me from my coveted seat at this sold out show). I cued up The Old 97’s and kept focus on my croissants.

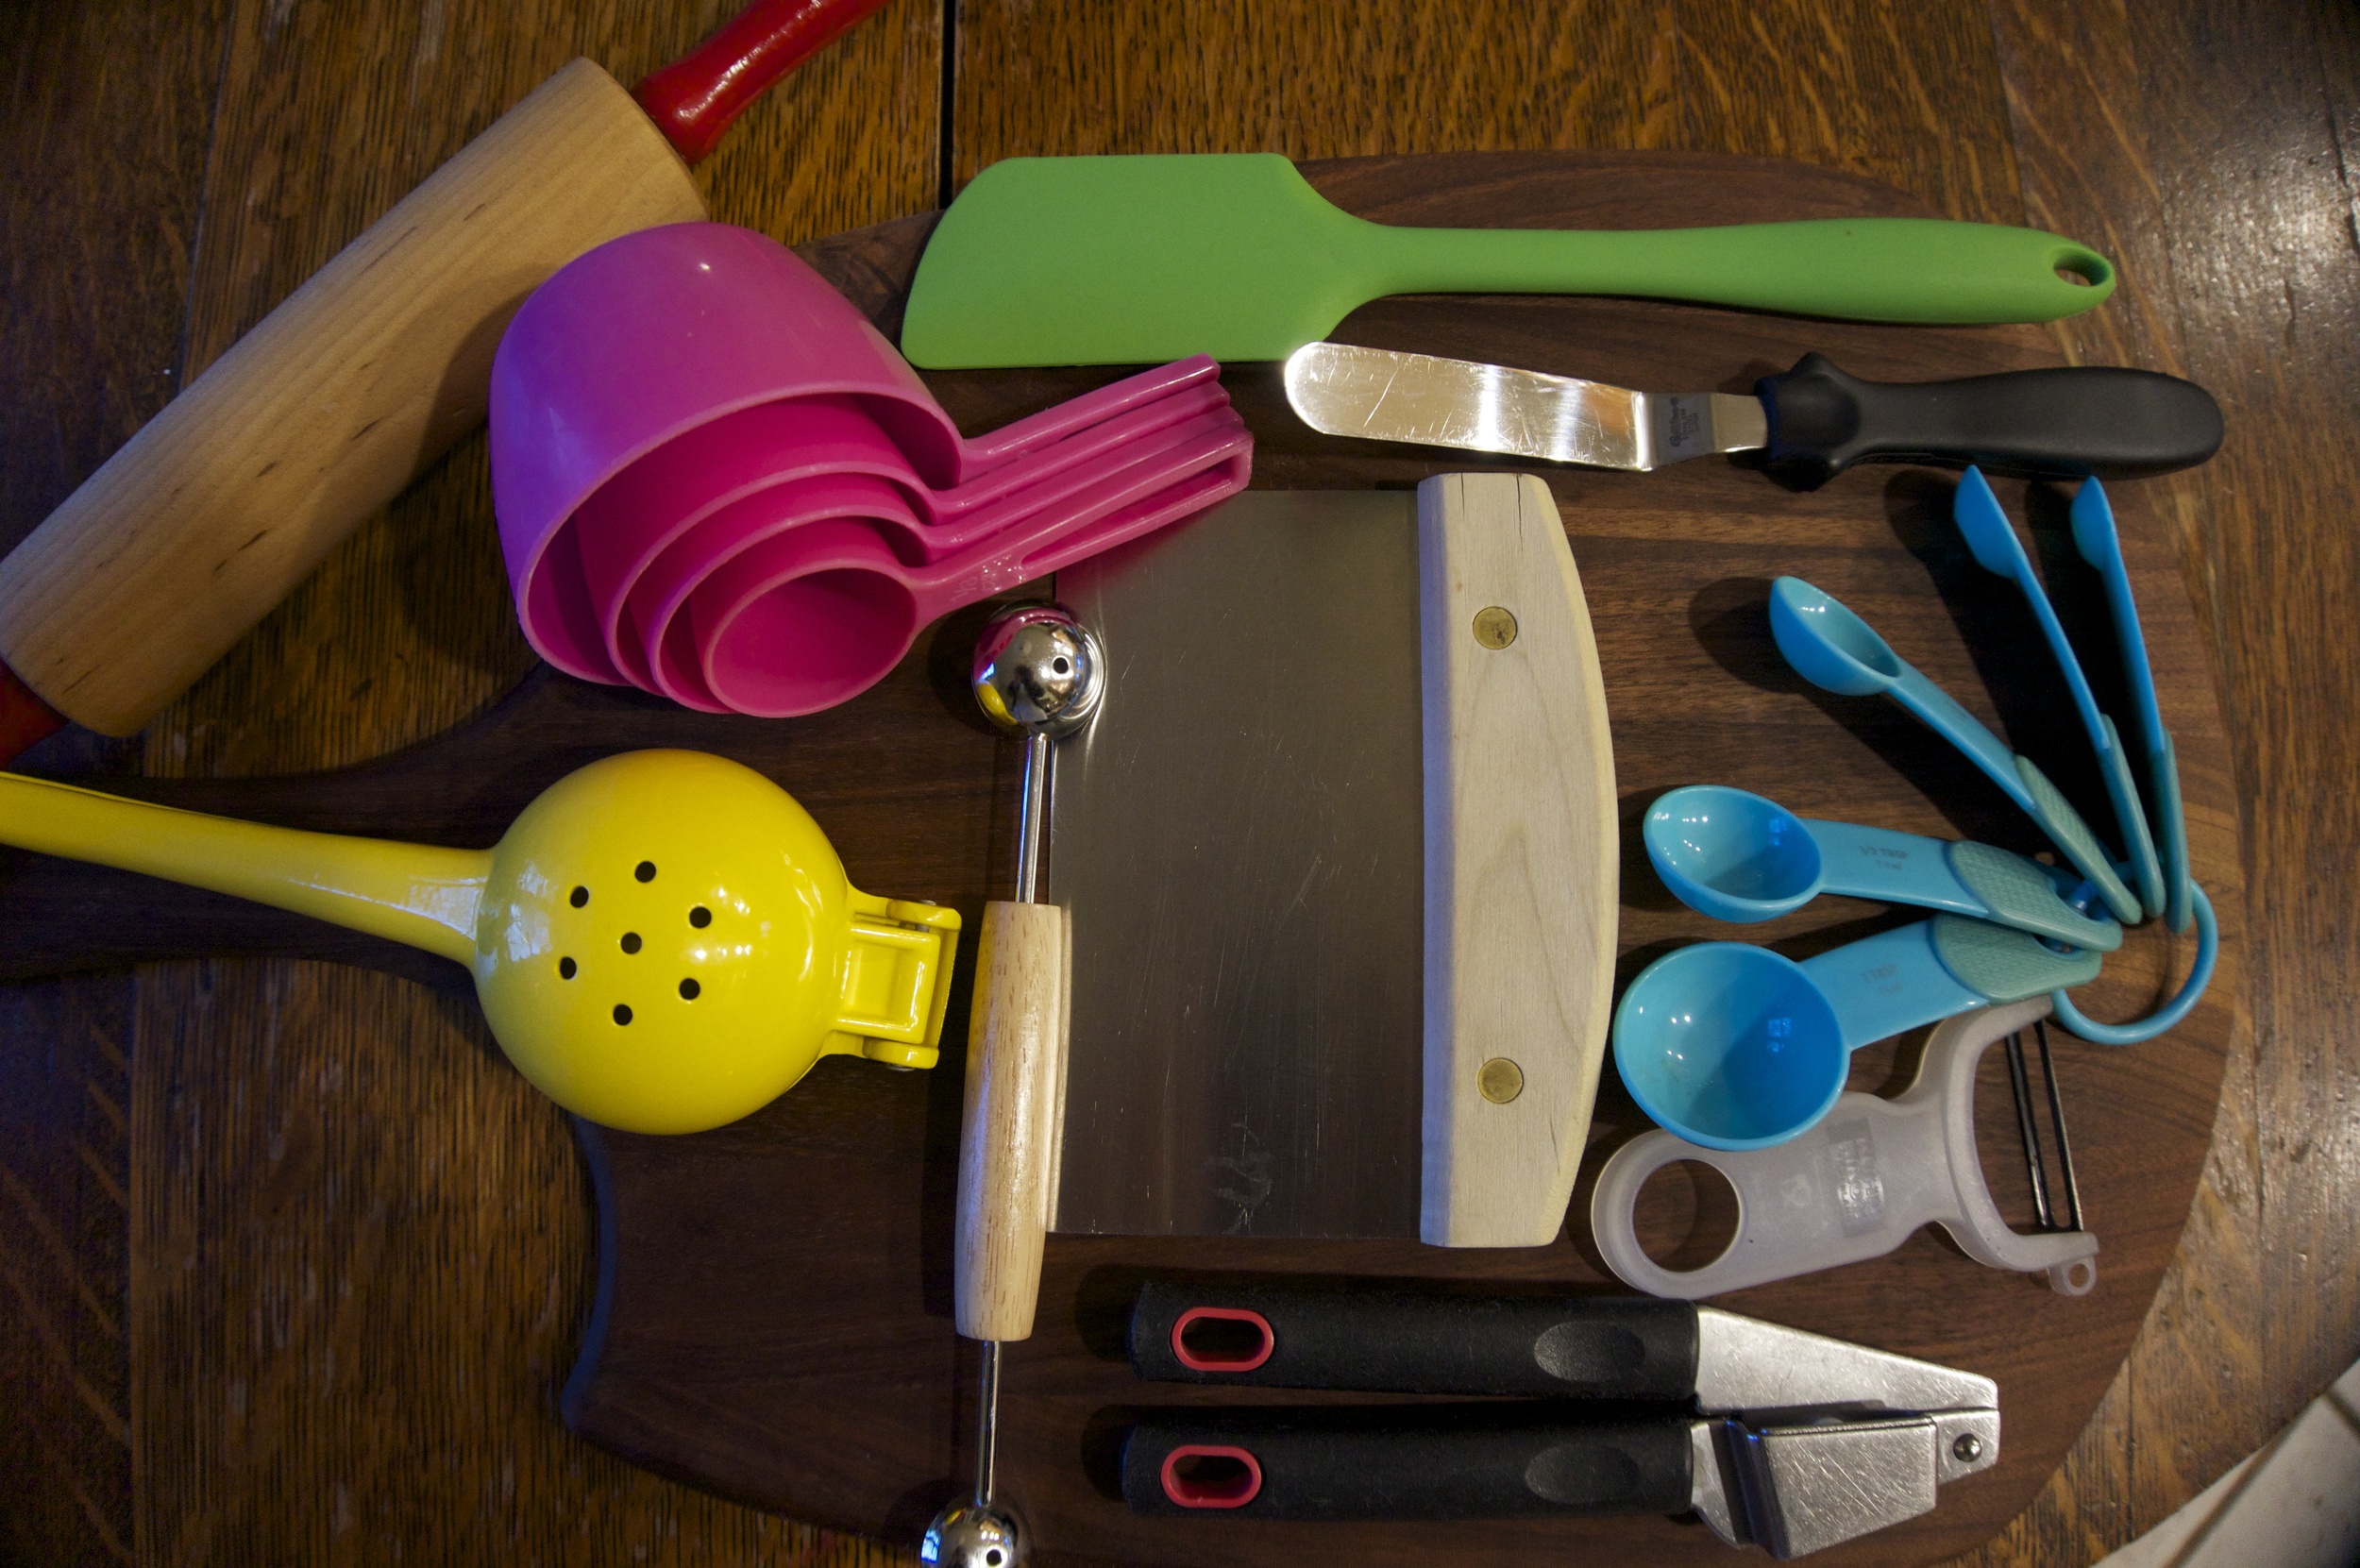
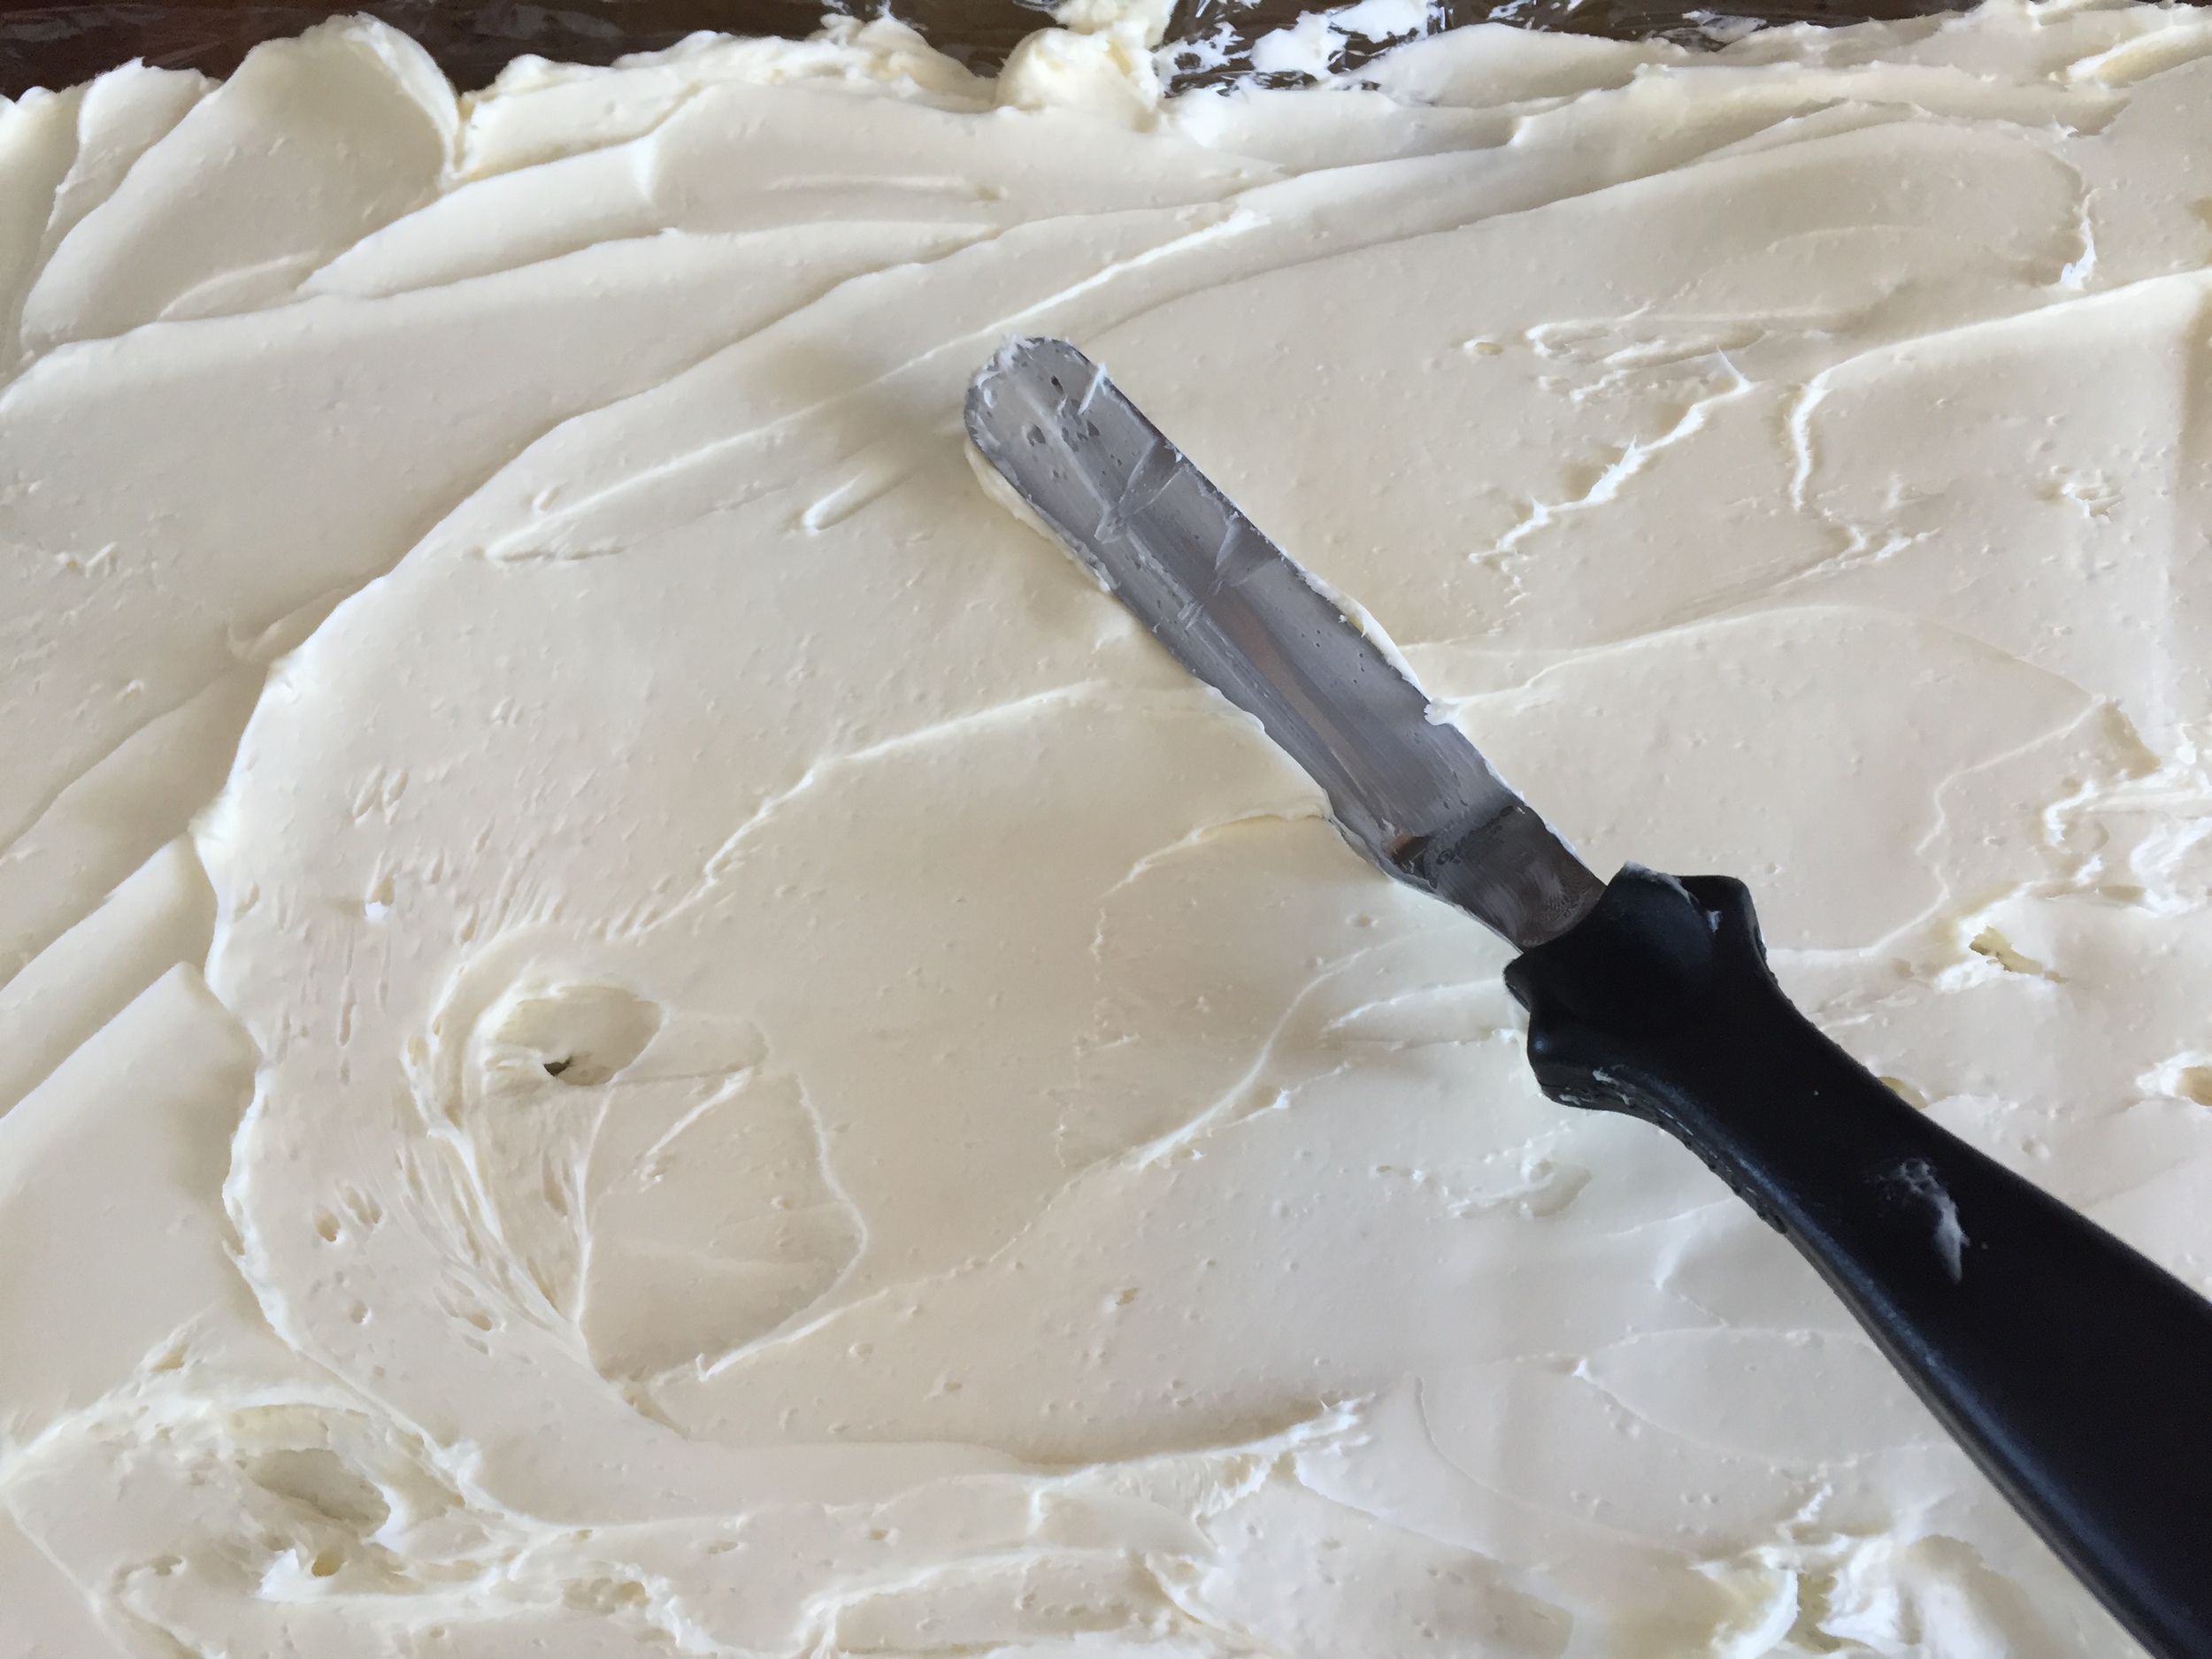
The French are fascinating kitchen wizards, discovering hundreds of years ago that if you wrap cold butter inside a yeast dough and fold and roll and layer and turn and roll some more, the two become one with impossibly flaky layers of crisp, buttery pastry. There is little margin of error in this process which fueled my apprehension. As instructed, I whipped my cold butter in the KitchenAid and then smeared it into a sheet on plastic wrap, covered the sheet of butter with more wrap, and into the fridge.

IMG_1172.JPG
IMG_1174.JPG
IMG_1175.JPG
IMG_1176.JPG

It was 3:00 and I was racing to get the dough and butter properly united before the show. Rolling pin engaged to the tune of the music, I did the rolling, the folding, the turning, all the while questioning if I was doing it right. My creation looked like a neat book, waiting for a title to be inscribed on the front. Just like a fairy tale, my husband appeared from his powder weekend and kept beat with the snow shovel, digging out the driveway and his truck, our way out. 

IMG_1187.JPG
IMG_1191.JPG
IMG_1193.JPG
IMG_1203.JPG

Monday morning, another snow day for my high school student and more rolling pin sessions for this intrepid baker. I messaged my friend Allison from our bakery for a last shot of courage and a few hours later, 16 croissants were born. The dough performed as promised and the kitchen boasted the perfume of browning butter. I watched them cool just long enough, selected one from the pan and uncoiled the layers, savoring my first bite. Eyes closed, the days of work validated, I recognized the danger of being snowed in with homemade croissants. I spread the cheer, inviting friends to stop by if they were un-stuck, then delivered two for Libby and Allison who responded, “Love the layers! And flavor -- the preferment adds some oomph. Good bold bake adds structure and flavor also. Big thumbs up!” 

Let it snow! When the next blizzard threatens, I’ll be ready with my butter and flour, with rolling pin and courage intact. I hope you’ll join me.

Croissants

adapted from TARTINE by Elizabeth M. Prueitt and Chad Robertson
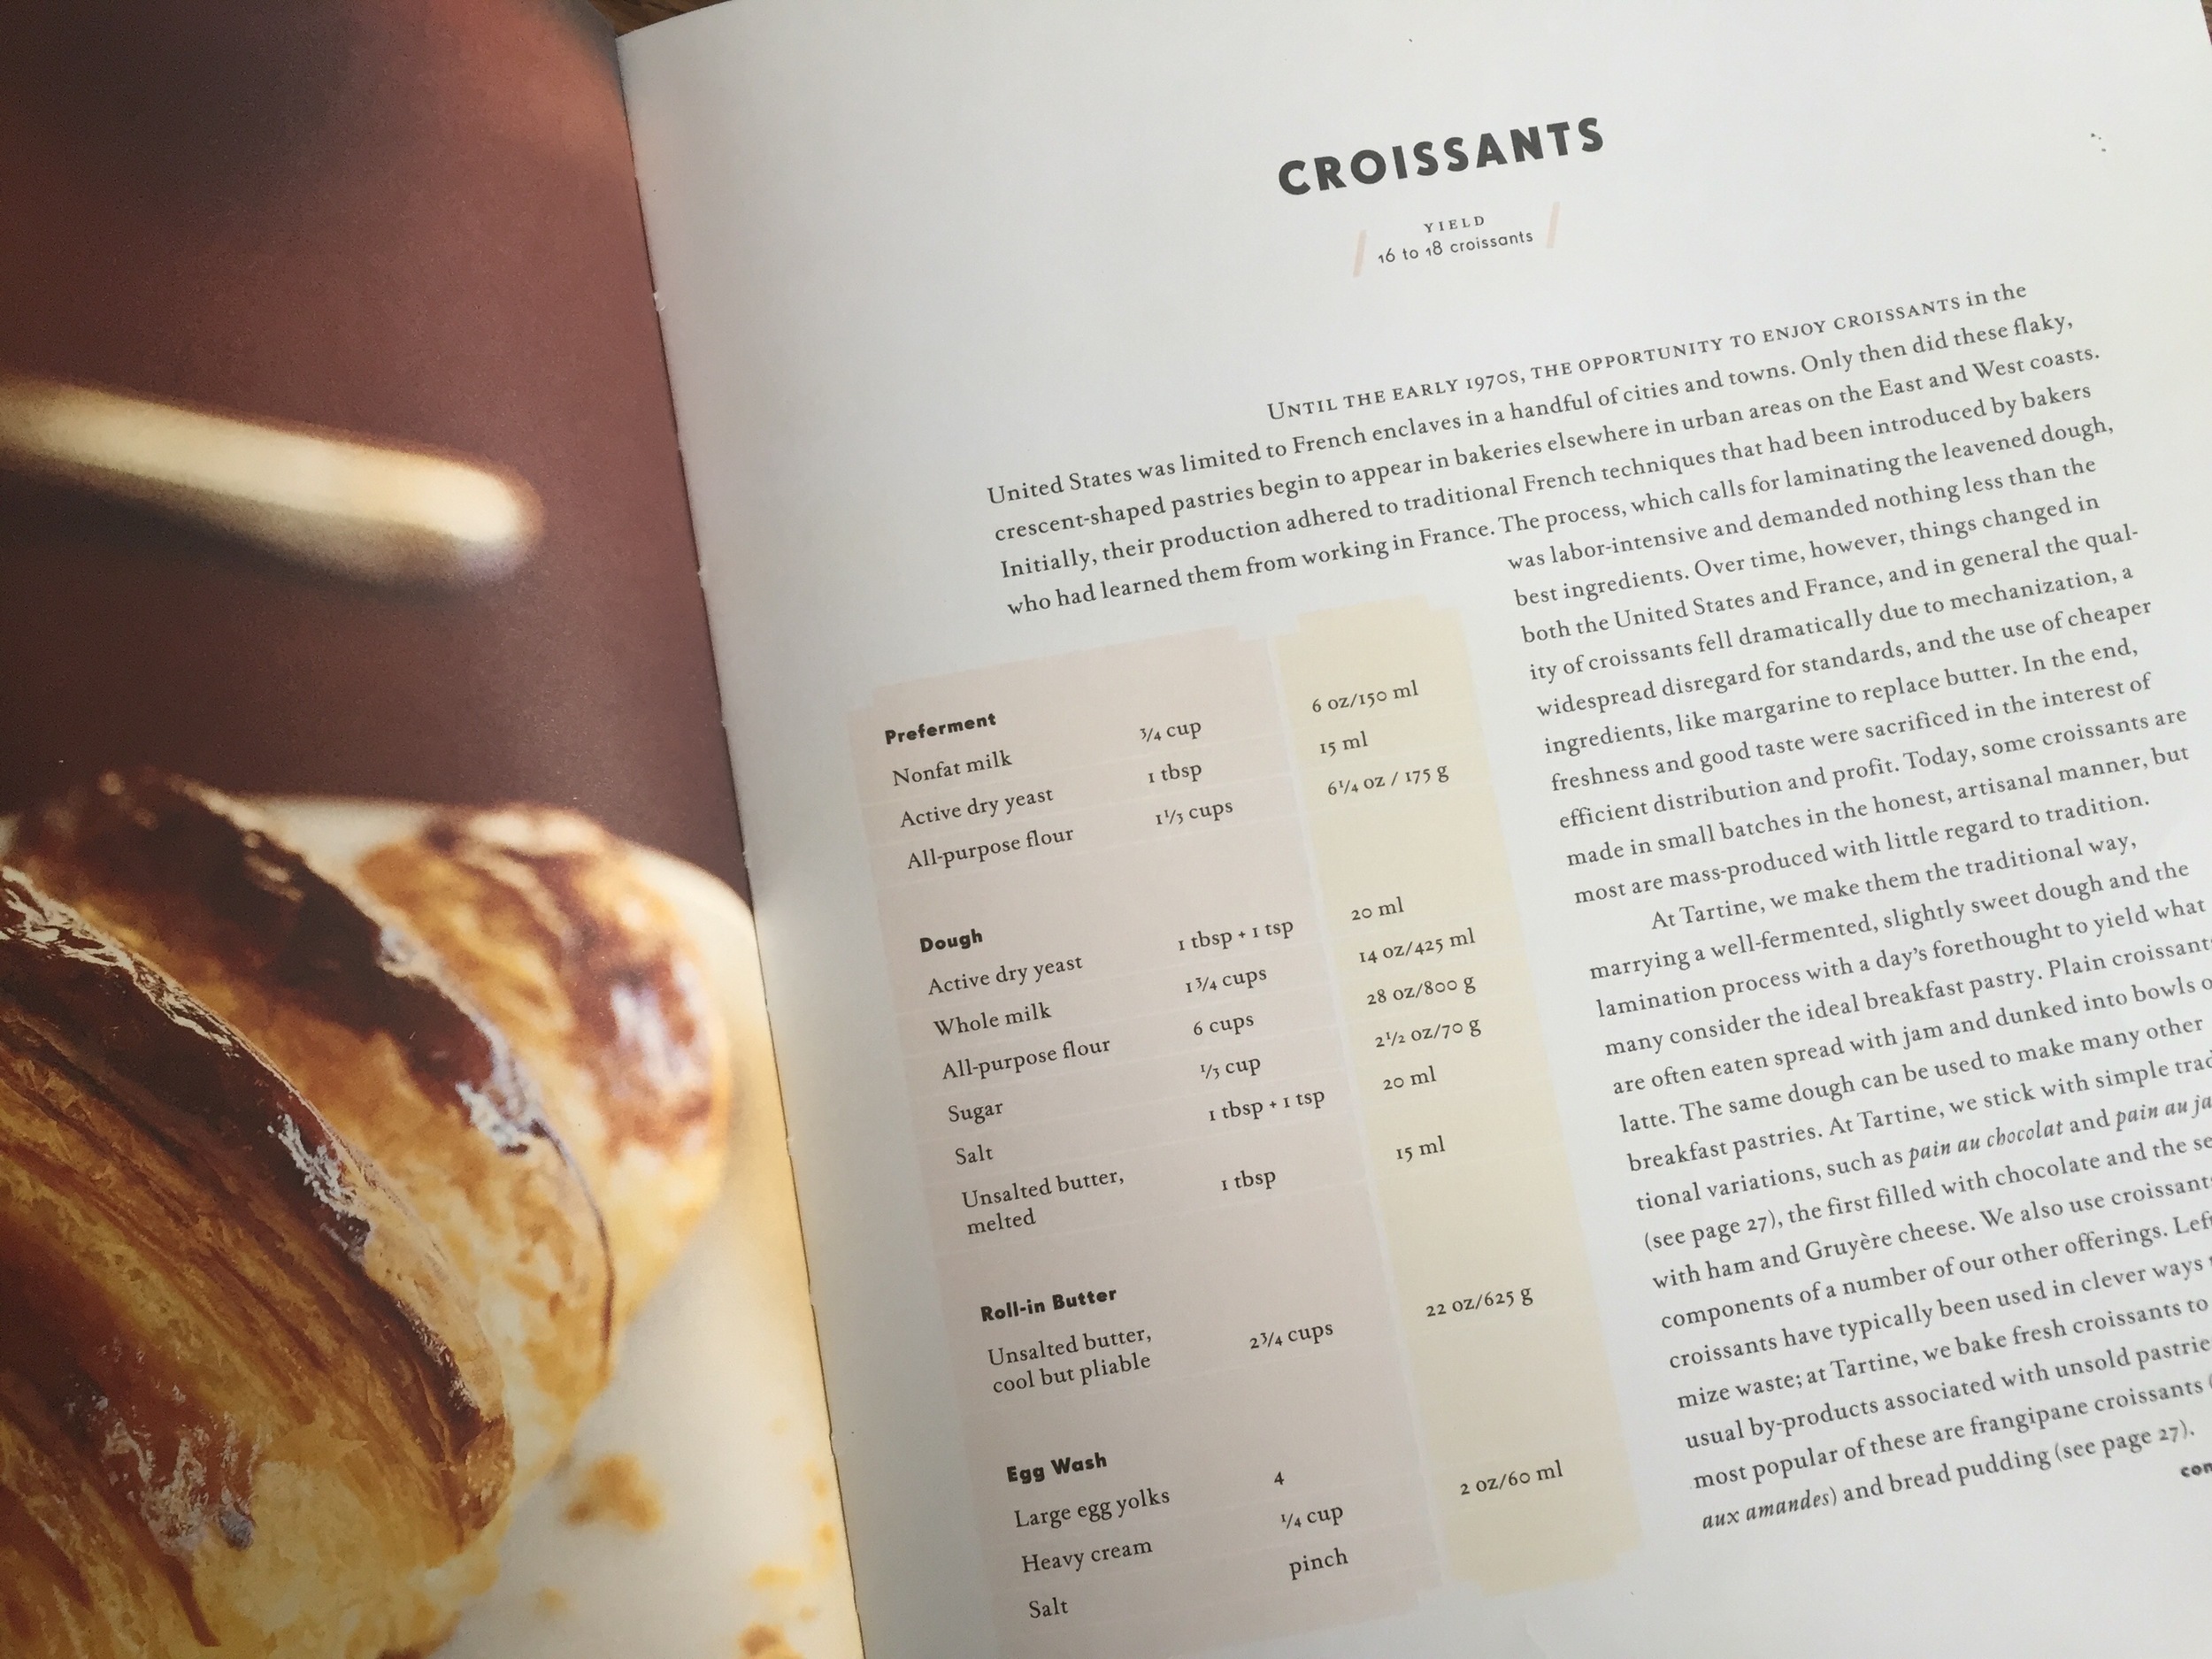
Preferment
  • 3/4 cup skim milk
  • 1 1/3 cups unbleached flour
  • 1 tablespoon instant yeast
Dough
  • 4 teaspoons instant yeast
  • 1 3/4 cups whole milk (plus extra if needed)
  • 6 cups unbleached flour
  • 1/3 cup sugar
  • 4 teaspoons salt
  • 1 tablespoon unsalted butter, melted
  •  
Roll-in Butter
  • 2 3/4 cups unsalted butter, cool but pliable (5 1/2 sticks)
Egg Wash
  • 2 egg yolks
  • 2 tablespoons heavy cream
  • pinch of salt
Make the preferment:

Warm the 3/4 cup skim milk in a small saucepan over low heat just to take the chill off. The milk should not feel warm or cold to the touch, 80-90 degrees.

Combine the 1 1/3 cups flour with the 1 tablespoon yeast in a mixing bowl and add the milk, stirring to create a soft dough. Cover the bowl with plastic wrap and let the mixture rise until doubled in volume, about 2 hours at room temperature or overnight in the refrigerator.

Make the dough:

Measure all the ingredients for the dough (like the French do -- mise en place!). Transfer the preferment and the 4 teaspoons of yeast to the large bowl of a stand mixer fitted with the paddle attachment. Mix on low speed until the yeast is incorporated, stopping the mixer to scrape the bowl as needed. When the mixture is well combined, increase the speed to medium and mix for a couple of minutes, then slowly add half of the whole milk and mix well.

Reduce the mixer speed to low, gradually add the flour (to prevent the ‘whiteout’ flour explosion), sugar, salt, melted butter, and the remaining milk. Scrape the dough from the paddle and switch to the dough hook. Mix until well combined, about 3 minutes.  Turn off the mixer and let the dough rest for 15 to 20 minutes.

Turn the mixer on to low and mix until the dough is smooth and elastic, adding additional milk one tablespoon at a time as needed. Take care not to overmix, about 4 minutes is all it takes. Cover the bowl with plastic wrap and let rise in a cool place until volume increases by half, about 1 1/2 hours.

Transfer the dough to a lightly floured work surface and press into a 2-inch thick rectangle. Wrap the rectangle in plastic wrap and place in the refrigerator to chill for 4 to 6 hours.

About 1 hour before you are ready to start laminating the dough, put the rolling-in butter into the bowl of a stand mixer fitted with the paddle attachment. Beat on medium speed until creamy, but not soft, about 3 minutes. Spread the creamy cold butter out onto a sheet of plastic wrap into a rectangle about 12 by 18-inches. Lay another sheet of wrap over the butter and place in the refrigerator to chill but not resolidify.

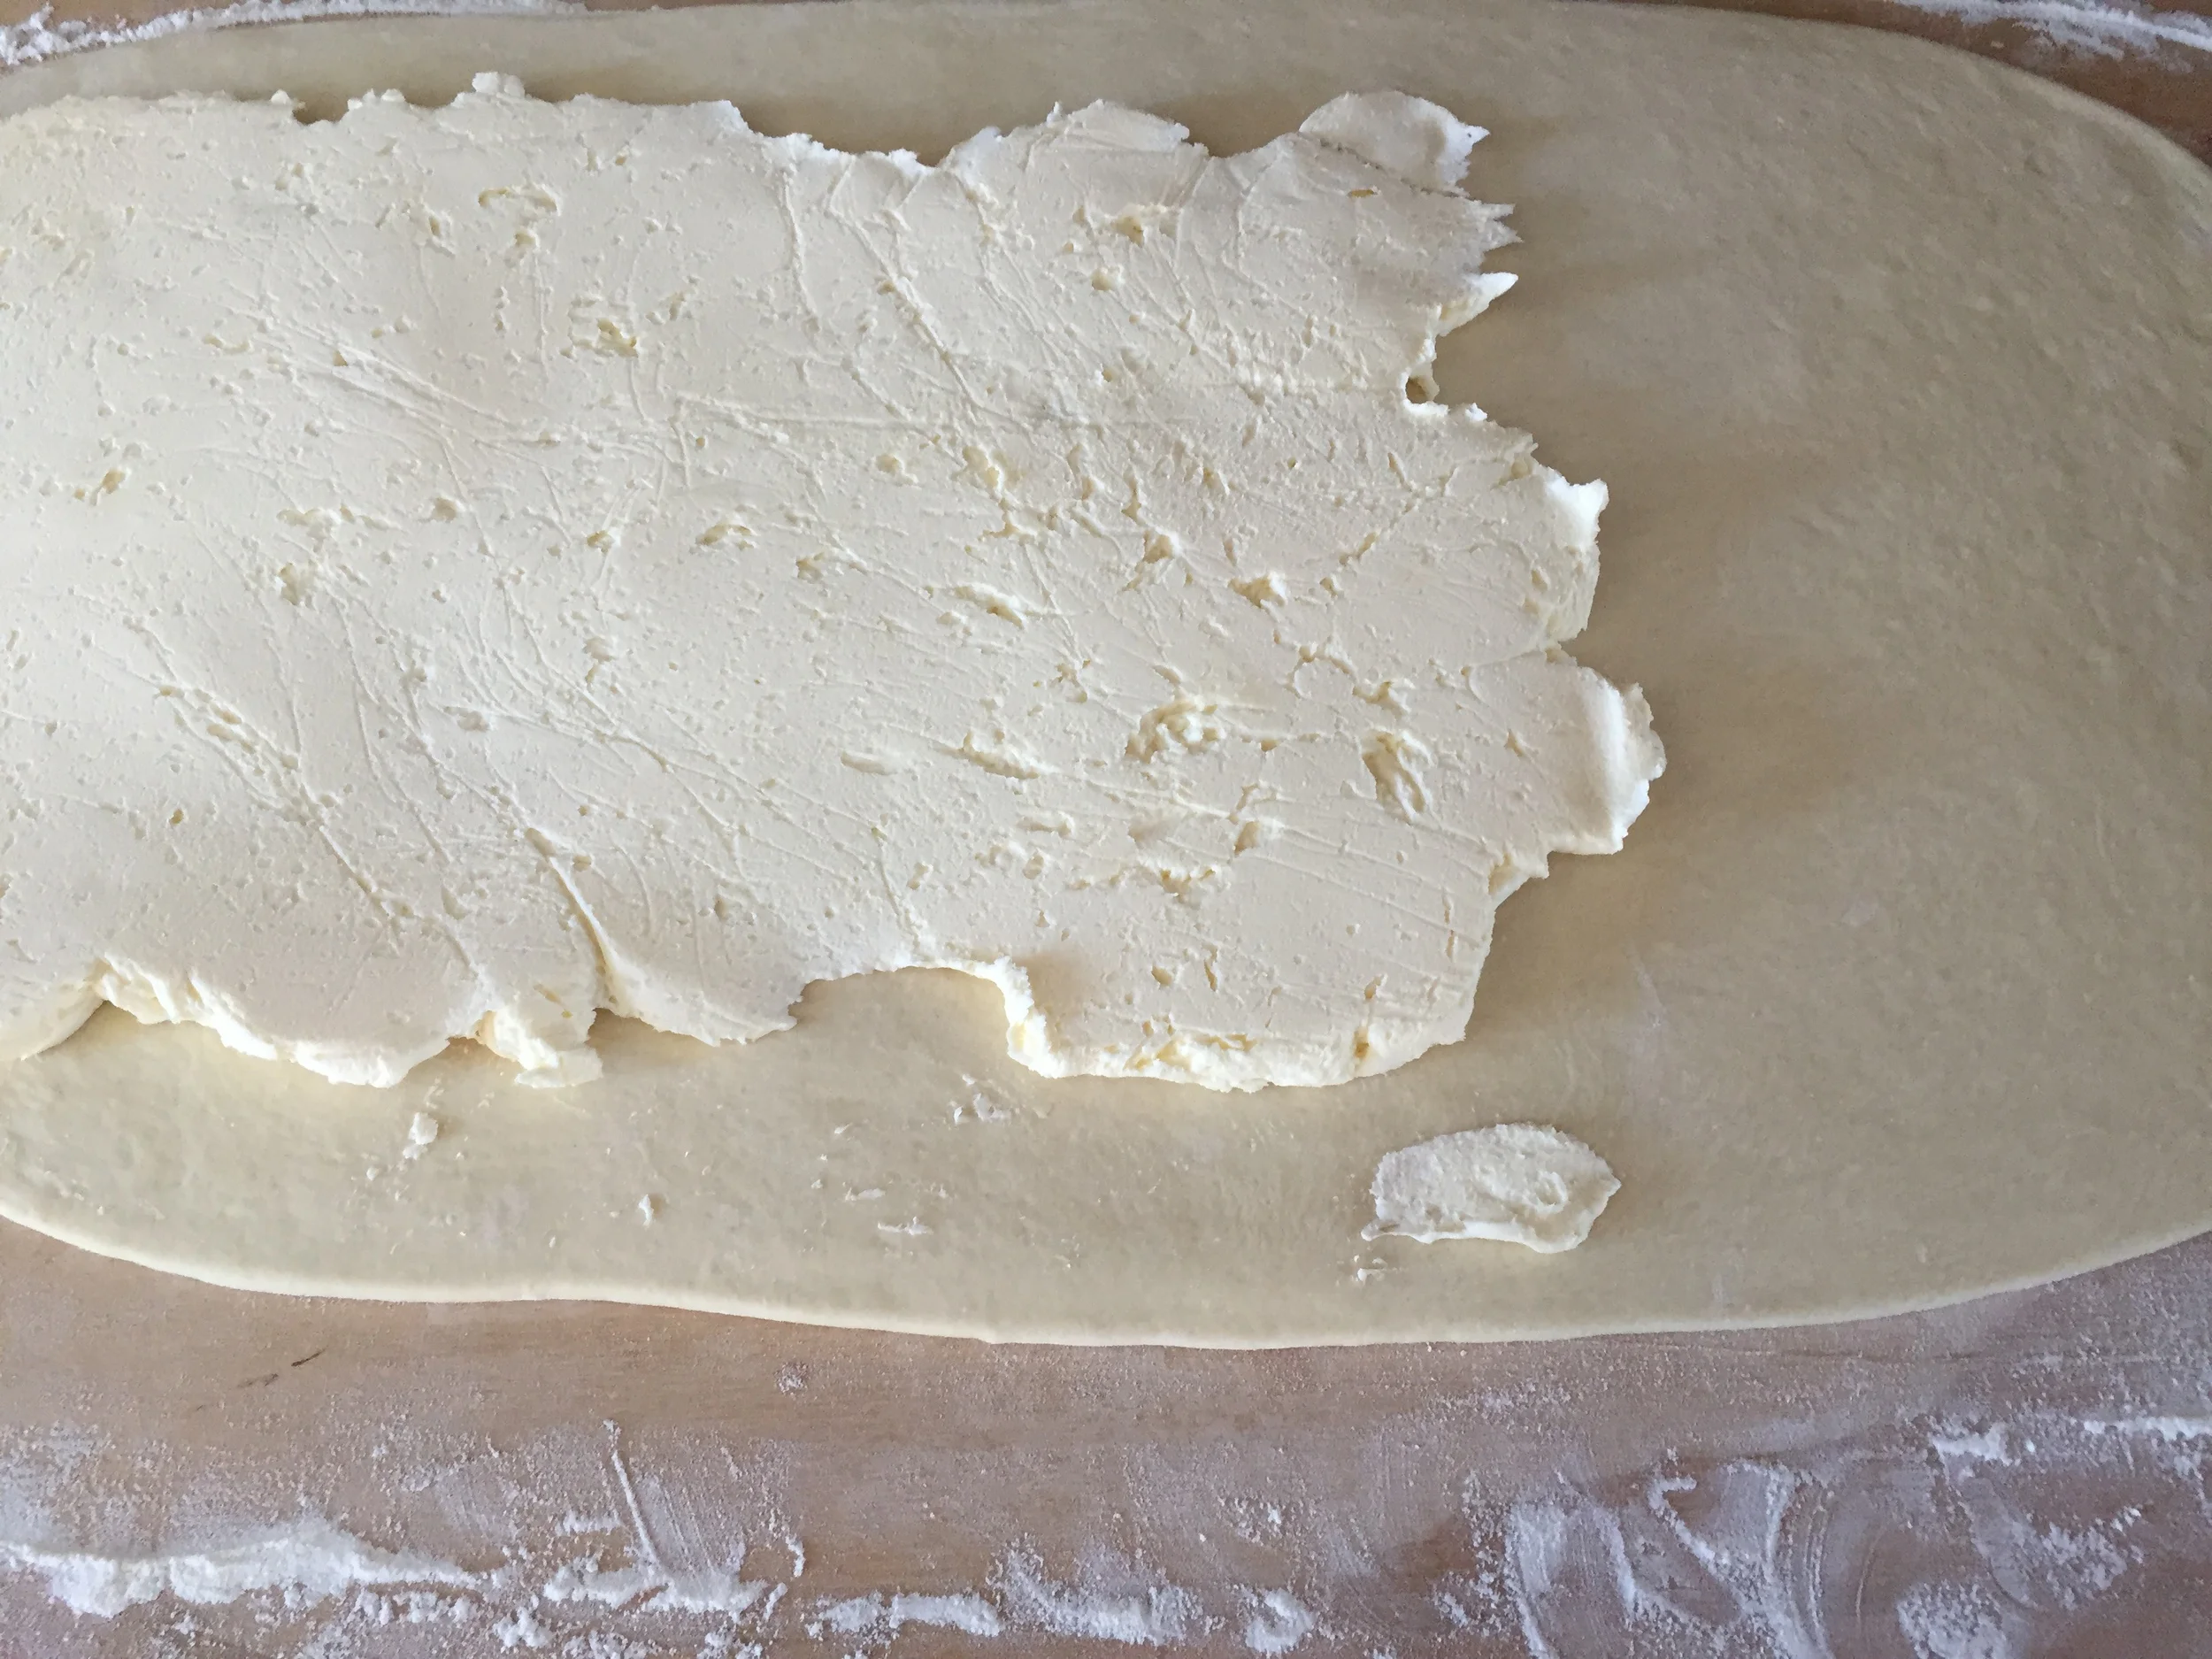
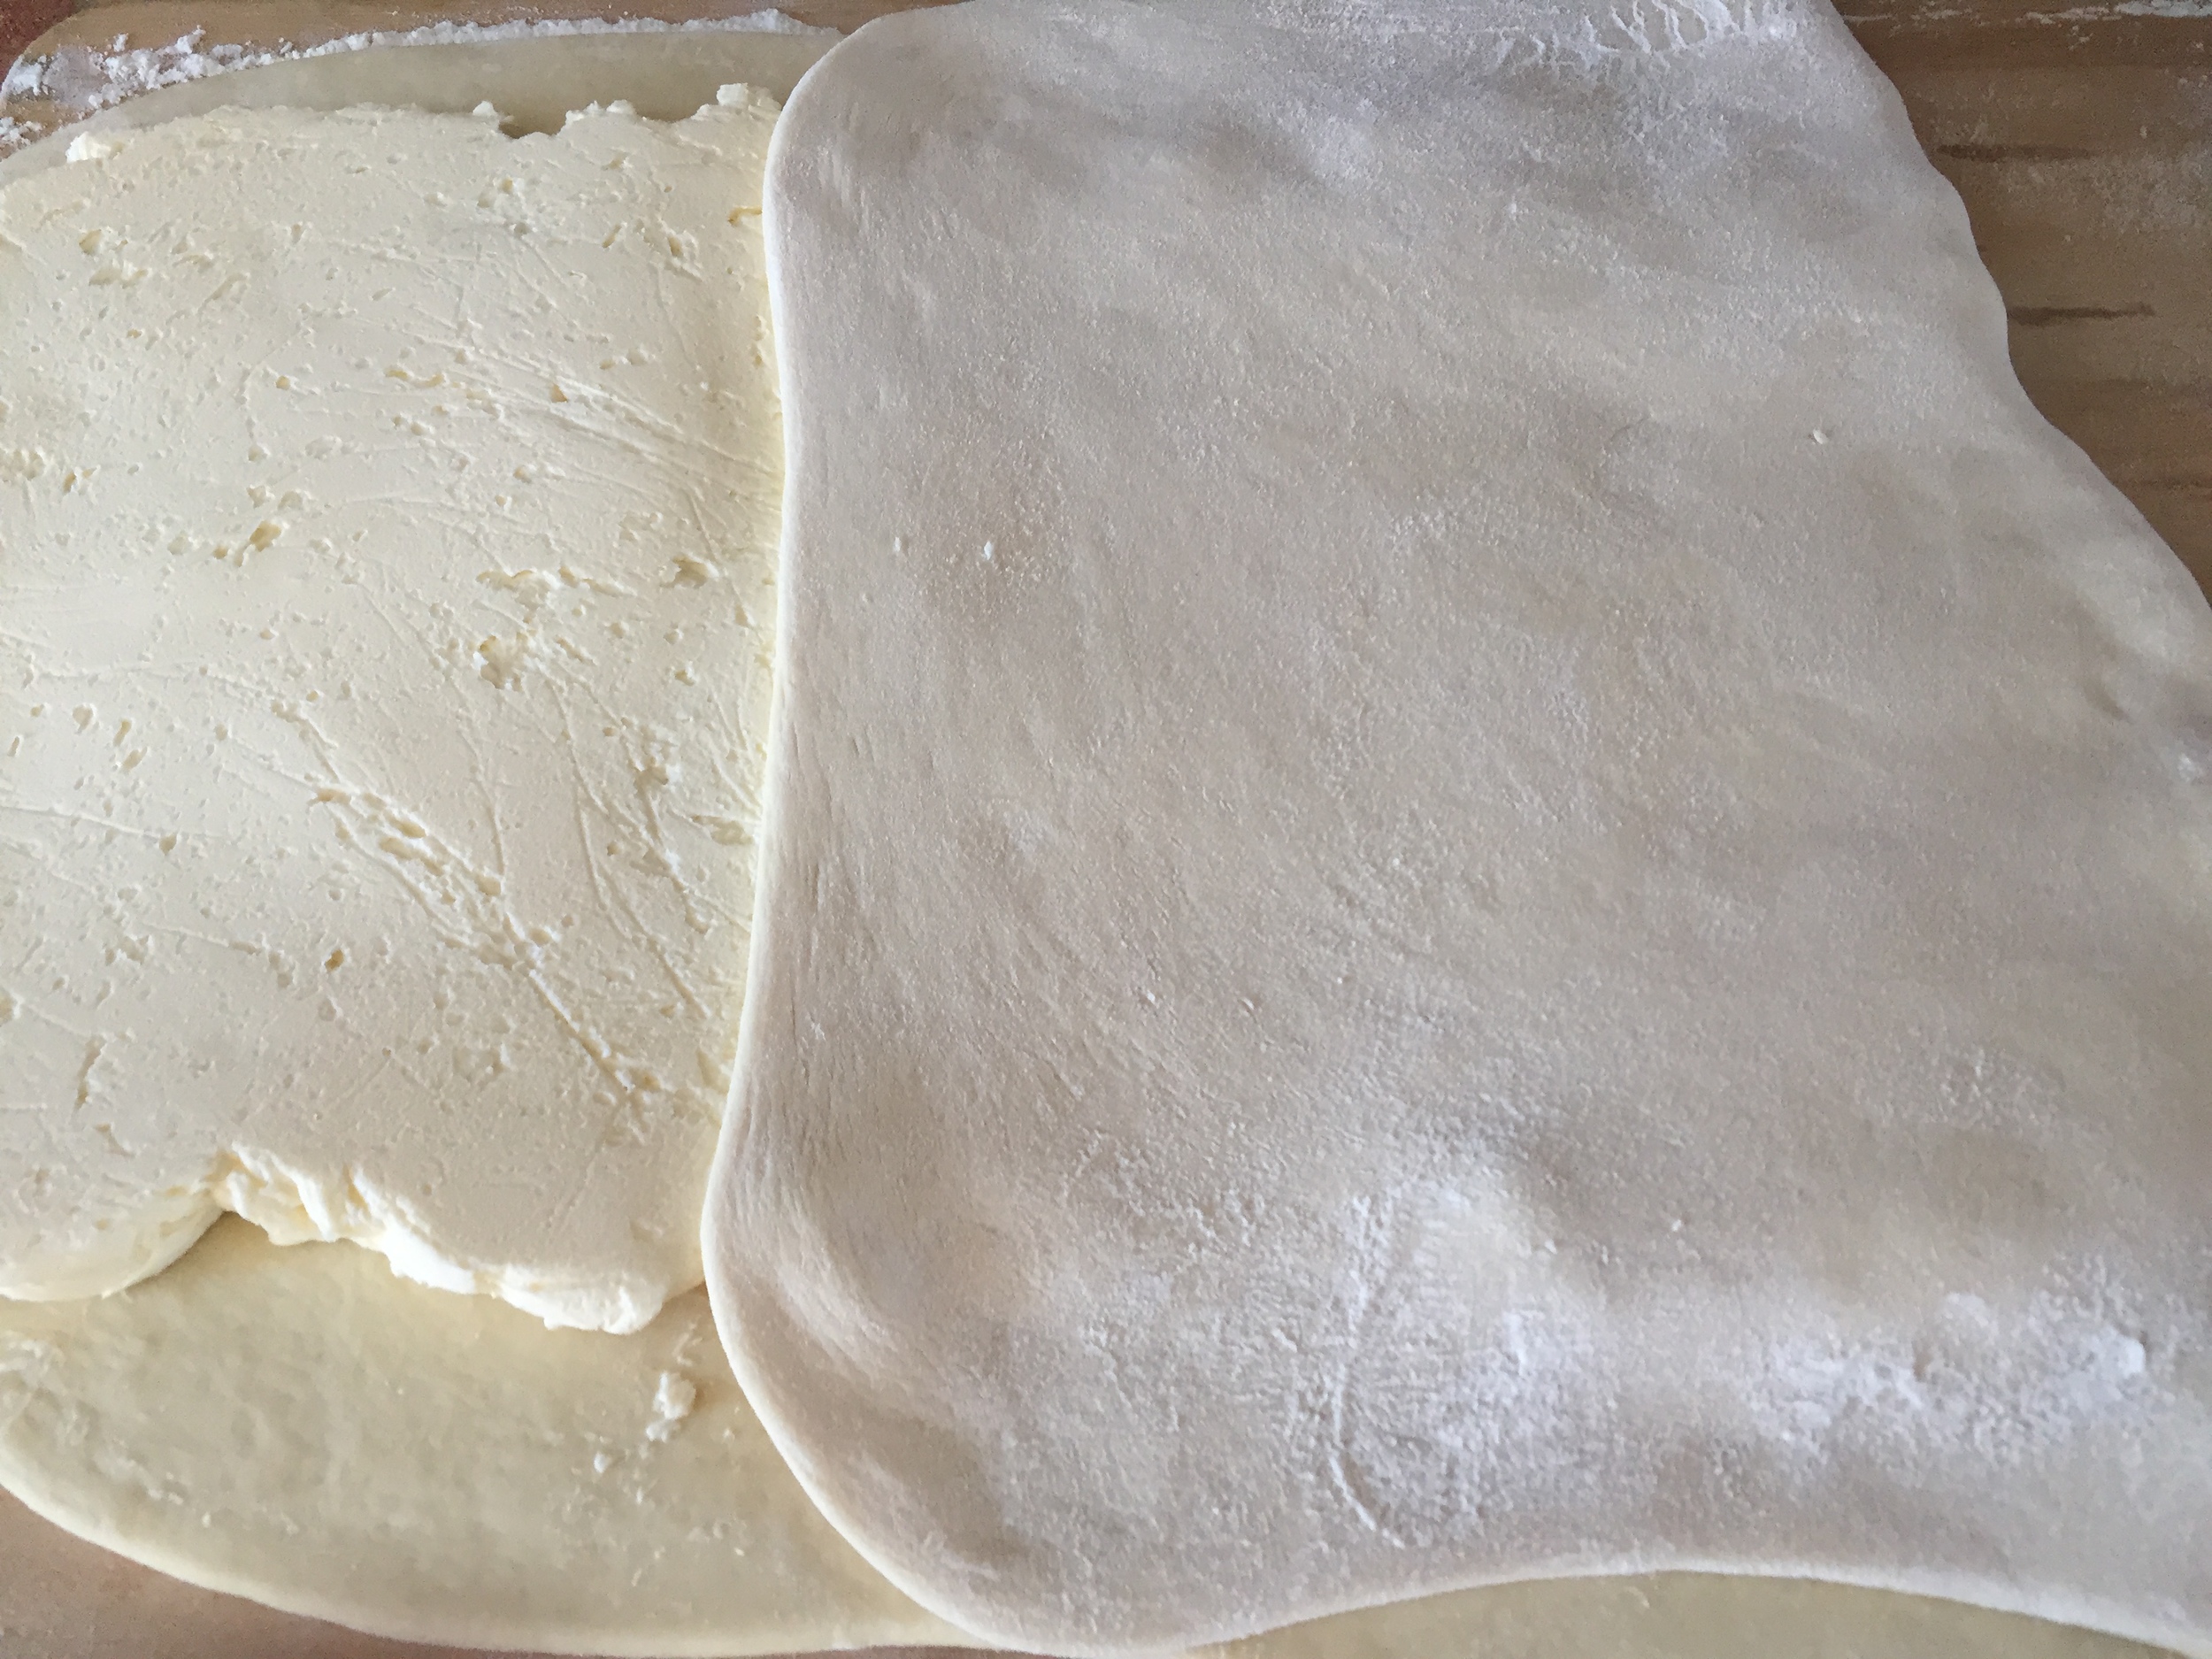
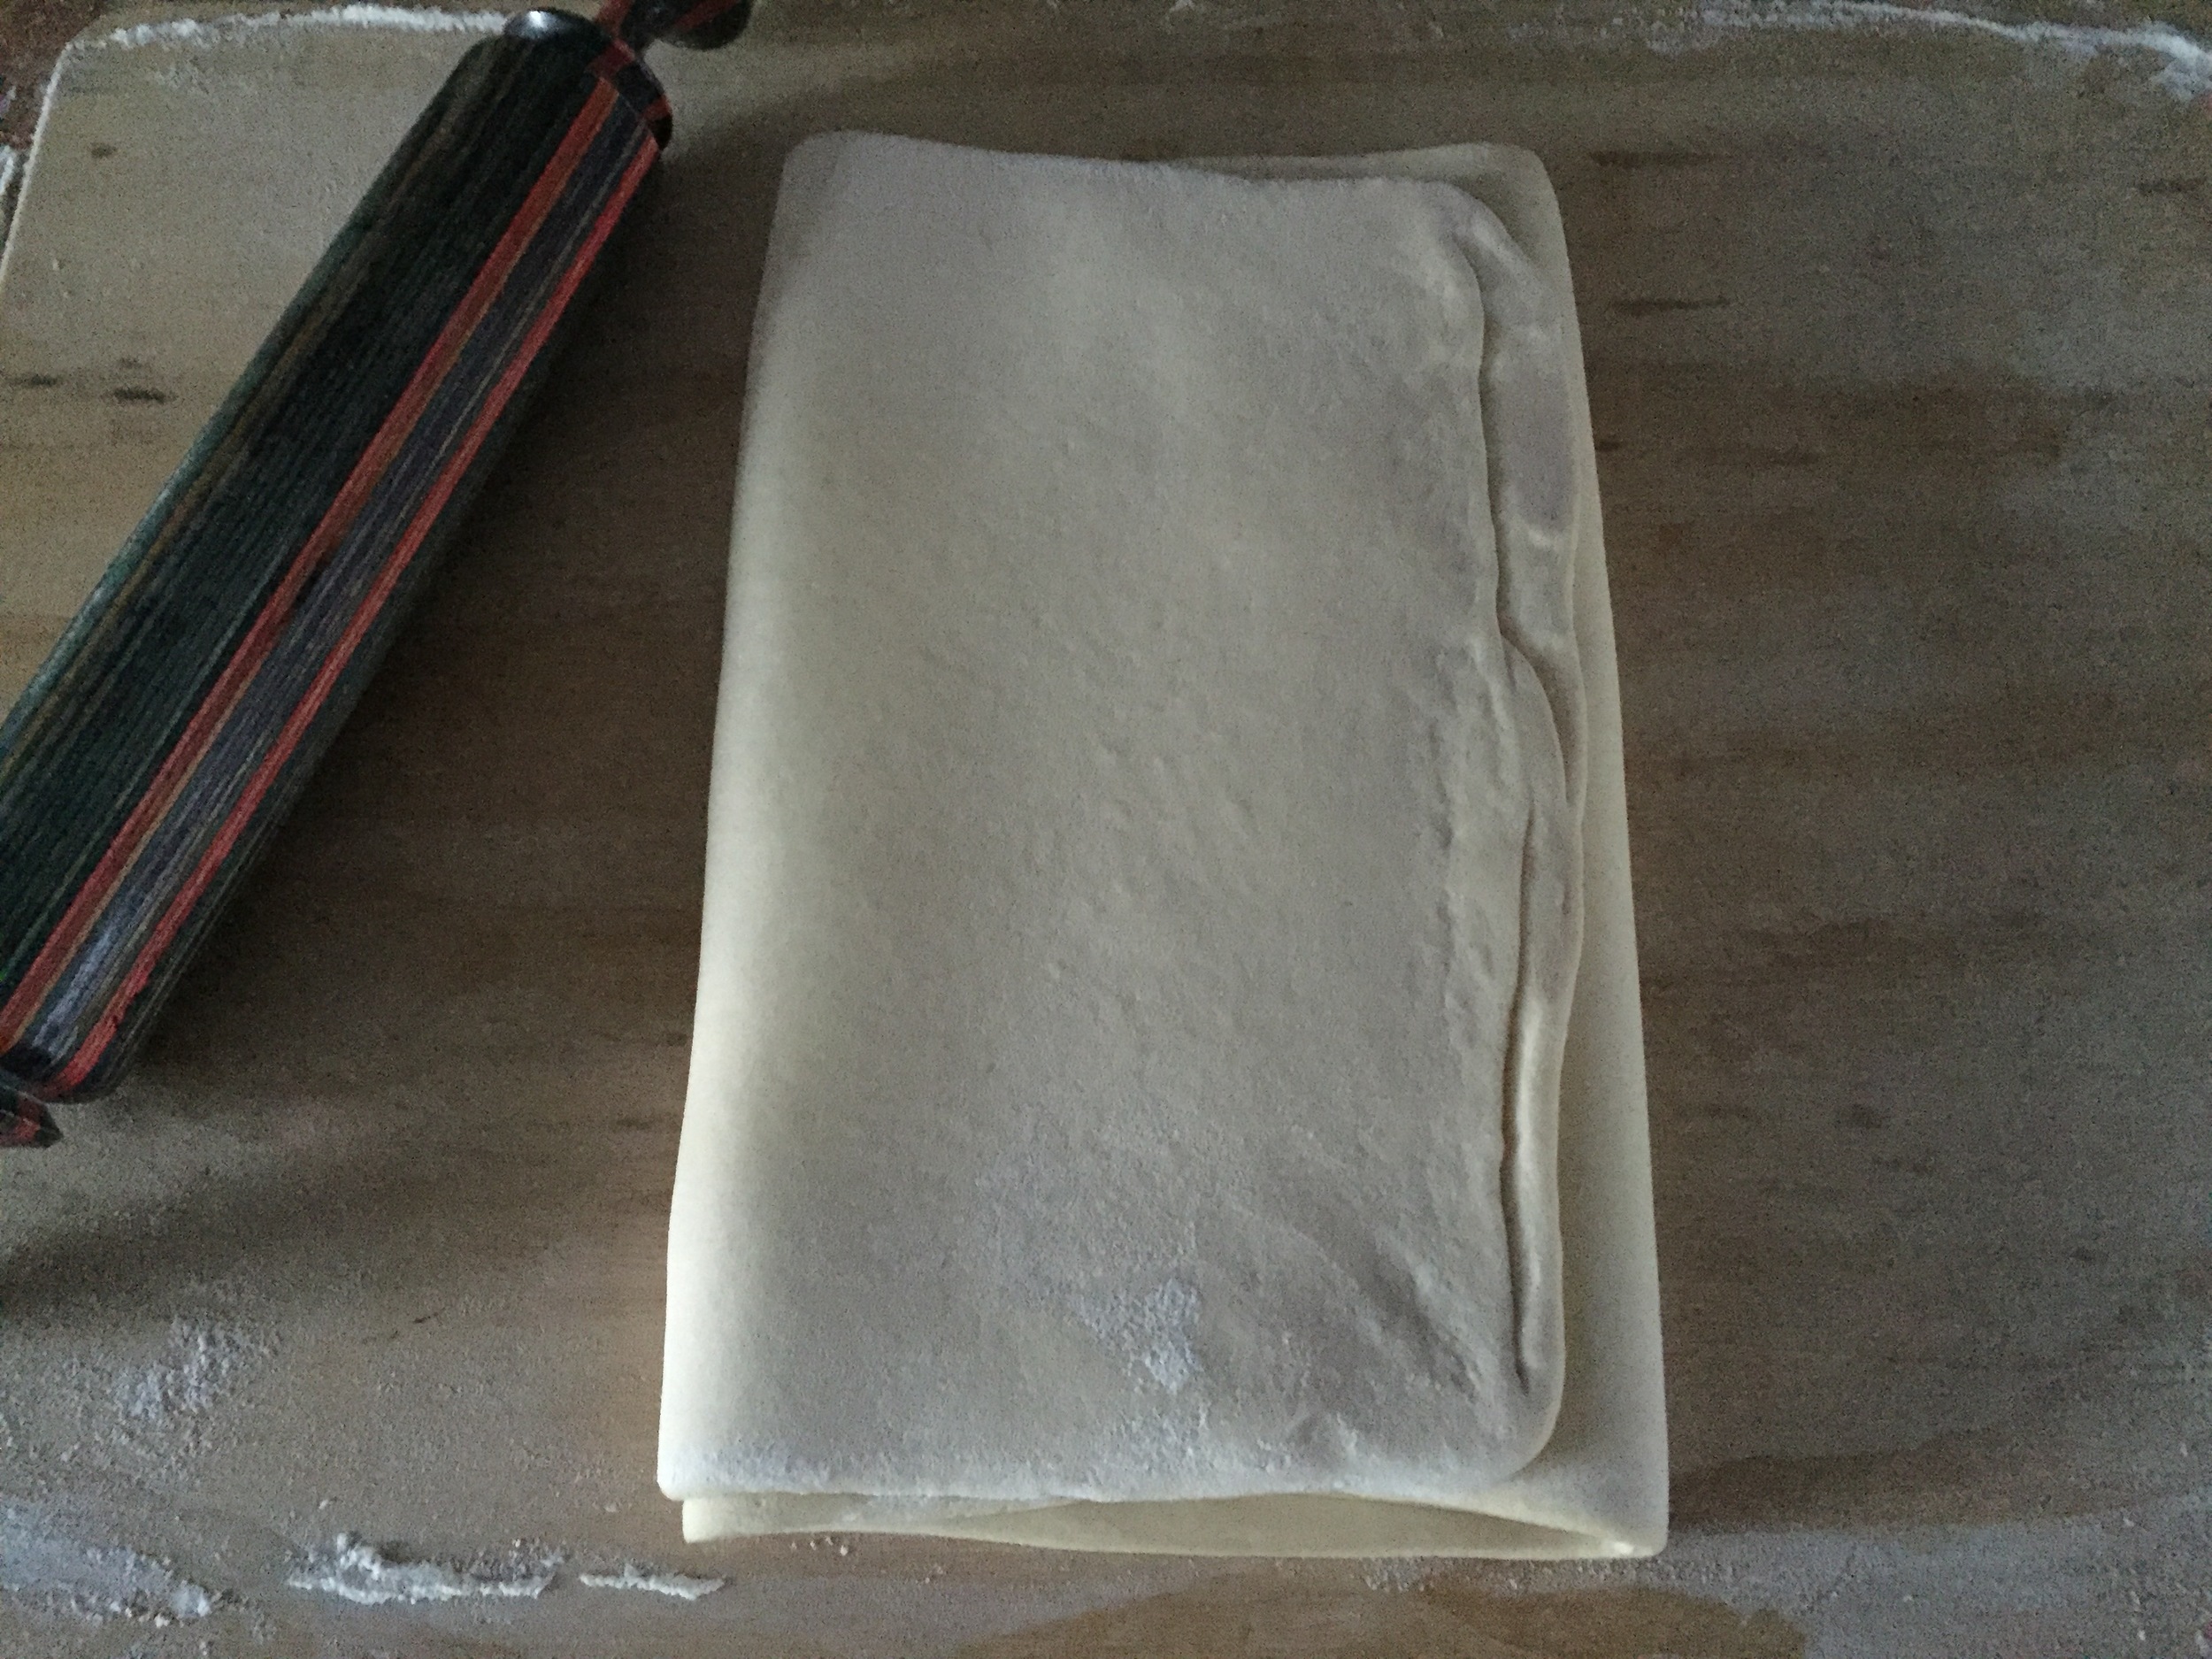
To laminate the dough, lightly dust a large work surface with flour. Remove the chilled dough and butter from the refrigerator. Unwrap the dough and roll it into a rectangle 28 inches long and 12 inches wide. Unwrap the sheet of butter and lay it over the dough, covering two thirds of the dough from the left side. Fold the uncovered third over the butter and then fold the left-hand third over the center, as if folding a tri-fold brochure. You now have a plaque. With your fingers, push down along the seams on the top and the bottom to seal the butter in the plaque.

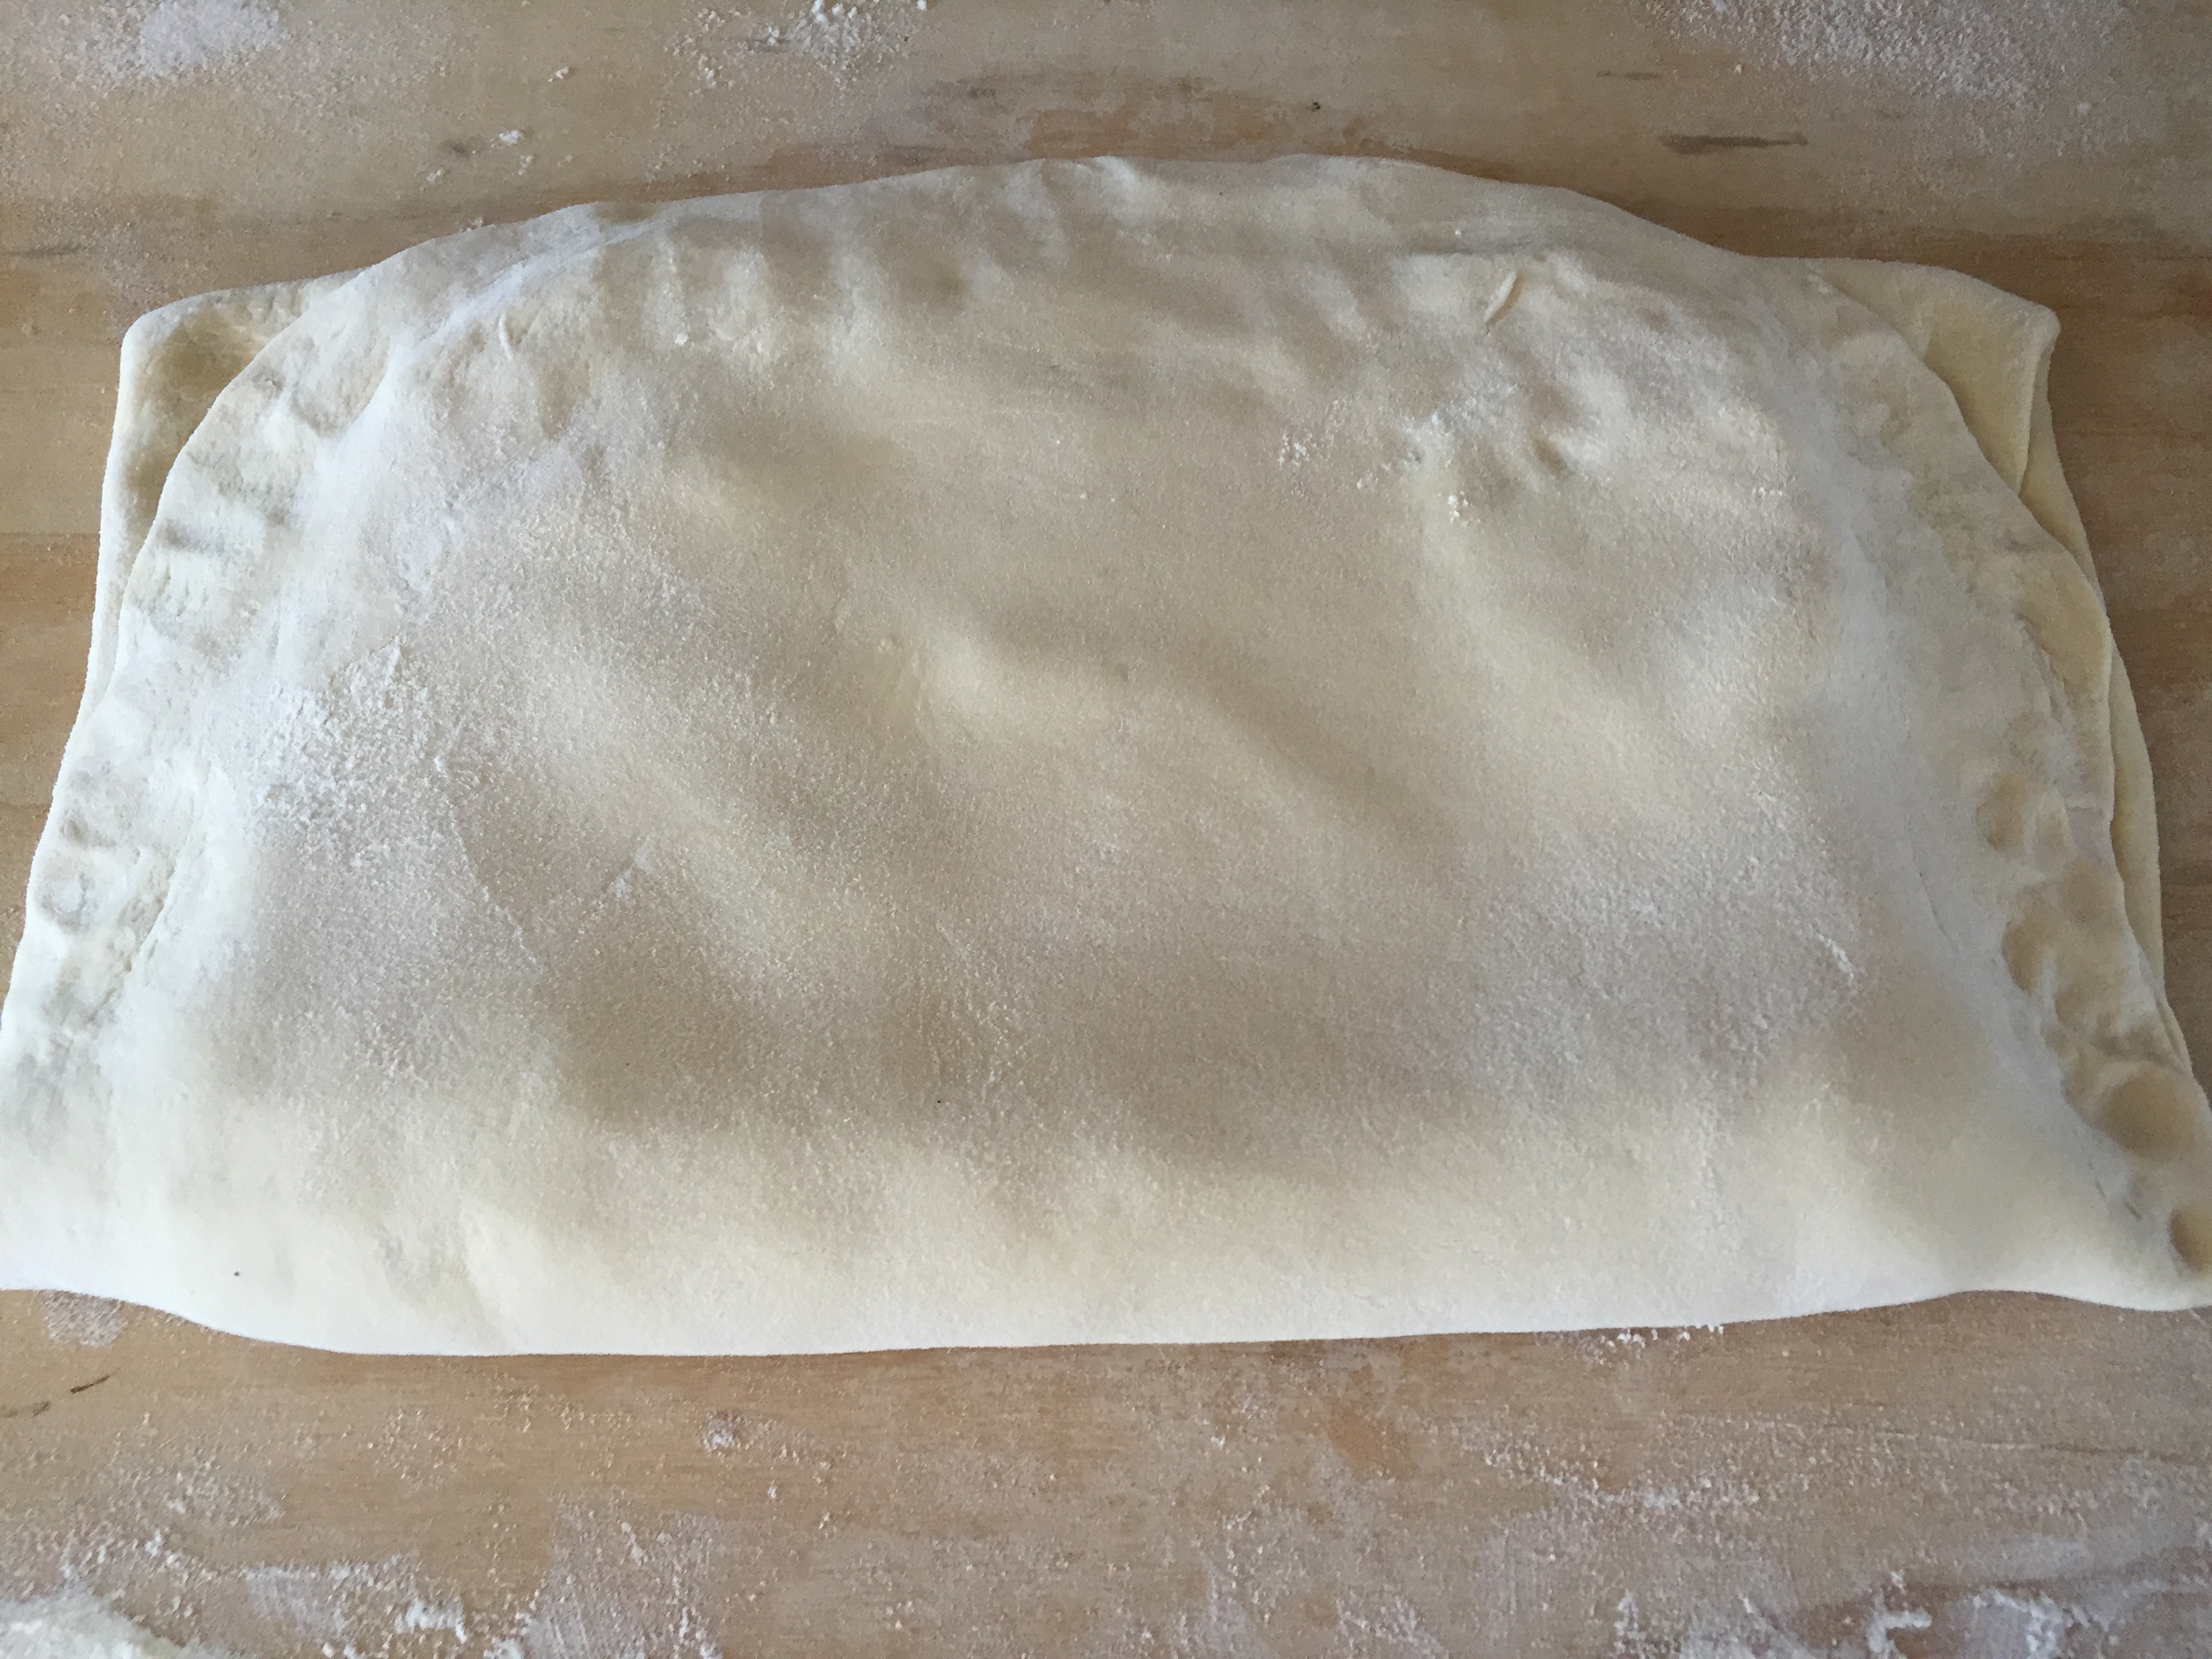
Give the plaque a quarter turn so that the top and bottom seams are now to your right and left. Again, roll the dough into a rectangle 28 inches long and 12 inches wide and fold again in the same manner. Wrap in plastic wrap and place in the refrigerator for 1 1/2 to 2 hours to relax the gluten in the dough before you make the third fold, or ‘turn.’

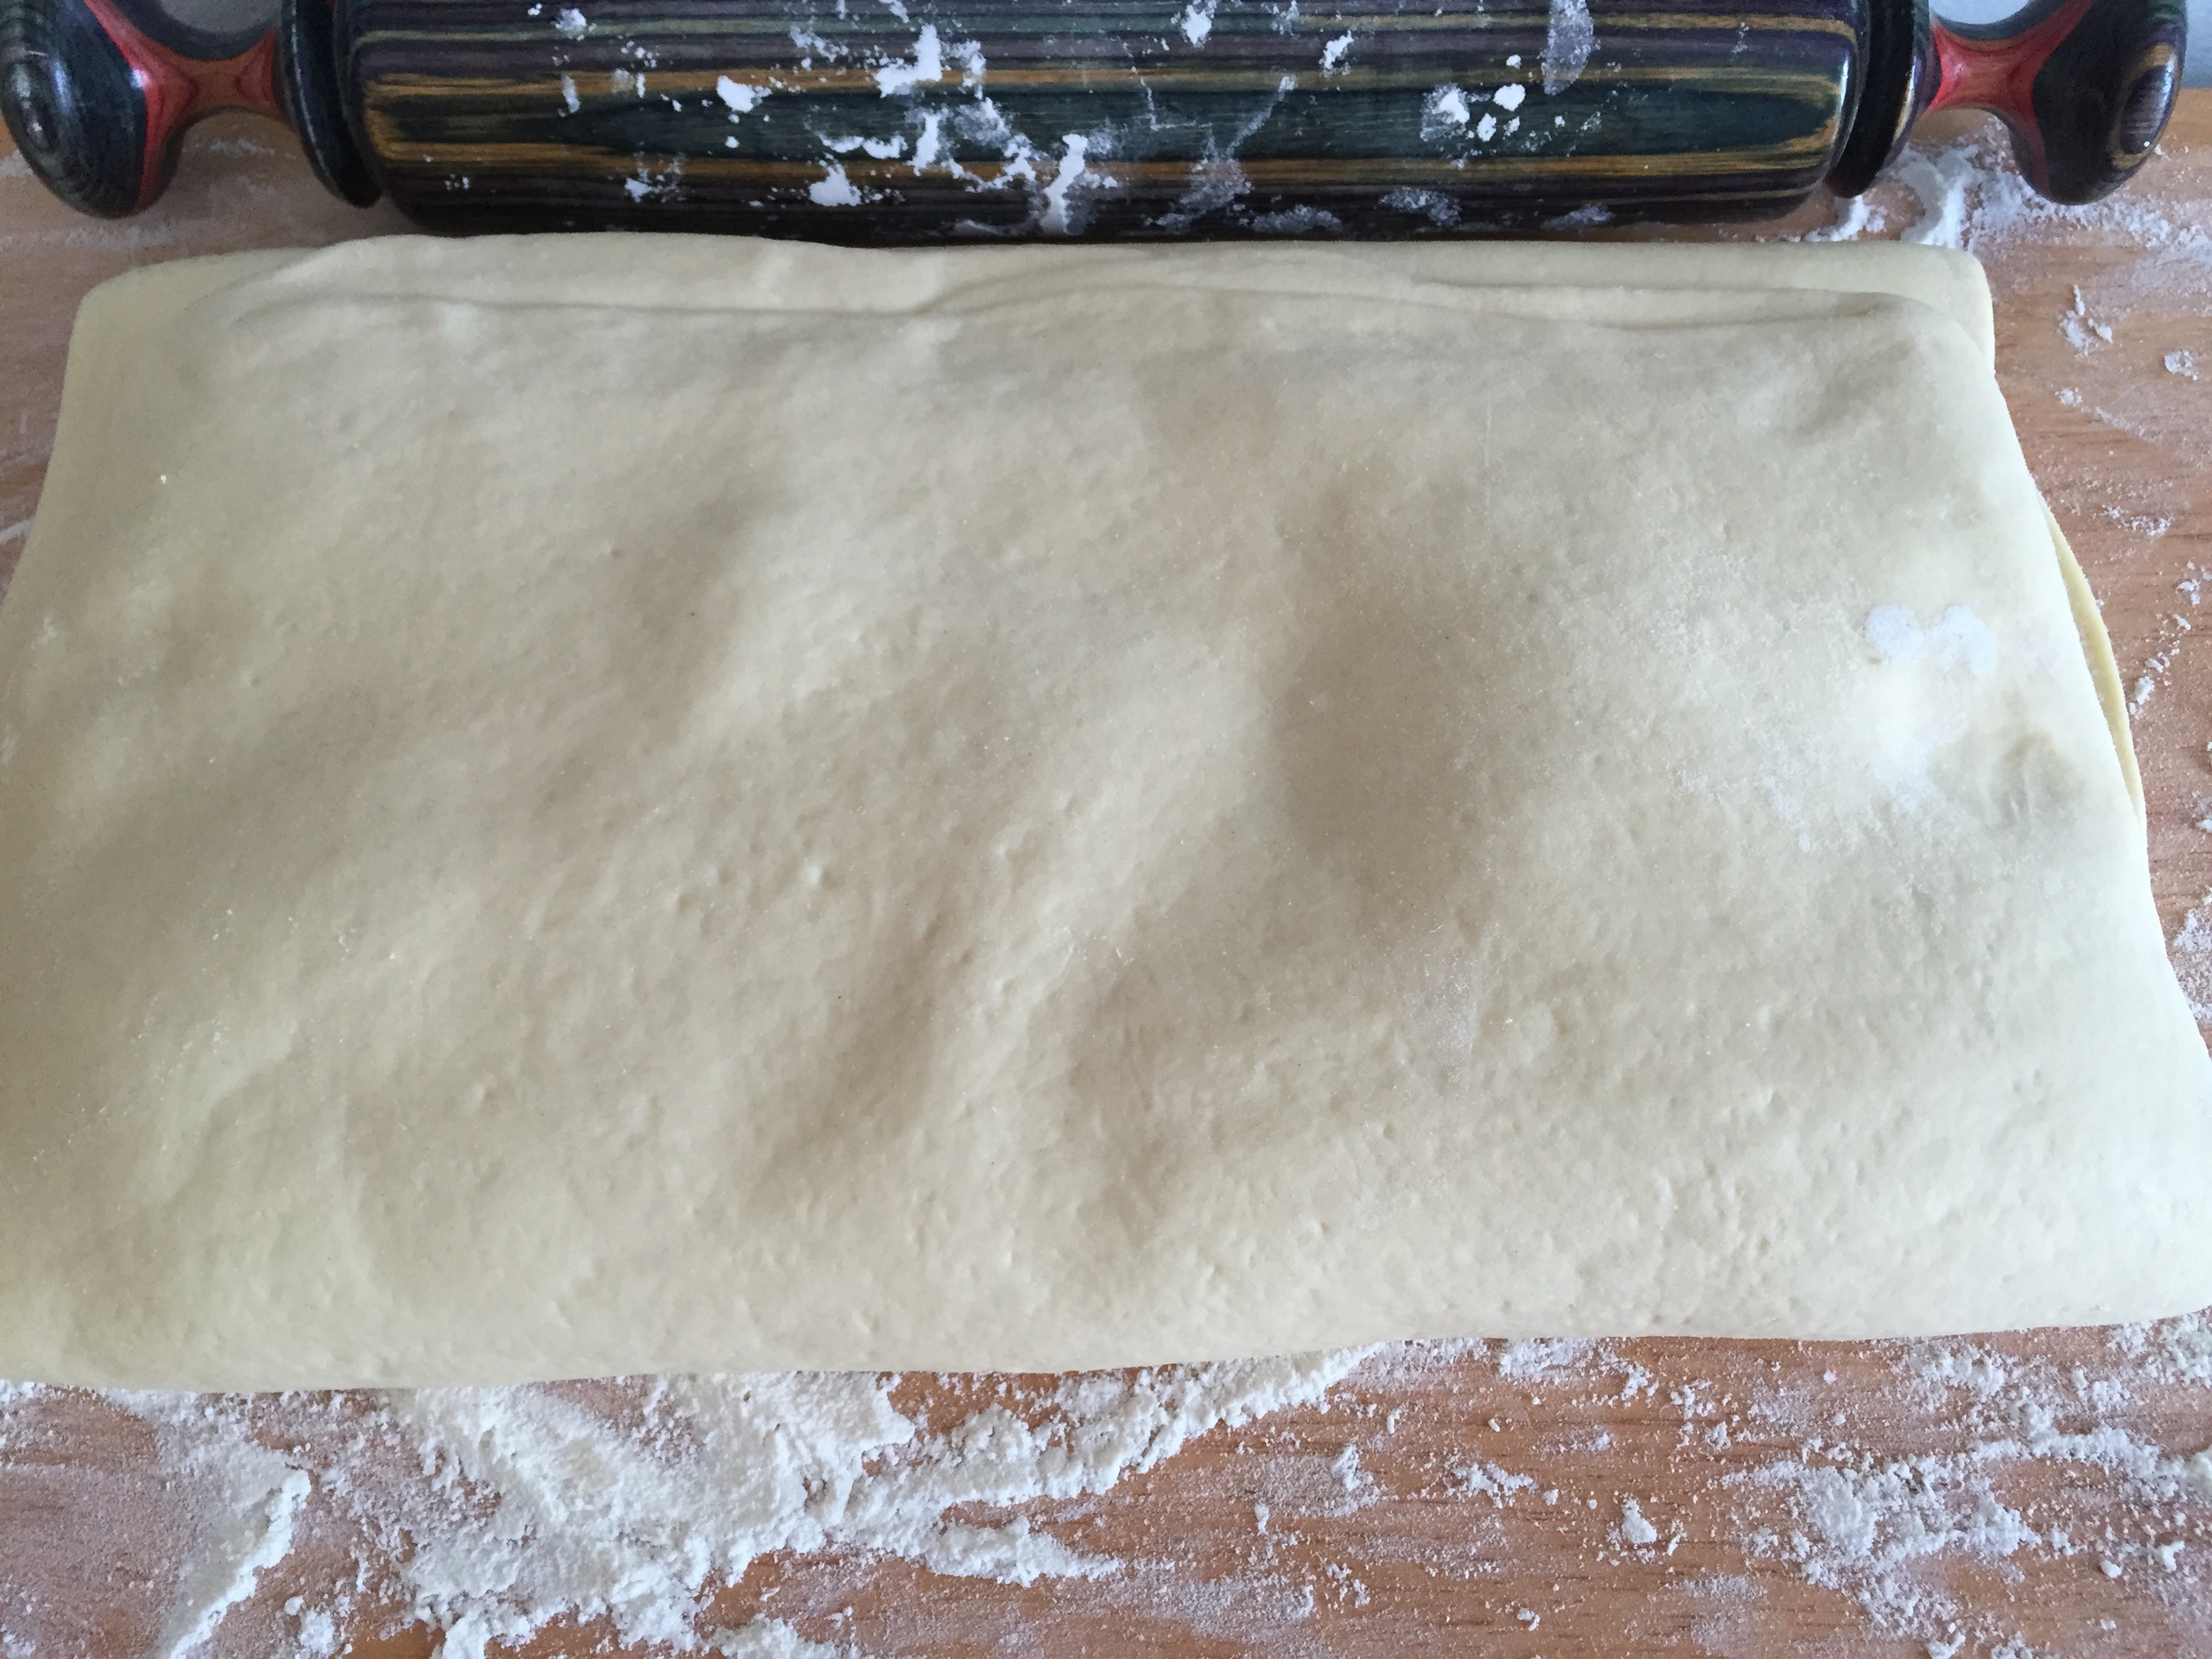
Clean the work surface, dust again with flour, and remove the dough from the refrigerator. Unwrap, place the dough on the floured surface, and again roll out into a rectangle 28 by 12 inches. Fold into thirds in the same manner. You should have a plaque of dough about 9 by 12 inches, and about 1 1/2 to 2 inches thick. Wrap in plastic wrap, place on a sheet pan, and place in the freezer to chill for at least 1 hour. If you plan to make the croissants the next morning, leave the dough in the freezer until the evening and transfer to the refrigerator. In the morning, the dough will be ready to roll out and form into croissants, proof, and bake. Or you can leave the dough in the freezer for up to 1 week, just remember to transfer it to the refrigerator to thaw overnight before using.

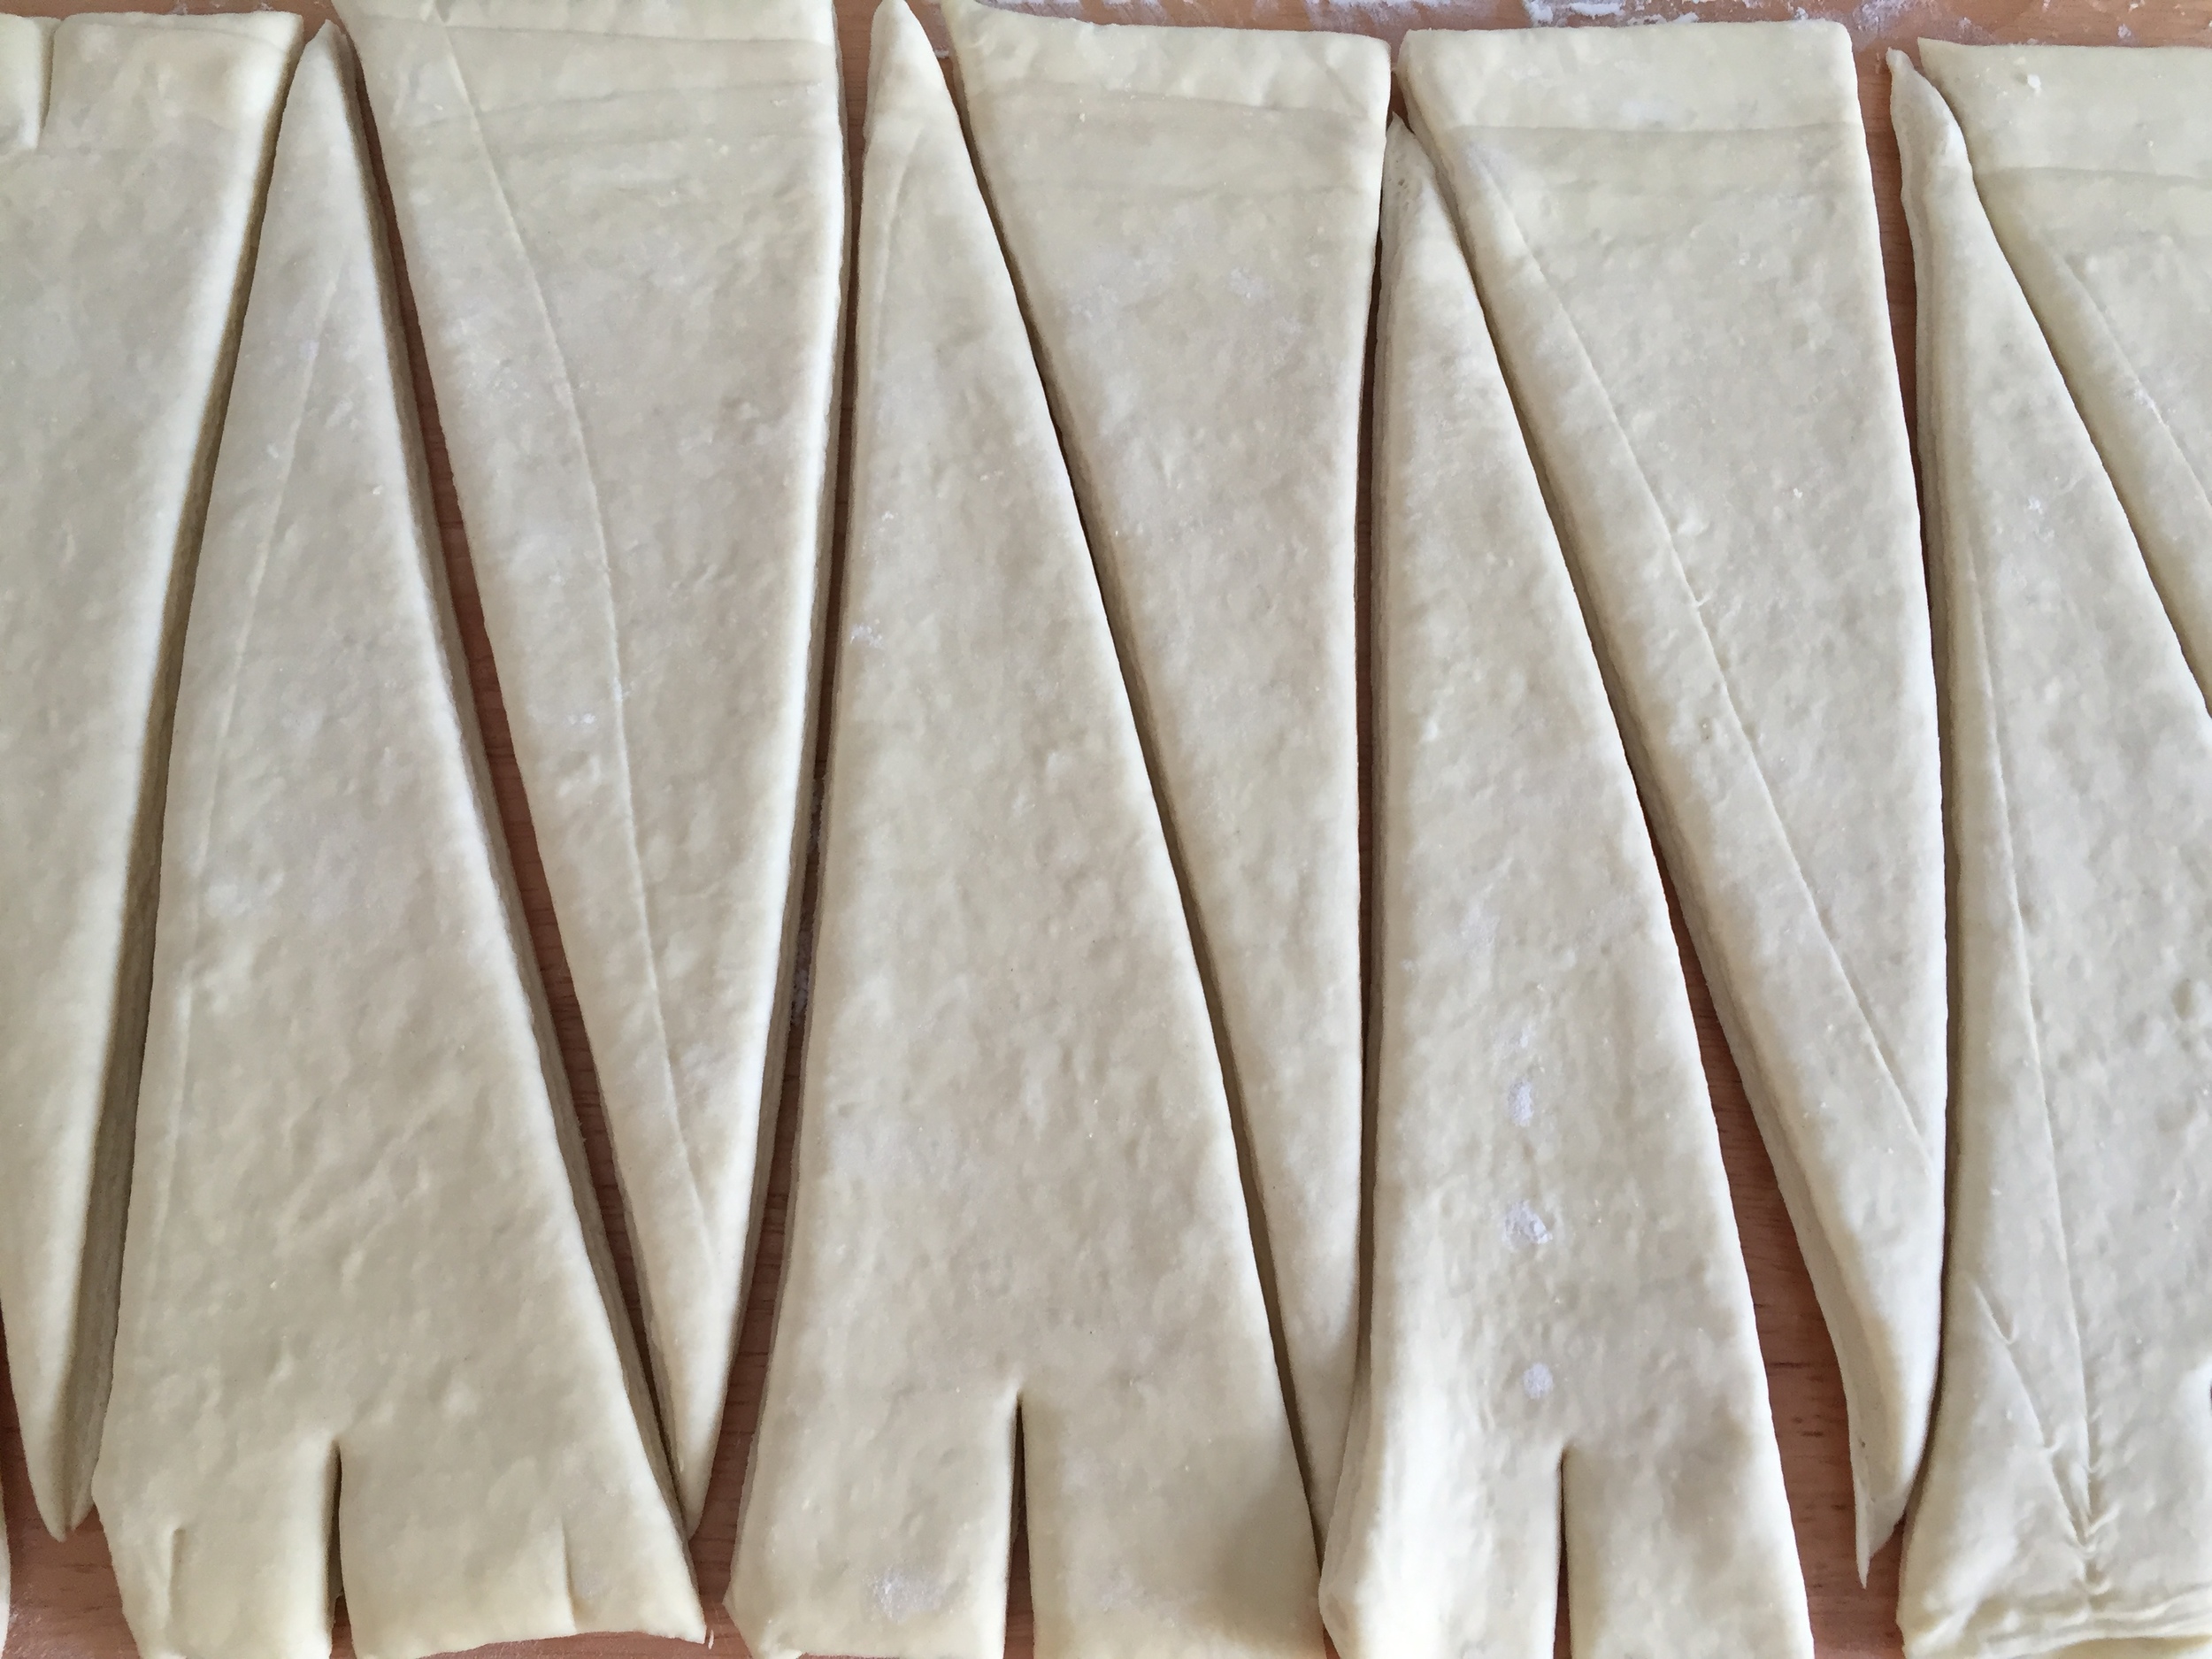
When you are ready to roll out the dough, dust the work surface again. Roll out the dough into a 32 by 12 inch rectangle, about 3/8- inch thick. Using a pizza wheel or chef’s knife, cut the dough into long triangles that measure 10 to 12 inches on each side and about 4 inches along the base. Using the pizza wheel or chef’s knife, make a 3/4-inch split in the center of each base.

Line 2 half-sheet pans with parchment paper. You are now ready to shape your croissants. Starting at the split base, gently pull the base apart at the split, then roll the base toward the point. Grab the point with one hand and stretch it slightly and continue to roll, tucking the point underneath the rolled dough. Place it point-down on the prepared pan and continue rolling and shaping the remaining dough. Space the croissants evenly on the 2 prepared pans, leaving a few inches between to allow room for rising. Lightly drape a sheet of plastic wrap over each pan and set the pans in a draft-free area to let the pastries rise until they are puffy and doubled in size, about 2 to 3 hours.

Heat the oven to 425 for 20 to 30 minutes.

About 10 minutes before baking, prepare the egg wash. Whisk the egg yolks with the cream and salt until you have a pale yellow mixture. Gently brush the egg mixture onto the pastries, being careful not to allow the egg mixture to drip onto the pan. Let the wash dry for about 10 minutes before baking.

Place one pan of croissants in the oven and reduce the temperature to 400. Rotate the pan, front to back, after 10 minutes to ensure even baking. Continue baking for 6 to 10 minutes longer, until the pastries are deep golden brown on the top and bottom, crisp on the outside, and feel light when they are picked up, indicating that the interior is baked through.

Remove the croissants from the oven and let them cool on a wire rack.

Increase oven temperature to 425 and repeat baking instructions for the second pan.

Enjoy the croissants warm from the oven or at room temperature. Store any leftovers in an airtight container at cool room temperature for up to 3 days. Recrisp them in a 375 degree oven for 6 to 8 minutes.

Makes 16 to 18 golden croissants

February 12, 2016 /April Hamilton
baking, french pastry
Wide Awake, Soup and Bread
Comment

Sweet Potato Chili

January 15, 2016 by April Hamilton in Soup and Bread

What do you get when you combine one ton of sweet potatoes and an elementary school? You get an all-hands-on-deck chili fest! When KEYS for Healthy Kids, a Charleston, WV based non-profit that focuses on children's health, received a pallet of West Virginia grown sweet potatoes from the state Department of Agriculture, they made sure the crop made it into good hands.

Principal Henry Nearman at Ruffner Elementary hosted "Sweet Potato Day," inviting children into the cafeteria to jump in for some sweet potato read aloud and a bunch of cooking fun, followed by a tasting for all. We made a 20-times batch in the cafeteria's soup kettle to rave reviews. Get your hands on some sweet potatoes and try this at home!

Sweet Potato Chili for 3 (or 300)

for our tasting, a 20-times batch made 300 sample servings. At home, a single batch will feed 3 or 4. Add a green salad accented with orange segments and avocado and it's dinner!

  • 1 tablespoon olive oil
  • 1 medium onion, chopped
  • 2 teaspoons chili powder (I prefer pure Ancho Chili Powder) 
  • 1 cup water
  • 1 10-ounce red-skinned sweet potato, peeled, cut into 1/2-inch cubes
  • 1 (14 ½ -ounce) can diced tomatoes (I prefer Fire Roasted)
  • 1 (15- to 16-ounce) can black or pinto beans, drained
  • 3 tablespoons chopped fresh cilantro
  • 1 ½  teaspoons grated orange peel 

Heat olive oil in heavy medium saucepan over medium-high heat. Add onion and sauté until golden, about 5 minutes. Add chili powder and stir 1 minute. Add water and sweet potato cubes. Cover pan; reduce heat to medium and simmer until potato is almost tender, about 10 minutes. Add tomatoes with their juices and beans. Simmer uncovered until chili thickens and potato is very tender, about 10 minutes. Mix in cilantro and orange peel. Season to taste with salt and pepper and serve. 

Serves 3 or 4, and easily doubles

January 15, 2016 /April Hamilton
vegan, chili, simple cooking ideas
Soup and Bread
2 Comments

Fresh Herb Primer

January 05, 2016 by April Hamilton in Smart Kitchen

A little pot of fresh herbs in the kitchen window makes life better. A few leaves of fresh basil enhance everything, from fancying up a glass of water to authenticating your marinara. Green thumb or no, give it a try. Or pick some up at the farmer's market. Either way. And here's a 101 for the best herb pairings. Happy Cooking!

  • Basil -- Italiano! Great with eggs, fish. and poultry. Add a sprig to your water with a lemon twist
  • Chives -- A lovely addition to a cream soup. Also great with eggs, fish, and poultry
  • Cilantro -- Wake up jarred salsa with a handful of chopped cilantro. Stir some into chicken soup for a taste of the tropics
  • Dill -- Mix with plain yogurt and chopped fresh cucumber (plus some salt to taste) for a quick, calcium-rich dip
  • Mint -- Steep fresh mint with your morning tea for a refreshing lift. Freeze mint leaves in ice cube trays and add the ice cubes to your water or iced tea
  • Oregano -- Add whole sprigs to a simmering pot of vegetable soup. Add chopped fresh oregano to a roasted vegetable sandwich
  • Parsley -- More than just a garnish! It elevates everything, love it on potato salad
  • Rosemary -- Mince fresh rosemary and make a great dipping oil for your next baguette
  • Sage -- My favorite with pork. 
  • Thyme -- Stuff a few sprigs under the skin of a whole chicken before roasting 
January 05, 2016 /April Hamilton
cooking tips, fresh herbs
Smart Kitchen
Comment

Spicy Rice

January 04, 2016 by April Hamilton in Dinner Table

When the invitation came to test-drive a cooking kit that makes preparing authentic Indian dishes at home “easier than ever,” I said Yes Please! I have dabbled in some simple Indian recipes at home, but Channa Masala is about the only one I have mastered. 

The kit arrived and I ripped the box open. It felt like my birthday! A collection of aromatic spices and a new cookbook, that’s worthy of celebration. A cooking party was definitely in order, so we packed up the car and the kid and headed to the country to visit my in-laws.

We gathered around the kitchen island and enjoyed a three generation chop and chat. The only difficult part of our feast was choosing which recipes to make. It feels like Neena, the kit’s creator, is right there in the kitchen guiding you through her recipes.

Crack open the book and you’ll want to assemble an entire buffet. The first one, Spicy Rice, had me sold in an instant. Spiced rice, tempered with sweet raisins and crunchy cashews and a fresh sprinkle of cilantro will be in regular rotation at our house.

Spicy Rice

Feel free to substitute curry powder and ground cumin for the seeds if you don't have them. It may not be quite as authentic, but will still be a fabulous one pot meatless meal! Here's a great reason to make a double batch of rice -- save the extra for a quick and delicious meal.

  • 2 tablespoons olive oil
  • 1/2 teaspoon mustard seeds
  • 1/2 teaspoon cumin seeds
  • 1/2 teaspoon fenugreek seeds
  • 1 tablespoon chopped fresh garlic
  • 1 medium onion, chopped
  • 1/2 cup cashew nuts
  • 1/2 cup raisins
  • 1/2 cup corn kernels (frozen or off the cob)
  • 1 tablespoon turmeric
  • 1/2 teaspoon chili powder
  • 4 cups cooked Basmati rice (hot or cold)
  • 1 1/2 teaspoons salt
  • 1/4 cup water
  • 1 handful fresh chopped cilantro

Heat the oil in a Dutch oven or saute pan over medium heat. Add the mustard seeds, fenugreek seeds, and garlic. Stir, then cover for 30 seconds. Reduce the heat to low and add the onions, cashews, raisins, and corn. Stir and saute for 5 minutes. Add the turmeric, chili powder, cooked rice, salt, water, and half of the cilantro, stirring to combine. Cover and cook for 5 minutes to heat through.

Serve with remaining fresh cilantro.


January 04, 2016 /April Hamilton
healthy recipes, Meatless, vegetarian
Dinner Table
Comment

What's for Dinner?

January 03, 2016 by April Hamilton

Half the battle of home-cooking is the question of WHAT? Take turns choosing your weekly menus and the whole family gets engaged. WHEN in the world will you have time to cook given a busy schedule filled with late meetings and kids' activities? Choose some simple recipes and prep a little in advance, then you can put your meals together 'a-la-minute.' If you've drawn a blank, start the week with a Sunday kitchen session, whipping up a batch of 'ground beef starter' that can translate into countless meals throughout the week.

I had a fun time in the kitchen recently with our Secretary of Health, Karen Bowling, making taco salads, a healthy twist to the traditional Taco Salad Tuesday. Jump into the kitchen with us! 

January 03, 2016 /April Hamilton
healthy recipes, dinner ideas, simple cooking ideas
Comment
Something for everyone -- fire up the grill and celebrate Spring in January

Something for everyone -- fire up the grill and celebrate Spring in January

Grilled Chicken Wings

January 02, 2016 by April Hamilton in Dinner Table

The calendar says January and the mercury says first day of Spring, a perfect occasion to fire up the grill and make merry. Phone a few friends and get grilling. As everyone is tumbling home from their holidays away, it's a great time to reconnect before reality resumes. They will say 'yes! We'll be there!' Make extra just in case. 

Wings are fun and I found this recipe in This is a Cookbook, a stylish cookbook I picked up at my local bookstore. Sriracha and lime? I'm in. These are flavorful-spicy, tangy with their crispy char. The kids love them! There was lots of marinade left behind once I removed the wings for grilling, so I cooked it for a while to thicken into a fabulous dip for the finished wings.

As long as the grill is going, we like to throw all kinds of things on the fire. I pulled a rack of ribs from the freezer and gave them a dry rub while they thawed on a rack in the fridge (thinking ahead!). For good measure, we'll toss a big caesar salad (family favorite recipe in my book) and add a couple of chicken breasts, plus the remnants of a baguette for lovely 'croutons.' Something for everyone. Suddenly we have an impromptu dinner party and I'm the happiest girl in town. 

Grilled Chicken Wings

adapted from This is a Cookbook by Max Sussman and Eli Sussman

1 cup hot pepper sauce (Frank's Redhot!)

1 cup Sriracha sauce

zest and juice of 2 limes

freshly ground black pepper

3 pounds raw chicken wings, cut apart at the joint if whole, and tips removed

Stir the hot sauces together in a large bowl and add the lime zest and juice and pepper. Add the wings and toss to coat. Cover and marinate in the fridge for 4 to 24 hours. 

Build a charcoal fire or heat a gas grill to high. Reserving the marinade, remove the chicken from the bowl and grill on the grill rack for about 15 minutes, turning occasionally, until done. Chicken will be opaque with a lightly charred crust.

Heat the reserved marinade in a small saucepan over medium-high heat until it boils, then reduce heat and simmer until thickened while chicken grills.

Pile the wings on a big platter and pass the sauce separately. Serve with lots of napkins and cold drinks.

Serves 6-8

Happy Cooking!


January 02, 2016 /April Hamilton
Dinner Table
Comment
green currency and shiny coins make a delicious way to start the year

green currency and shiny coins make a delicious way to start the year

Prosperity in a Pot

December 31, 2015 by April Hamilton in Soup and Bread

“People are so worried about what they eat between Christmas and the New Year, but they really should be worried about what they eat between the New Year and Christmas.”--unknown

Fresh food instead of fast, an attainable endeavor that reaps tremendous rewards. Kick off with prosperity-producing provisions, a gorgeous stew of fresh greens which symbolize green paper currency and black-eyed peas which resemble a handful of shiny coins.  It might not make us rich or thin, but it’s easy, aromatic, delicious, and fresh. 

The moment I started planning the New Years Day feast with black-eyed peas on the menu, the crew in my kitchen broke out into song, belting out the hits from The Black Eyed Peas and reminiscing about their performance at The Greenbrier a few summers back. It’s a full blown dance party in the kitchen, cue “Tonight’s Gonna Be a Good Night.”  After a bit of chopping and a long simmer, we have steamy bowls of satisfying soup.  And a perfect start to another great year.

Cue the playlist, gather your group and start chopping.

I hope you’ll enjoy the cooking routine.  When the next holiday season rolls around, you can enjoy and indulge without worry.

Prosperity in a Pot

Loosely adapted from a classic Persian recipe Aash, as shared by my friend Cosima Amelang.  Chop the greens once you get the black-eyed peas simmering

  • 1/4 cup olive oil, plus additional for serving
  • 1 medium onion, chopped
  • 1 teaspoon ground turmeric
  • 1 teaspoon ground cinnamon
  • 1 teaspoon ground cumin
  • 1 tablespoon chopped fresh ginger
  • 3 cups dried black-eyed peas, rinsed
  • water
  • 1 large bunch Swiss chard, leaves chopped and stems reserved for another use
  • 1/2 pound fresh spinach, chopped
  • 1 large leek, chopped*
  • 1 bunch green onions, chopped
  • 1 bunch fresh parsley, leaves chopped
  • salt and pepper
  • 1 teaspoon hot sauce (Sriracha is nice here)
  • 2 tablespoons honey
  • 1 tablespoon lemon juice
  • *for best results with leeks: trim the ends, remove the top greens and reserve for other use.  Cut the leeks in half lengthwise, slice thinly crosswise and rinse well in water.  Lift them out into a strainer to drain.

Heat the 1/4 cup olive oil in a large stockpot over medium heat. Saute the onion until translucent. Add the turmeric, cinnamon, and cumin and saute 1 minute. Add the chopped ginger and cook another minute. Add the black-eyed peas and enough water to cover (about 2 quarts). Bring to a boil, then reduce heat and simmer, partially covered, for 30 minutes. Add the chopped chard, spinach, leek, green onions, and parsley.  Stir well to combine and add additional water if needed just to cover the greens.

Cook over low heat for one hour, until black-eyed peas are just tender. Season with hot sauce, honey and lemon juice, and salt and pepper to taste. Continue cooking for 15 minutes to infuse with the seasonings.

Serve, topping each portion with a swirl of olive oil.

Happy Cooking!

Makes 8 servings


December 31, 2015 /April Hamilton
new years, black eyed peas, healthy, holiday
Soup and Bread
Comment

Bring on a Sweet '16!

December 30, 2015 by April Hamilton

The new year is knocking and I struggle to grasp how the earth spins so quickly. In my quest to slow things down just a little I turn to my kitchen. We all love instantaneous gratification, but there are few things more gratifying than home cooking. Even if it takes a little longer to get dinner on the table, it's time well spent! Invite the kids and follow along on a fun kitchen adventure. Whether you're into planning menus in advance or would rather whip something together with pantry staples, you're in the driver's seat. Break out the new calendar and start fresh. It's going to be a sweet '16! What a wonderful time to turn over a new leaf, start a new habit, break a bad one. 

Some people build long lists of things they truly want to change, while others have trouble sticking with one resolution.  As I ponder the myriad possibilities for new year’s resolutions, I concocted my own list from various sources of inspiration.  In this new year, I decided on a collection of 16 popular resolutions.  Sounds a little daunting.  But I quickly realized that this long-ish list of goals could all be accomplished with one simple action.

Want to save money?  Lose weight?  Spend more quality time with loved ones?  Cook. Cooking for yourself instead of eating out saves lots of money. Cooking for yourself, with fresh ingredients, can be instrumental in achieving a healthy weight. What better way to spend quality time with family and friends than sharing stories over a home-cooked meal? And I think we'd all agree, the family table is the perfect no-phone-zone.

Come along and discover the true joy of cooking. According to my great mentor, the late writer Laurie Colwin,“What you want is an enormous return on a small investment. Almost the only situation in which this is possible is cooking.” Count me in!

Sixteen Resolutions for a Sweet '16, a brilliant plan for bringing cooking into your daily routine

  • Save money
  • Travel more (cooking brings the world to your kitchen!)
  • Stay happy
  • Buy local
  • Find your love
  • Start a hobby
  • Help others often
  • Slow the pace
  • Keep on learning
  • Eat five new foods
  • Grow a simple garden
  • Spend more time with loved ones
  • Lose weight
  • Cut out processed foods
  • Do something out of your comfort zone
  • Plan everything

Stop in daily for ideas and recipes that will help make this year the sweetest ever.

Happy New Year and HAPPY COOKING!

December 30, 2015 /April Hamilton
Comment

Welcome to my Playground

December 10, 2015 by April Hamilton

“Learn how to cook--Try new recipes, Learn from your mistakes, Be fearless, and above all, HAVE FUN!”--Julia Child

When my kids were tiny, I was determined to instill the love of cooking in them. They sensed my desperation and showed little interest in the kitchen.  There was the time when I embarked on a handmade gingerbread village with my first three year old.  I was starry-eyed, imagining ours would be perfect, just like the photo in the fancy food magazine.  

OK it was a disaster!  What was I thinking?  Perhaps I should have started with a realistic graham cracker milk carton cabin.

We swore off gingerbread projects for awhile, but eventually each of my daughters has come around to the kitchen and there are no more tears involved.  Now we laugh, even if there’s a mistake. (And we enjoy our coffee table book The Gingerbread Architect ).

One by one, I figured out simple tasks that they could master and followed their lead of interest rather than forcing them.

So we started amassing a collection of kitchen tools that were kid-friendly, if not exactly advertised as ‘for kids.’  Maybe your kids (grandkids, nieces, nephews, neighbors) aren’t quite ready for chopping onions with an 8-inch chef’s knife, but they can stir the onions you chopped as they saute.

They can measure, mix, and mash.  They can also spin salad, grate cheese, peel carrots.   Before you know it, you’ll be having tons of fun in the kitchen with your helper at the ready, and in minutes, all smiles, dinner is on the table.

As Rose, an eight-year old cooking student observed, “A kitchen is a classroom in a cook’s world.”  Math, science, reading, writing, and culture are all covered!  Kids have it all figured out--invite them to the kitchen.

For mess-proof cooking with kids, think BIG.  

Big mixing bowls, even for small jobs, help kids keep their ingredients in the bowl rather than spilling out everywhere.  

Big cutting boards also help contain their mess to a minimum.

Cookbooks with colorful illustrations or step-by-step photos engage kids and give them confidence.  A few favorites:  

Salad People, Pretend Soup, and Honest Pretzels, all by Mollie Katzen 

Rick and Lanie’s Excellent Kitchen Adventures by Rick and Lanie Bayless

Cooking on a Stick by Linda White, for campfire cooking fun

CHOP CHOP: The Kids’ Guide to Cooking Real Food with Your Family by Sally Sampson (also available as a magazine subscription)

Counter Intelligence The Best of April’s Kitchen (Smart, Delicious Recipes from my Family to Yours) by Yours Truly

Tools with comfortable handles are great for kids.  They also love colorful gear--mix and match a rainbow of tools.

Cooking is contagious -- spread the love!


December 10, 2015 /April Hamilton
Easy for kids
Comment

Ode to the KitchenAid

November 30, 2015 by April Hamilton in Soup and Bread

My mother marked the arrival of her fourth baby in 1963 with a sparkling stainless steel stand mixer. Hands-free, she could mix cakes from scratch for birthdays, cookies for school parties and church bake sales, and her still-famous roll dough. The KitchenAid rescued this busy mother and curated untold thousands of batches of good things.

Some mothers quiet their fussy babies with a drive around the block, a lullaby in the rocking chair, or with a hopeful pacifier. My mother turned on the KitchenAid mixer, with me, the fifth baby, on her hip. I know this, not because she has told me or because there are photos to prove it, but because to this day, the gentle hum of the KitchenAid mixer makes me feel at ease. It whisks away stress. It restores calm.

When the word came that her mixer ‘quit,’ we kids sprang into action and bought her a new one. In this new age of mail order, it was a one-click transaction, we received our thanks and that was that.

Mom turned 85 last year and it was decided that she needed to downsize from the big house where we were raised, across the street from the ocean, our forever home. We sorted through the decades of photos, memorabilia, the old prom dresses, the shelves of books, each of us selecting a few keepsakes. “Who wants this?” my sister asked. It was a KitchenAid box with the spiffy new logo and image of a white stand mixer. I opened it to find mom’s original mixer, the one that quit years ago. Abandoning the photo drawer, I pulled the shiny mixer from the box, inspected it, and clutched it like my firstborn. 

Mom is happily settled into her new home, a manageable 2 bedroom condo with a perfect kitchen, across the street from the ocean. Her white KitchenAid is dusted with flour from the Thanksgiving roll dough. The Original now graces my counter in the hopes that she will fire up as she once did, making cakes by the batch and singing me her sweet lullaby.

Butter Horn Rolls

Recipe adapted from Duncan Hines Adventures in Good Cooking and The Art of Carving in the Home. I promise, these are worth the effort!  

Makes 3 dozen

  • 4 cups unbleached flour
  • 2 teaspoons ‘instant’ yeast (Rapid Rise)
  • 3/4 cup butter at cool room temperature (1 1/2 sticks)
  • 1/2 cup sugar
  • 1 1/2 teaspoons salt 
  • 3 eggs, lightly beaten
  • 1 cup milk at room temperature
  • additional flour for the work surface

Whisk together the flour and yeast in a medium bowl.

Cream the butter, sugar, and salt together in a large mixing bowl, preferably using a stand mixer and the paddle attachment. Scrape down the sides of the bowl. Pour in the eggs and milk, then add the flour/yeast mixture. Mix together on low speed until well blended. (Draping a kitchen towel over the whole mixer will help prevent the flour from flying out). Scrape the bowl down to the bottom to ensure everything is well incorporated. (OR get a Sideswipe paddle attachement for KitchenAid!)

Cover the bowl with a clean towel and allow it to rise until doubled, about one and a half hours.

Fold the risen dough with a large spoon or scraper. Transfer to a one gallon size zip-top bag and chill at least 6 hours or up to 3 days.

For Crescent Rolls:

Roll out one third of the dough on a well-floured cloth to a 1/4-inch thick round. Cut the dough into 12 triangles (like a pizza). Roll each triangle into a crescent roll shape, starting at the outer wide end. Place the rolls 2-inches apart on a parchment-lined baking sheet. Repeat with remaining dough.

Cover each sheet with a clean towel and allow the rolls to rise until doubled, about one and a half hours.

Bake uncovered at 350 for 12-15 minutes or until lightly browned. Cool for a few minutes on the baking sheets before removing to a basket. Serve warm.

November 30, 2015 /April Hamilton
KitchenAid mixer, homemade rolls, nostalgia
Soup and Bread
Comment
  • Newer
  • Older

real. good. food.