April's Kitchen Counter

  • About
  • Recipes
    • Wide Awake
    • In Between
    • Great Salads
    • Soup and Bread
    • Dinner Table
    • Sugar and Spice
    • Pantry
    • Roaming
    • 20 Questions
  • Blog
  • Shop
  • Events
Hummus heats up with a splash of pink

Hummus heats up with a splash of pink

Discover a New Recipe

November 12, 2015 by April Hamilton in In Between

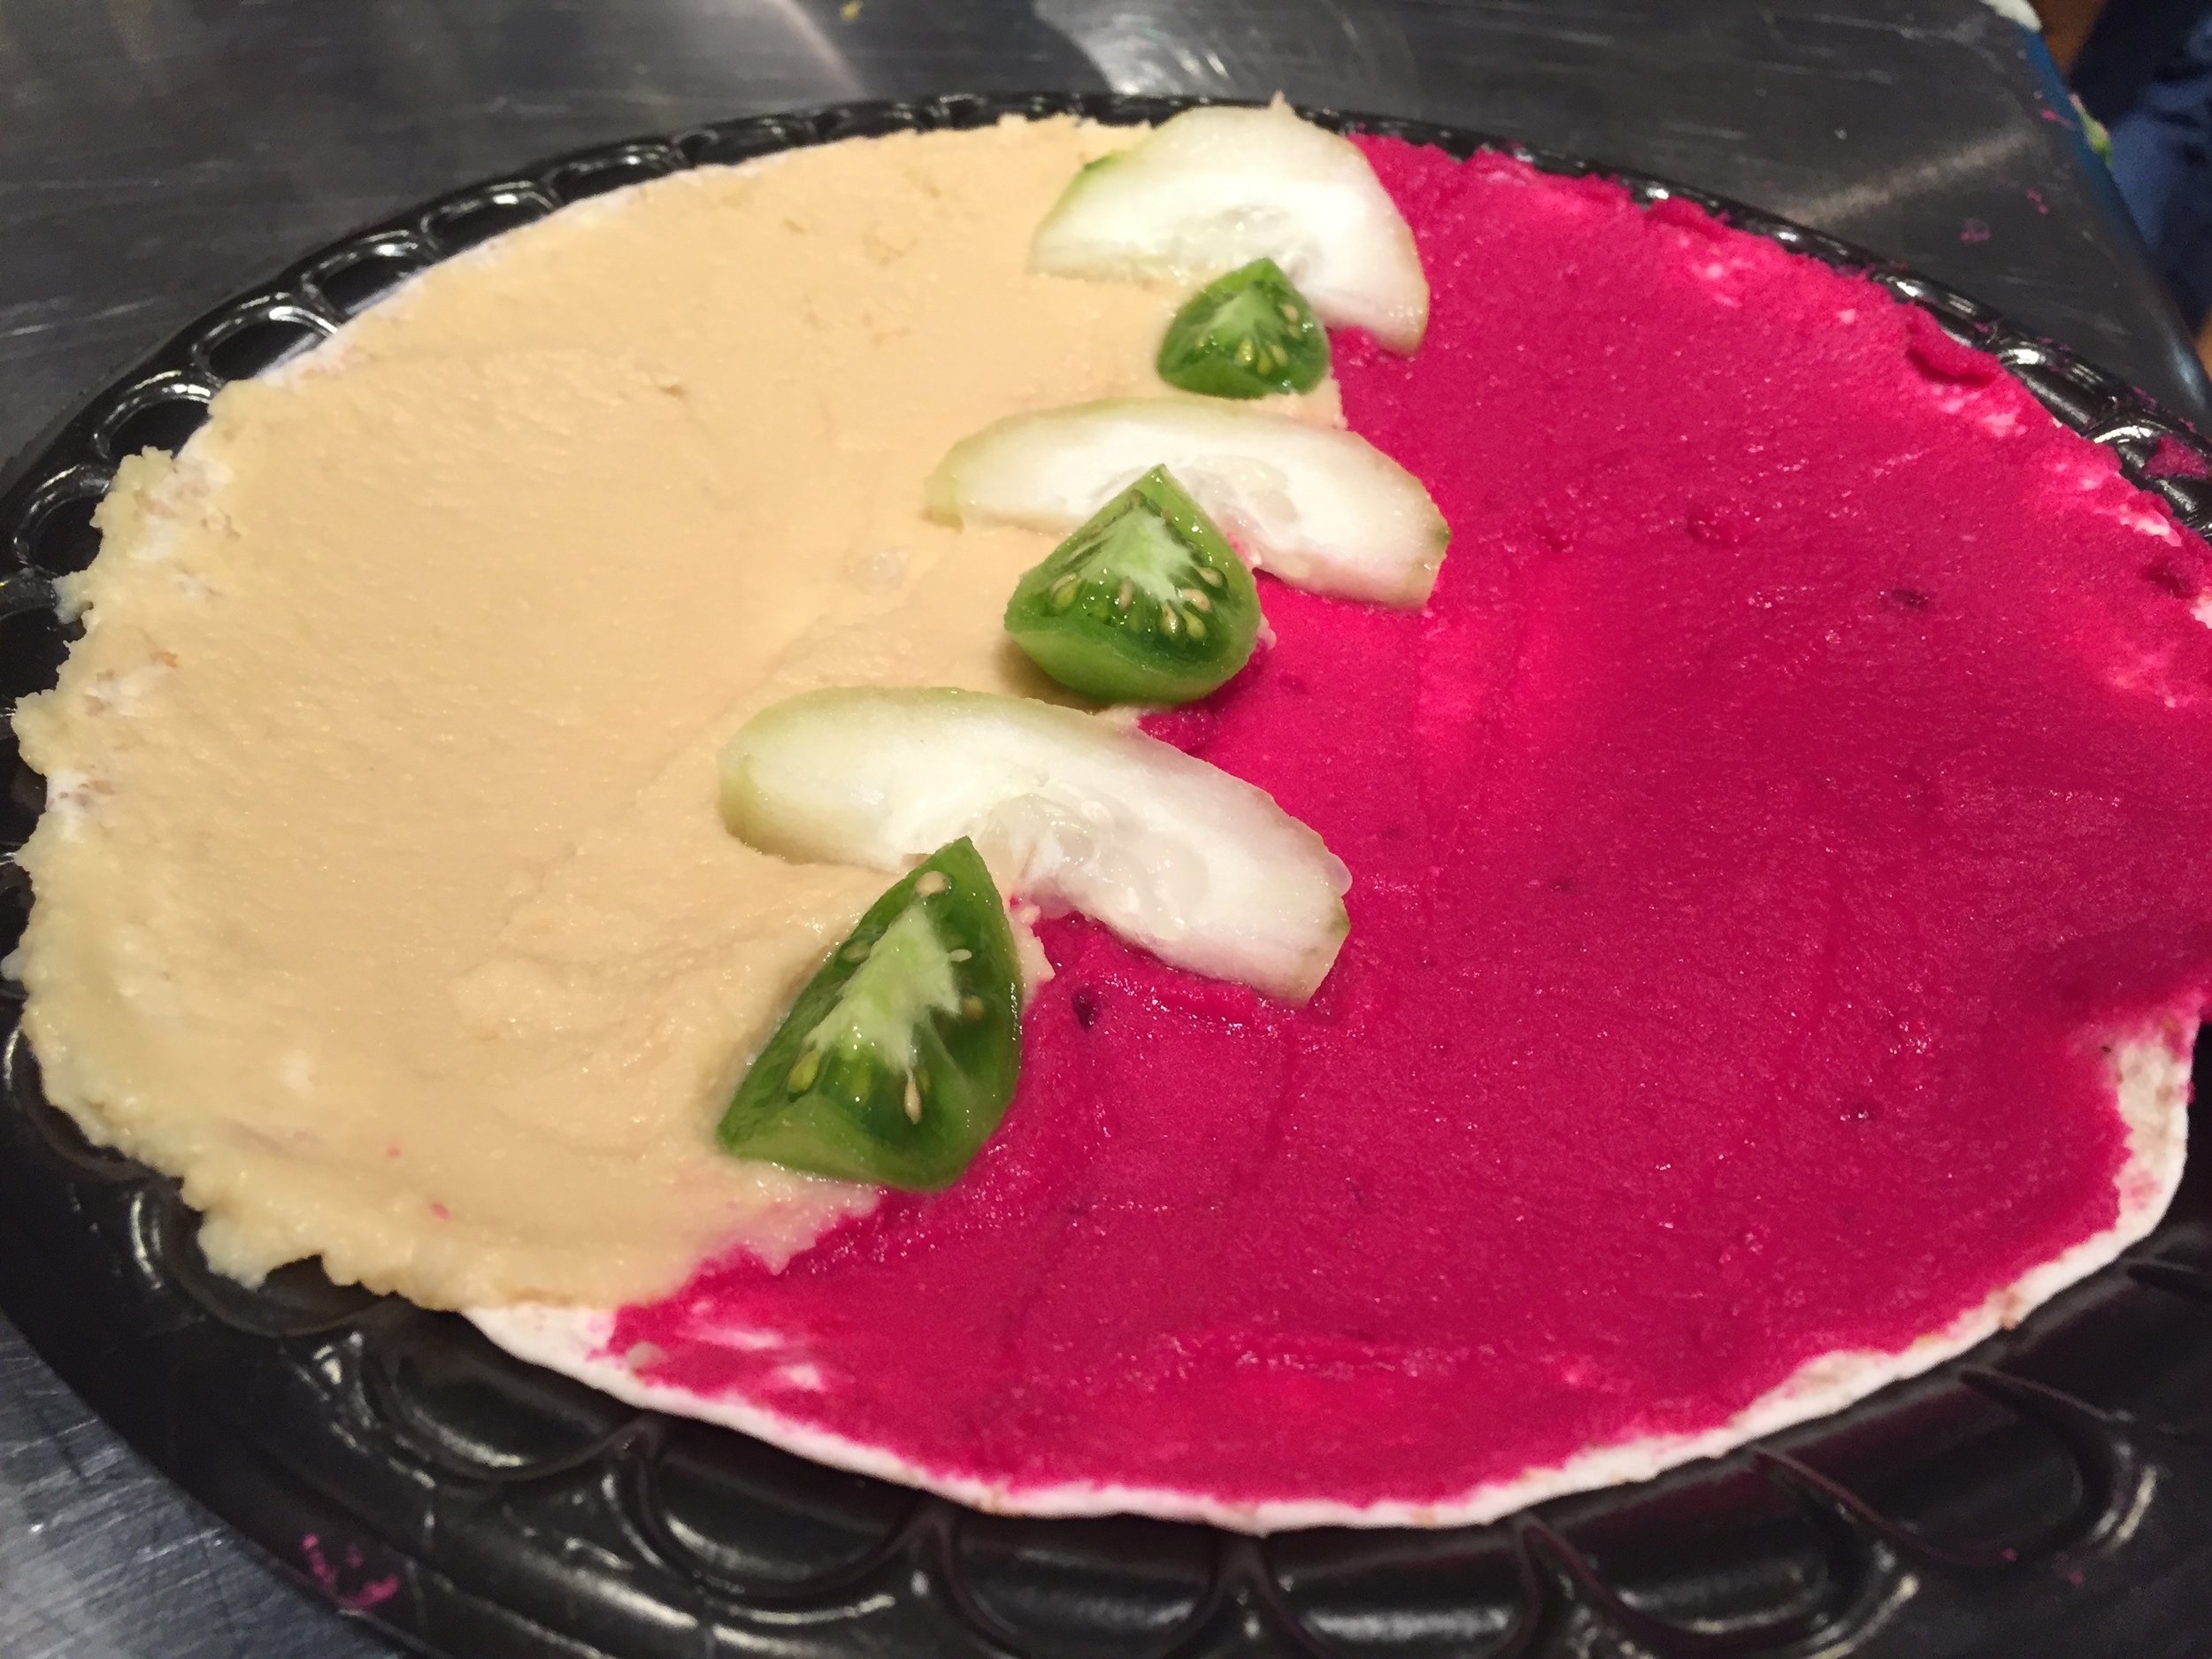
How do you get a room full of kids (and their reluctant cooking teacher) to eat their just-harvested beets? Whirl them into some homemade hummus! When I was invited to cook with a group of students from SCRATCH, a community garden program focusing on youth who bring their farm to the table, I couldn't believe my luck. They arrived with about a bushel of beets which we scrubbed and roasted and then let the food processor do the work of turning our golden hummus into a hot pink discovery. Then it disappeared just as magically. These happy growers are amazing kitchen hands and I can't wait to see what they harvest next. Happy Cooking!

Hot Pink Hummus

We made a double batch of classic hummus, then scooped out half and added the beets to the processor. A couple of swirls of the machine and gold turned to the most amazing pink

  • 2 cloves garlic, peeled
  • 1 (15-ounce) can chick peas, drained and rinsed
  • zest and juice of 1 lemon
  • 1/2 cup boiling water
  • 2 tablespoons olive oil, plus extra for storing
  • 1/2 teaspoon coarse salt
  • 2 small beets, roasted until tender and peeled

PULSE the garlic in a food processor to mince. Add the drained chick peas, lemon zest and juice and boiling water. Blend for 3 minutes, scraping the side of the container after 1 minute. Add the olive oil, salt, and beets and blend until smooth. Transfer to an airtight container and drizzle the top with a bit of olive oil to keep from drying out. Refrigerate for up to 1 week


November 12, 2015 /April Hamilton
fresh, family kitchen, Easy for kids
In Between
Comment
Day 10 of "30 Days of Kitchen Fun" -- Visit your Fish Market

Day 10 of "30 Days of Kitchen Fun" -- Visit your Fish Market

Blackened Mahi Mahi

November 10, 2015 by April Hamilton in Dinner Table

Growing up in Florida with the warm Atlantic ocean in my backyard was the best possible environment for a kid, except when it came to dinner.  I flat refused to savor its bounty when it was served on my plate.  This delicacy, fresh from the salty sea, was a near-daily offering and I would have no part of it.  Eighteen years of no.

Then I went to college, an hour and some change from my beloved playground.  I craved the salt, missed having sand between my toes.  I longed for my mom’s home cooking and forgot all about her spectacular fish dishes.  I craved home.

When my older sister moved to the Virgin Islands, I couldn’t wait to visit her.  Independent college student, going to the Caribbean!  I invited my surfer boyfriend/now husband, and off we went to ‘America’s Paradise’ for a Spring Break getaway. Every day adventure and a return to home cooking.  It was such a treat to eat ‘real food’ for a change.  

One night my sister and her husband offered to treat us to dinner out to their favorite little restaurant, The Fishnet.” On our way there, I wondered if I would let my guard down and give fresh fish another try.  It had been a few years since my mom had tried to force feed me.  Maybe this was the time?

We entered the quaint fresh air eatery with a fishnet draped above, serving as a roof.  We were seated at a four-top overlooking the sparkling sea.  Paradise. The waiter in his island t-shirt and tattered ankle-length jeans served us tropical drinks as I ogled the plates passing by.  “That looks delicious!  I’m having THAT!” I decided.  It was the house specialty, the day’s freshest catch, completely encrusted in a sheath of spices. “Do you even like fish?” my sister asked.

At that moment, I completely got swept up in the ‘when in Rome’ phenomenon and placed my order.  “I’d like the fresh catch, blackened,” I said, feeling incredibly grown up.  No one was there cajoling me, mom wasn’t there forcing me.  This was my decision and it felt really good.

Still smoking hot from its cast iron skillet, this gorgeous, crispy black filet was elegantly delivered before me.  Cracking my fork through the aromatic crust, I took the first bite.  Tender, flaky, crunchy, spicy.  Delicious.  From that moment, I realized that I had been missing out my whole life. I mentally apologized to my mom, one of the best cooks on earth, for all those years of rejection.

Returning home for a summer visit, I asked mom what she was planning for dinner.  “I have some fish,” she said apologetically.  My eyes lit up.  “Where’s your iron skillet?”

Looking ahead to an upcoming trip home to the coast, I offer you a taste of fresh fish that is sure to convert you! How sad that when I fell in love with fresh fish, I also moved far away from the coast.  Lucky for us in Charleston, we can head to Joe’s Fish Market for really great fish and service to match.

You can find brothers Joe and Robin Harmon behind the counter at Joe's Fish Market year-round. Robin took a quick break to wave my "30 Days of Kitchen Fun" calendar and I hear he's quite a fisherman when his work schedule allows.

You can find brothers Joe and Robin Harmon behind the counter at Joe's Fish Market year-round. Robin took a quick break to wave my "30 Days of Kitchen Fun" calendar and I hear he's quite a fisherman when his work schedule allows.

Blackened Mahi Mahi

Most firm-fleshed fish work well in this preparation.  At Joe’s, the mahi mahi came highly recommended.  It cooked up perfectly!  Though commercial ‘blackening’ spice blends are available, they often contain a lot of salt.  I prefer to blend my own.

  • 2 1/2 tablespoons paprika
  • 1 teaspoon dried thyme 
  • 3/4 teaspoon coarse salt
  • 1/2 teaspoon cayenne pepper
  • 1/2 teaspoon garlic powder
  • 1 tablespoon olive oil
  • 4 four to six ounce skinless firm fleshed fish filets (halibut, salmon, mahi mahi work well)

Heat the oven to 375. Mix the paprika, thyme, salt, cayenne, and garlic powder together in a small bowl. Transfer the mixture to a large plate or pie pan. Brush the fish on both sides with the olive oil. Carefully dip the filets into the seasoning mixture, turning to coat each side. 

(If using smaller filets, you may have some spice mixture remaining--stir it into the liquid for cooking rice or quinoa, or discard if not using right away)

Heat a large cast iron skillet(12-inch) over medium-high heat. When the skillet just starts to smoke, add the filets and cook for 2 minutes.  Carefully turn the filets over and transfer the skillet to the oven and finish cooking for about 5-7 minutes--the fish will feel just-firm when pressed at the center.  (Cooking time will vary depending on oven and thickness of fish).

Serve with Fruit Salsa (recipe follows)

Fruit Salsa

If I was in our Florida backyard, I’d grab some mangoes for this salsa. In West Virginia summers, I pick fresh peaches. Pineapple works in the off-season.

  • 2 cups chopped fresh fruit
  • 2 teaspoons lemon juice
  • 1 small Roma tomato, chopped
  • 1/4 red bell pepper, finely chopped
  • 2 green onions, chopped
  • 1/2 jalapeno pepper, seeded and finely chopped (or to taste)
  • 1 tablespoon fresh chopped cilantro

Toss the fruit with the lemon juice in a medium bowl. Add the chopped tomato, bell pepper, green onions, jalapeno pepper, and cilantro. Stir gently to combine. Serve with the fish.


November 10, 2015 /April Hamilton
seafood, simple, healthy
Dinner Table
Comment

Fried Rice, Your Way

November 09, 2015 by April Hamilton in Dinner Table

“The only thing that you absolutely have to know, is the location of the library.”--Albert Einstein

Whenever I need to jumpstart my recipe repertoire, I turn to the library.  Sure there are some hundreds, even thousands of cooking blogs and websites, many of which I turn to daily.  However, nothing quite compares to thumbing through a great cookbook.

My cookbook collection grows exponentially every time I visit the library.  My shelves overflow with great cooking titles, yet I can never get enough.  I love visiting the ‘new arrivals’ section, bring several home, and without fail fall in love. There are some I find I couldn’t live without and purchase a few from time to time, finding room on my crowded shelves.  The Seductions of Rice by Jeffrey Alford and Naomi Duguid is a top-ten in my collection, and I first discovered it at the library.

My cooking education began at my mother’s knee and continues today with every book I read.  I’ve been accused of reading cookbooks like novels and it’s absolutely true.  I can’t get enough. I’m currently entrenched in Mark Kurlansky’s new book International Night, soaking up the flavors of cultures from across the globe. Fascinating facts and trivia mingle with recipes in this hefty tome penned by Kurlansky and his 14-year old daughter Talia.  My kind of book!  

The Kurlanskys present a culinary world tour to us hungry readers, marching us along from Andalusia ‘where two continents meet’ to Japan ‘a very crowded island nation with the world’s longest life expectancy,’ stopping along the way to sip, sample, and stir in every corner of civilization.

I’m swept away and suddenly realize it’s time to cook dinner.

I turn to The Best Homemade Kids’ Lunches on the Planet by Laura Fuentes and find a perfectly delicious no-fuss Fried Rice recipe.  The headnotes are right up my alley--‘no measurements to follow and just some simple rules: use leftover rice.’ I just happen to have cold rice from last night’s dinner and only a few minutes before everyone’s starving.  Then I can quickly get back to my awaiting stack of books.

Better-Than-Takeout Fried Rice

tweak according to your whim and what you have on hand

  • 2 eggs, beaten
  • 1 tablespoon vegetable oil
  • 1 1/2 cups mixed chopped vegetables (I’m going with carrot, green onion, and frozen peas)
  • 2 tablespoons soy sauce
  • 3/4 cup cooked diced chicken or tofu , or a handful of cashews
  • 3 cups leftover cold cooked rice

Heat oil in a large skillet over medium-high heat. When oil shimmers, add the egg and let sit until it bubbles and just the center remains uncooked. Carefully turn the ‘egg pancake’ and cook another minute until done.Transfer to a plate and cut into small squares.  Set aside.

Add the vegetables to the skillet and stir to coat with the residual oil. Reduce the heat to medium, drizzle with the soy sauce and cover.  Cook 1 minute to quick-steam the vegetables. (Depending on type and size of vegetables, time may vary). Add the chicken or tofu and toss to combine.

Add the rice and stir gently to combine. Cook, covered, for 3 minutes to heat the rice through. Then uncover and cook a few extra minutes, if desired, to sear rice.Gently fold in the cooked egg and serve with chopsticks.

Serves 4

November 09, 2015 /April Hamilton
simple cooking ideas, leftovers
Dinner Table
Comment

Sunshine in a Glass

November 08, 2015 by April Hamilton in Pantry

Fresh squeezed OJ is nature's gift to get us through the dark days of Winter. It will fix what ails you, just sweet enough and rich with pulp, it's like drinking sunshine. Growing up on the East Coast of Central Florida, sandwiched between the warm Atlantic Ocean and miles upon miles of citrus groves, fresh squeezed OJ was a weekly ritual at our house. On Sundays, we would stop at a roadside stand to buy our supply of fresh citrus. I still remember the simple sign "Juicing Oranges" and a farmer in his Sunday overalls and fedora would load a bulging brown grocery sack into the back of our station wagon. At home, we cut them in half and took turns squeezing a bushel of golden fruit. The pulp and tiny seeds escaped from the juicer into the pitcher and into each awaiting glass. I just picked up a sack of Florida oranges in my West Virginia grocery store. I am ready for Winter.

November 08, 2015 /April Hamilton
juice, fresh, healthy
Pantry
Comment
9-year old Isaac stretches the dough

9-year old Isaac stretches the dough

Pizza Night in the Comfort of your Kitchen

November 06, 2015 by April Hamilton in Dinner Table

A bulky but rather lightweight package arrived at my kitchen door.  It was addressed to me, strangely enough.  The sender label read ‘Primal Kitchen’ and I ripped open the box to reveal its contents--a gorgeous walnut pizza peel and a note from my daughter in college:

“Happy very late Mother’s Day and kind of late Father’s Day!  I hope you have plenty of patio pizza parties and I can’t wait to get in on them when I get home.” Of course I cried as I read the note aloud and we all reminisced about our tasty family tradition, pizza night at home.

At our house, it’s an all hands on deck affair.  I make the dough and everyone jumps in making sauce, grating cheeses, and prepping the toppings. For years, this happened like clockwork every Friday night.  Neighbors joined in on the fun and we have experimented with every possible topping combination, working lots of fresh veggies into the mix.

As our kids have gotten older, the frequency of this fun tradition has fallen off, though we pull it instantly back into the rotation whenever the mood strikes. It’s heartwarming to know that my faraway college student is eager to come home and rekindle the family pizza custom. I urge you not to delay, start a pizza tradition at your home today!

A few tips for successful pizza night

  • heat pizza stone at 500 on the bottom rack of the oven. 
  • lightly coat a pizza peel or a rimless baking sheet with cornmeal--stretch your dough on top of the cornmeal, then top the pizza.  Carefully slide the pizza off the peel or baking sheet and onto the hot stone (always check to see that the pizza hasn’t glued itself to the pizza peel before attempting to launch it onto the stone. Give a gentle shake of the peel--if the pizza seems to be stuck in any place, carefully lift up the dough and sprinkle a little more cornmeal on the peel)
  • dough can be baked on a pizza pan or cookie sheet if you don’t have a stone; first lightly oil the sheet before laying down the dough.

Pizza Dough

This dough can be made in a Kitchenaid mixer with a dough hook, but the food processor works well for a single batch of dough. This makes enough for 3 large pizzas If making a double batchfor a pizza party! you will need to use the Kitchenaid. -- if you want to start off slow, you can chill the remaining dough balls for up to 2 days, or freeze them, well wrapped, for 2 months.

  • 1 teaspoon Instant Yeast (also called "rapid rise")
  • 3 cups bread flour
  • 1 1/2 teaspoons coarse salt
  • 1 to 1 1/4 cups water
  • 2 tablespoons olive oil
  • additional olive oil for bowl for rising, and for handling dough

COMBINE yeast, flour, and salt in the container of a food processor and pulse a few     times to blend.  Turn the machine on and add 1 cup water and 2 Tablespoons olive oil     through the feed tube. Process for about 1 minute, adding more water 1 tablespoon at a     time, until the mixtureforms a ball and is slightly sticky to the touch.  If it is dry, add     another tablespoon of water and process for 10 more seconds.  If the dough is too sticky,     add flour a tablespoon at a time. You want the dough to just barely stick to your fingertip.

KNEAD the dough with lightly oiled hands for a few seconds to form a smooth round     ball. Divide the dough into 3 balls. Brush a baking dish with a drizzle of olive oil and     place the dough balls in it.  Gently roll the dough around so that each ball is lightly coated     with oil and will not dry out.  Place the balls apart so they have room to rise.   

Cover the dish with plastic wrap and let rise in a warm draft-free area until the dough     doubles in size, usually about 1 hour (aha! the time it takes to make sauce, toppings, and     get the oven preheated) .The dough can rise slowly in the refrigerator for 6-8 hours, if     that is more convenient.  Let the chilled dough sit at room temperature for a few minutes before shaping.

Color is king when it comes to fabulous pizzas -- this one with Roma tomatoes, red onion, and asparagus.

Color is king when it comes to fabulous pizzas -- this one with Roma tomatoes, red onion, and asparagus.

Quick Pizza Sauce

I like to keep this sauce on hand to make English muffin pizzas for quick after-school snacks.  It can also be tossed with hot pasta as an easy marinara

  • 2 cups canned diced tomato (I like to use Muir Glen crushed tomato)  
  • 1 Tablespoon Olive oil
  • 2 cloves garlic crushed
  • 1/2 teaspoon dried oregano
  • salt and pepper to taste

    Combine all ingredients in a small mixing bowl. (Quick!)Refrigerate leftovers for up to a week.

Spinach and Garlic Pizza

This is a family favorite!  When we moved from Houston, we craved the pizzas that we fell in love with at STAR Pizza.  I called them for their recipe for “Joe’s Pizza” and they wouldn’t share, so here’s our version. Really the BEST part about pizza night is everyone jumping in with topping ideas -- have fun creating your own favorites.

Start with a ball of dough and some quick pizza sauce, top with 

  • 6 ounces shredded mozzarella cheese (or fontina) and can be supplemented with asiago, parmesan or feta

For sautéed spinach and garlic:

  • 2 tablespoons olive oil
  • 6 cloves garlic, very thinly sliced
  • 5 ounce bag fresh ‘baby’ spinach
  • salt and pepper

HEAT oil and garlic in large skillet over low heat until oil begins to shimmer and stir a few minutes until garlic gently sizzles.  When garlic is almost tender, add spinach to skillet a handful at a time, and add 1/2 teaspoon salt, stirring to evenly wilt spinach.  Remove from heat and season with pepper.

SPREAD pizza dough. Spoon about 1/2 cup of pizza sauce over dough. Sprinkle cheese over sauce. Distribute sautéed spinach and garlic over the top. Bake ina very hot oven (preheated to 500) for 10-15 minutes.


November 06, 2015 /April Hamilton
pizza, party, family kitchen
Dinner Table
Comment

30 Days of Kitchen Fun!

November 04, 2015 by April Hamilton

My friends at I Love Nice People are rolling out  "A Month of Niceness" campaign, a great reminder to all of us to join them in doing a nice deed every day for the month. Their suggestion for today is "talk to someone who seems lonely" and of course my personal favorite is this Saturday's tip: "Make breakfast for your friends." I love their idea and checked in with Kate Webster, college student and co-founder of ILNP to ask about kicking off a similar calendar "30 Days of Kitchen Fun". In addition to granting approval for me to mimic her concept, she made the calendar for me. Talk about NICE!

Kate and I share some fun kitchen history--For her 10th birthday, she celebrated in the teaching kitchen with her friends and I was the lucky one who cooked alongside these cute 4th graders. I remember the scenario well--I had donated a class as part of a Hurricane Katrina fundraiser that our school was hosting and Kate's parents bought it. Next thing you know, the kitchen was full of giggling 4th grade girls. We had a ball and are in search of the photos to share the memories. 

Have a NICE day, and Happy Cooking!

November 04, 2015 /April Hamilton
simple cooking ideas, family kitchen
1 Comment

Pastel de Tres Leches

October 31, 2015 by April Hamilton in Sugar and Spice

Dreaming of jack-o-lanterns and sugar skulls, my mind is on holiday baking. Life’s pace of late has been unsustainable, so I’m off to the kitchen for some slow-down therapy. I’ve always been intrigued by the traditional fiesta cake “pastel de tres leches” and decided to give it a whirl for my daughter’s Spanish class Day of the Dead party. After poring over page after page of recipes, I settled on one from Pati Jinich of Pati’s Mexican Table. I’ve heard Pati on The Splendid Table radio show and each time I want to stop what I’m doing and dive into the kitchen with her. Here goes!

The cake is a magical blend of fluffy egg whites and creamy whipped yolks, sweetened with sugar and a good glug of vanilla, then folded with flour and baked.

DSC04461.jpg

The true alchemy occurs when the cake comes out of the oven. You pierce the cake all over with a fork and infuse it with a mixture of 3 milks--whole, evaporated, and sweetened condensed. I took a chance on caramelizing my sweetened condensed milk, a fascinating conversion that happens when you gently boil the unopened can in a pot of water.

The tasters responded with cheers of the highest praise: “It tastes like flan-cake!” Whether you’re celebrating The Day of the Dead or just need some down time in the kitchen, you’ll wow your tasting panel with this festive cake, perfect for any occasion.

Pastel de Tres Leches

adapted from Pati’s Mexican Table

For the cake:

  • 9 eggs, separated
  • 1 cup sugar
  • 1 tablespoon pure vanilla extract
  • 2 cups unbleached flour

For the leche syrup:

  • 1 (14 ounce) can sweetened condensed milk, preferably caramelized (see recipe below)
  • 1 (12 ounce) can evaporated milk
  • 1 cup milk
  • 1 tablespoon pure vanilla extract

For the topping:

  • 11/2 cups heavy whipping cream
  • 3 tablespoons powdered sugar
  • 1 teaspoon pure vanilla extract

HEAT the oven to 350. Buttera 13 x 9-inch baking pan and line the bottom with a piece of buttered parchment paper.

WHIP the egg whites on medium speed with a stand mixer until they are foamy. Increase the mixer speed to medium-high and whip in the sugar one tablespoon at a time while the mixer is running. Continue beating until the whites hold stiff peaks, about 5 to 7 minutes total. Transfer the whipped whites to a large mixing bowl and set aside.

POUR the egg yolks into the bowl for the stand mixer and beat on medium-high speed until thick and pale gold in color, about 5 to 7 minutes. Stir in the vanilla to combine. Fold the beaten yolks into the egg whites.

SPRINKLE the flour over the egg mixture and fold gently to combine, scraping with a spatula so that the flour is well mixed. Pour the thick batter into the prepared pan and bake until the cake is golden-tan and puffy, and a toothpick comes out clean, about 22 minutes. Cool on a cooling rack for 10 minutes, then loosen the edges of the cake with a blunt knife.

TURN the cake out onto the cooling rack, remove the parchment, then invert the cake onto a large serving platter. Place strips of parchment paper around the perimeter of the cake, tucking them just beneath the cake’s edges. Poke the cake all over with a fork (I used a wide-tonged serving fork to make large-ish holes)--the top of the cake will look like a sponge.

MIX the leche syrup ingredients together in a large bowl or quart-sized Pyrex pitcher (you can do this while the cake is baking. If using caramelized sweetened condensed milk, you will need to whisk it well to get a smooth sauce). Drizzle the leche syrup evenly over the cake.

WHIP the cream with the powdered sugar and vanilla until fluffy and spread over the top of the cake and chill for one hour. Cut into squares and serve.

Muchas gracias to Pati for this recipe!

If you want to caramelize your can of sweetened condensed milk, remove the label from the can and place the unopened can on its side in a pot of water, covering the can with an additional inch or so of water. Bring to a boil, then reduce heat to medium-low to keep the water at a low boil. Cover the pot and cook for 3 hours, making sure the water level stays above the can.

Using tongs, remove the can from the water and let cool before opening carefully. You will have a thick, golden caramel.

I got hooked on this when my aunt came for a visit when I was tiny. She made this, and we watched in amazement as she opened up the can of milk to reveal caramel sauce. She spooned it over vanilla ice cream topped with fresh pineapple and a sprinkle of dried currants. Such a fun food flashback!


October 31, 2015 /April Hamilton
Day of the Dead, Celebration dessert
Sugar and Spice
Comment

Texas Trash (It's mighty reckless to mess with Texas)

October 10, 2015 by April Hamilton in In Between

Kickoff is looming and you’re in charge of the snacks. Raid the pantry and toss together a tasty cereal mix with a twist. Take the traditional back-of-the-box idea to the Southwest and pour on some spice.

Start with crisp cereal squares (or hexagons if you’re going with Crispix) and toss in a cup or two of this and that--pumpkin seeds (out of the shell pepitas), nuts, sunflower seeds, small pretzels, corn chips, cheese crackers (fish or bunny shapes are a fun bonus). 

Drizzle on the spice, I like to go bold with Chipotle Tabasco, and bake until crisp. You can check on it and stir from time to time as the scent drifts from the kitchen into the living room.

This concoction has become a party staple and one that never turns out the same way twice. All credit to my spice-stained copy of The El Paso Chile Company’s Texas Border Cookbook by W.Park Kerr and Norma Kerr. They call it Texas Trash, and since we don’t want to mess with Texas, we’ll leave the name alone. Feel free to tweak the formula and give it your own personal brand. Either way, it’s a winner.

Texas Trash

  • 3 tablespoons unsalted butter
  • 2 tablespoons olive oil
  • 2 to 4 tablespoons hot sauce 
  • 2 tablespoons Worcestershire sauce
  • 2 teaspoons Ancho chile powder
  • 1 teaspoon garlic powder
  • 1/2 teaspoon dried oregano, crumbled
  • 1/2 teaspoon ground cumin
  • 4 cups mixed cereal squares ( I use Crispix and multigrain)
  • 2 cups mini cheese crackers
  • 2 cups small corn chips
  • 2 cups small pretzels
  • 1 cup pepitas
  • 1 cup roasted peanuts
  • 1 cup sunflower seeds


HEAT the oven to 250.

COMBINE the butter, olive oil, hot sauce, Worcestershire sauce, Ancho chile powder, oregano, and cumin in a 13 x 9-inch baking dish and bake for 5 minutes to melt the butter.

TOSS the cereal squares, cheese crackers, corn chips, pretzels, pepitas, peanuts, and sunflower seeds in a large bowl to combine.

POUR the cereal mixture into the baking dish with the spiced butter and stir to coat evenly.

RETURN the dish to the oven and bake, stirring every 10 minutes, for 1 hour. 

LET COOL and serve in a large bowl or pack in an airtight tin for 2 or 3 days. 

SHARE the bounty, scooping servings into festive gift containers.

Makes 12+ cups


October 10, 2015 /April Hamilton
party, snacks, spicy
In Between
1 Comment

Crazy Good Breakfast Sandwich

October 07, 2015 by April Hamilton in Wide Awake

Mornings can be crazy (we call it Pandemornium sometimes), so add some goodness to the crazy and you're set up for a perfect day. Eggs are a staple at our house. And bread. Our favorite bakery is closed on Sunday and Monday, so a Tuesday bakery run is a must. In case it falls off the to-do list, I try to keep some English muffins in the freezer, just in case.

Yes, I prefer the crusty multi-grain loaves from Charleston Bread, but in a pinch, the darkly toasted muffin is a fine canvas for my bed of arugula and egg over easy--enrobed with habanero jack. Tidy enough to eat in traffic, if necessary, but better at the kitchen table. Set the alarm, brew some coffee. Read the paper. Happy Cooking!

Crazy Good Breakfast Sandwich

2 slices whole grain bread 

1 teaspoon pat of butter

1 egg

Sprinkle of grated pepper jack cheese

Pinch of salt and ground pepper

Handful of fresh greens (I keep arugula and spinach on hand)

Additional goodness of your choosing--roasted bell peppers, tomato slices, avocado

TOAST the bread while you cook your egg.

HEAT a small skillet over medium heat and melt the butter, swirling the skillet to coat.

CRACK the egg into the skillet and sprinkle with salt and pepper.

COOK until the egg white looks set, about 2 minutes. Here comes the fun part...

FLIP the egg over and sprinkle with cheese (As Julia Child says,  "you have to have the courage of your convictions!") You can also flip it the old fashioned way with a spatula.

COOK until the desired degree of doneness, about 1 minute for 'over easy' or a little longer for 'over medium.' Crank up the heat if you like a crispy edge.

PILE some greens onto one slice of toast and slide the egg onto the greens.

TOP with the other slice of toast (or serve open-face if you prefer).

Makes 1, but you can easily make a dozen.


October 07, 2015 /April Hamilton
breakfast, Easy for kids
Wide Awake
Comment

Taco (Salad) Tuesday

September 23, 2015 by April Hamilton in Dinner Table, Great Salads

When you’re craving veggies on Taco Tuesday, reach for the salad bowl. I converted my simple ground beef ‘starter’ into taco salad for 2, with plenty leftover for Burrito Wednesday...Our dining numbers held at five for what I hoped was forever, but now they fluctuate. Two in college, a traveling husband, so this week the table is set for 2 and the skillet-ful of seasoned beef will stretch into lots of meals. I'll Mexify half of it, then season the rest with an Asian accent for noodle bowls.

Break out your iron skillet and the salad spinner and enjoy this any day of the week. Season it to suit your fancy and let me know about your delicious creations!

Taco Salad for 2, with DIY Leftovers

  • 1 tablespoon olive oil
  • 1 small onion, chopped
  • 1 clove garlic, minced or crushed
  • 1 pound lean ground beef
  • 1/2 teaspoon salt
  • 1 1/2 teaspoons ancho chile powder
  • 1/2 teaspoon ground cumin
  • 1 cup diced fire-roasted canned tomatoes
  • Romaine lettuce, rinsed, spun dry, and torn into bite-size pieces
  • Desired taco toppings--chopped tomato, jalapeno slices, cilantro sour cream, avocado, grated cheese, green onions, tortilla chips

HEAT the oil in a large skillet, preferably cast iron, over medium heat and add the onion.

SAUTE the onion until just tender, stirring occasionally.

ADD the ground beef and the salt, stirring to break up and cook just until no longer pink.

DIVIDE the mixture, scooping half into a bowl for later use and keeping half in the skillet.

ADD the chile powder and cumin to the skillet and cook 1 minute to toast spices.

STIR in the fire-roasted tomato and bring mixture just to a boil.

REDUCE heat to low and simmer for a few minutes while you assemble your taco salad toppings.

ASSEMBLE your salads as desired, topping a bed of lettuce with a few chips, a spoonful of warm meat, lots of veggies and a sprinkle of cheese.

CHILL the remaining taco meat for tomorrow's burrito, and freeze the reserved half for next week's noodle bowl.

Happy Cooking!

Lodge L10SK3 Pre-Seasoned Skillet, 12-Inch
Lodge
Buy on Amazon
OXO Good Grips Green Salad Spinner
OXO Cook's Tools
Buy on Amazon
September 23, 2015 /April Hamilton
simple, Salad
Dinner Table, Great Salads
Comment
  • Newer
  • Older

real. good. food.