Carrot Ginger Soup

Market fresh carrots and snappy ginger dance together in this soothing-sunny soup

Handwarmer mugs, saluting West Virginia, from Wingard Pottery

Handwarmer mugs, saluting West Virginia, from Wingard Pottery

This silky carrot soup is as quick to make as it is satisfying.  Sizzle some chopped onion in a little olive oil, add as much fresh ginger as you like–I go for a strong ginger bite.  Throw in a pound of sliced carrots.  Add vegetable stock and simmer until everything is tender. Then puree.  Done.  An immersion blender is key here.  Keep the soup right in its pot and buzz until smooth.

When my friend Amy sampled a spoonful, she sang, “OH!  This is OH, OHHH!  This is better than chocolate!”

The following day, she shared that she had enjoyed it cold, for breakfast.

Make a big batch to enjoy and share.  This soup makes its rounds in town whenever someone is under the weather.  Sunshine on a cloudy day.

Carrot Ginger Soup

  • 2 tablespoons olive oil
  • 1 onion, chopped
  • 1 clove garlic, crushed or minced
  • 1 to 2 tablespoons minced fresh ginger
  • 4 large carrots (about 1 lb. preferably organic), peeled and sliced
  • 4 cups chicken or vegetable broth (I typically use veg.)

HEAT the olive oil in a large saucepan over medium heat.

ADD the onion and saute for 5 minutes to soften.

STIR in the garlic and ginger and saute 1 minute (enjoy the fragrance!)

ADD the sliced carrots and cook for 5 minutes to soften.

STIR in 3 cups of the broth and bring to a boil.

REDUCE heat and simmer for 20 minutes or until carrots are tender.

PUREE soup in batches (blender or food processor), or in the pot with an immersion blender.

RETURN soup to the pot and heat, adding additional broth if needed and seasoning with salt (depending on saltiness of broth).

Let cool completely before packing in mason jars or containers.

Chill until ready to serve, then reheat. Some even like it chilled!

Share the love:)

Chocolate Mousse in Minutes

“Five!!” my daughter Reilly exclaimed as she set our patio table for dinner on a recent late-summer evening. Five! I shared her glee. Since early January, we had dined without our fifth family member, Sara, and at last she was home. Five. Tink the glasses, give thanks and dig in. Family dinner. For two short weeks, the table was set for five. We all embraced our tradition of dining together, savoring the bounty of the season and catching up. Two short weeks and off she went, back to her beckoning college, to the land of infinite knowledge and new best friends. But mostly a kitchen-less place.  

While Sara was home she delighted in every cooking project possible, planned menus and did the shopping. She even invited friends into the mix for late night kitchen sessions. I can still hear their laughter. During her last seemingly endless semester away, she worked as an intern for Food52, the amazing recipe and happy cook website. She had mastered her way around the site and had curated a page of her favorite recipes. “Mom! Have you ever made 2-ingredient chocolate mousse?! We have to make it!” And off she went melting dark chocolate–first ingredient–with water–second ingredient, then whisking the luscious liquid into a velvety mousse. Tada! We tasted the ethereal creation and tapped our spoons together. Sublime comfort. She piped it into 6 small ramekins which we all enjoyed at her until-next-time dinner. The last ‘five’ until Thanksgiving. A week later, after moving Reilly into her freshman dorm, my heart ached. Two gone. Wiping away tears, I was poking around the fridge and way at the back, I discovered a tiny treasure. The last dish of mousse. I plunged my spoon into it, closed my eyes, and quietly savored each soothing spoonful. Suddenly we were five again and my sadness lifted. Chocolate therapy.

With tremendous gratitude to the team at Food52 for this life-changing recipe.

2-Ingredient Chocolate Mousse

makes 6 servings
  • 3/4 cup water
  • 8 ounces bittersweet chocolate, chopped (I love Holl's)

HEAT water in a small saucepan over medium-low heat.

WHISK in the chocolate until mixture looks like chocolate sauce.

PLACE the saucepan in a large bowl half-filled with ice cubes.

WHISK the mixture until cool and thickened--it will hold the shape of the whisk.

PIPE or spoon into small dishes.

SERVE immediately, or chill to enjoy later.


Seasonal Fruit Crostata

“It’s a brayer!” Judy sang as she saw the dessert tools  on display at the crostata station. A polymer clay artist, Judy sculpted the buttery dough as if she were in her artist’s studio. Each little tart became an edible jewel, studded with black diamonds

The sweet finale, complete with a scoop of Ellen’s Homemade zabaglione gelato. Team Tamarack, thank you for crafting with us in the kitchen!

Seasonal Fruit Crostata

Make these  with apples in the Fall, or fresh cranberries or red-skin pear in the Winter. Fresh berries or stone fruits, such as peaches, plums, or nectarines make lovely Summer crostata

  • 1 recipe crostata dough (recipe below, divided for 12 individual tarts)
  • 1/4 cup unbleached flour, for rolling the dough
  • 2 Tablespoons sugar, divided use
  • 4 fresh pears, thinly sliced off the core, divided into 8 equal portions
  • 1/4 cup currants, soaked in 1 tablespoon dark rum
  • 1 Tablespoon milk

SPRINKLE a clean work surface with flour, and gently pat each dough disk into the flour to lightly coat.

WORKING with half of the dough, roll out each dough disk into a 5-inch circle and transfer each to a parchment-lined baking sheet.

SPRINKLE each circle of dough with 1/2 teaspoon sugar.

REPEAT with remaining dough, keeping one sheet chilled while you work with the first.

WORKING with one sheet of dough circles at a time, lay one portion of pear slices in the center of each dough circle, leaving a 1-inch border.

MOUND any extra fruit just slightly in center.

FOLD plain edge of crust up to partially enclose pears, leaving fruit exposed in center.

PINCH dough edge to seal any cracks. Dough will drape gently over fruit, with creases or folds every few inches enclosing the fruit around the edges.

REPEAT until all tarts are formed. Sprinkle the top of each tart with a few currants.

CHILL tarts for up to several hours before baking, or bake immediately.

PREHEAT oven to 425-

BRUSH crust with milk and sprinkle top of fruit and dough with remaining sugar.

BAKE crostatas until crust is golden brown and fruit is bubbling, 20-25 minutes.

REMOVE from oven. Cool on baking sheet 10 minutes.  

SERVE warm.

Can be made 4 hours ahead. Let stand on sheet at room temperature. Rewarm in 425°F oven 5 minutes before serving.

Note: Recipe can easily be halved. Freeze remaining wrapped dough disks in a freezer zip-top bag.

Crostata Dough

A food processor makes light work of this pastry. If you don’t have a food processor, the dough can be mixed by hand.  Recipe adapted from Cucina Simpatica by Johanne Kelleen and George Germon

  • ½ pound cold unsalted butter, cut  into ½ inch cubes and kept cold
  • 2 cups unbleached flour
  • 3 Tablespoons granulated sugar
  • ½ teaspoon coarse salt
  • ¼ cup ice cold water

PLACE the flour, sugar, and salt in the bowl of a food processor fitted with the steel blade. Pulse a few times to combine.

ADD the cold butter cubes to the processor, carefully tossing with a spatula to coat each butter cube with flour (This prevents the butter cubes from sticking together and helps them combine more evenly with the flour).

PULSE 12 times, or until the butter particles are the size of small peas.

REMOVE the lid and drizzle the water evenly over the flour-butter mixture.

PROCESS for about 10 seconds, stopping the machine before the dough becomes a solid mass.

If the dough seems dry and crumbly, add a few sprinkles of cold water and pulse again.

TURN the dough onto a sheet of parchment paper, pressing any loose particles into the mass of dough.

DIVIDE into 12 equal pieces for individual tarts.

FORM each piece of dough into a disk and wrap in parchment or plastic wrap.

CHILL for at least one hour. The dough may be refrigerated for up to 2 days or frozen for up to 2 weeks.

Summer Quinoa Salad

School is out, or close, anyway. The days are longer and more relaxed, making it the perfect time to embrace the kitchen! Whether you’re packing for a picnic or just trying to keep cool as the mercury soars, this quick quinoa salad is the trick. If you’re new to quinoa, give it a try. It’s the ‘ancient Incan grain’ and heralded as super good for you. I love it because it’s delicious, versatile, and quick cooking. Prep the ingredients for the salad while the quinoa cooks, and toss it all together. Done.

Quinoa Salad

Adapted from The New Basics Cookbook by Julee Rosso and Sheila Lukins

Makes 4-6 servings

  • 1 cup quinoa
  • 2 cups water
  • 1/2 cup raisins
  • 2 tablespoons light sesame oil (not the dark ‘toasted’ typee)
  • 2 tablespoons fresh lemon juice
  • zest, juice, and segments from 1 fresh orange*
  • 1/4 cup thinly sliced green onions
  • 1/2 cup toasted sliced almonds
  • 2 tablespoons chopped fresh mint, plus additional for garnish

RINSE the quinoa in a fine mesh strainer.

COMBINE the quinoa and water in a medium saucepan and bring to a boil over medium-high heat.

REDUCE the heat to low and cover. Cook for 20 minutes and remove from heat.

FLUFF the quinoa with a fork, add the raisins and cover for 5 inutes to plump them.

TRANSFER the quinoa to a large serving bowl and drizzle with the oil and lemon juice.

ADD the orange zest and the juice squeezed from the peels, plus the orange segments.

STIR in the green onions, almonds, and mint, topping with additional mint for garnish, if desired.

Enjoy!

*TRIM the top and bottom off of the orange, using a very sharp knife. SET the fruit on end, and carefully cut the skin from the flesh, beginning at the top and following the curves down. Rotate each fruit as you go, removing all of the peel with a bit of fruit clinging to it. CUT out each section of the fruit by inserting the blade of the knife between the flesh and the membranes on both sides. The wedges should come out easily, leaving only the membrane intact.

Fajita Fiesta + Homemade Guacamole

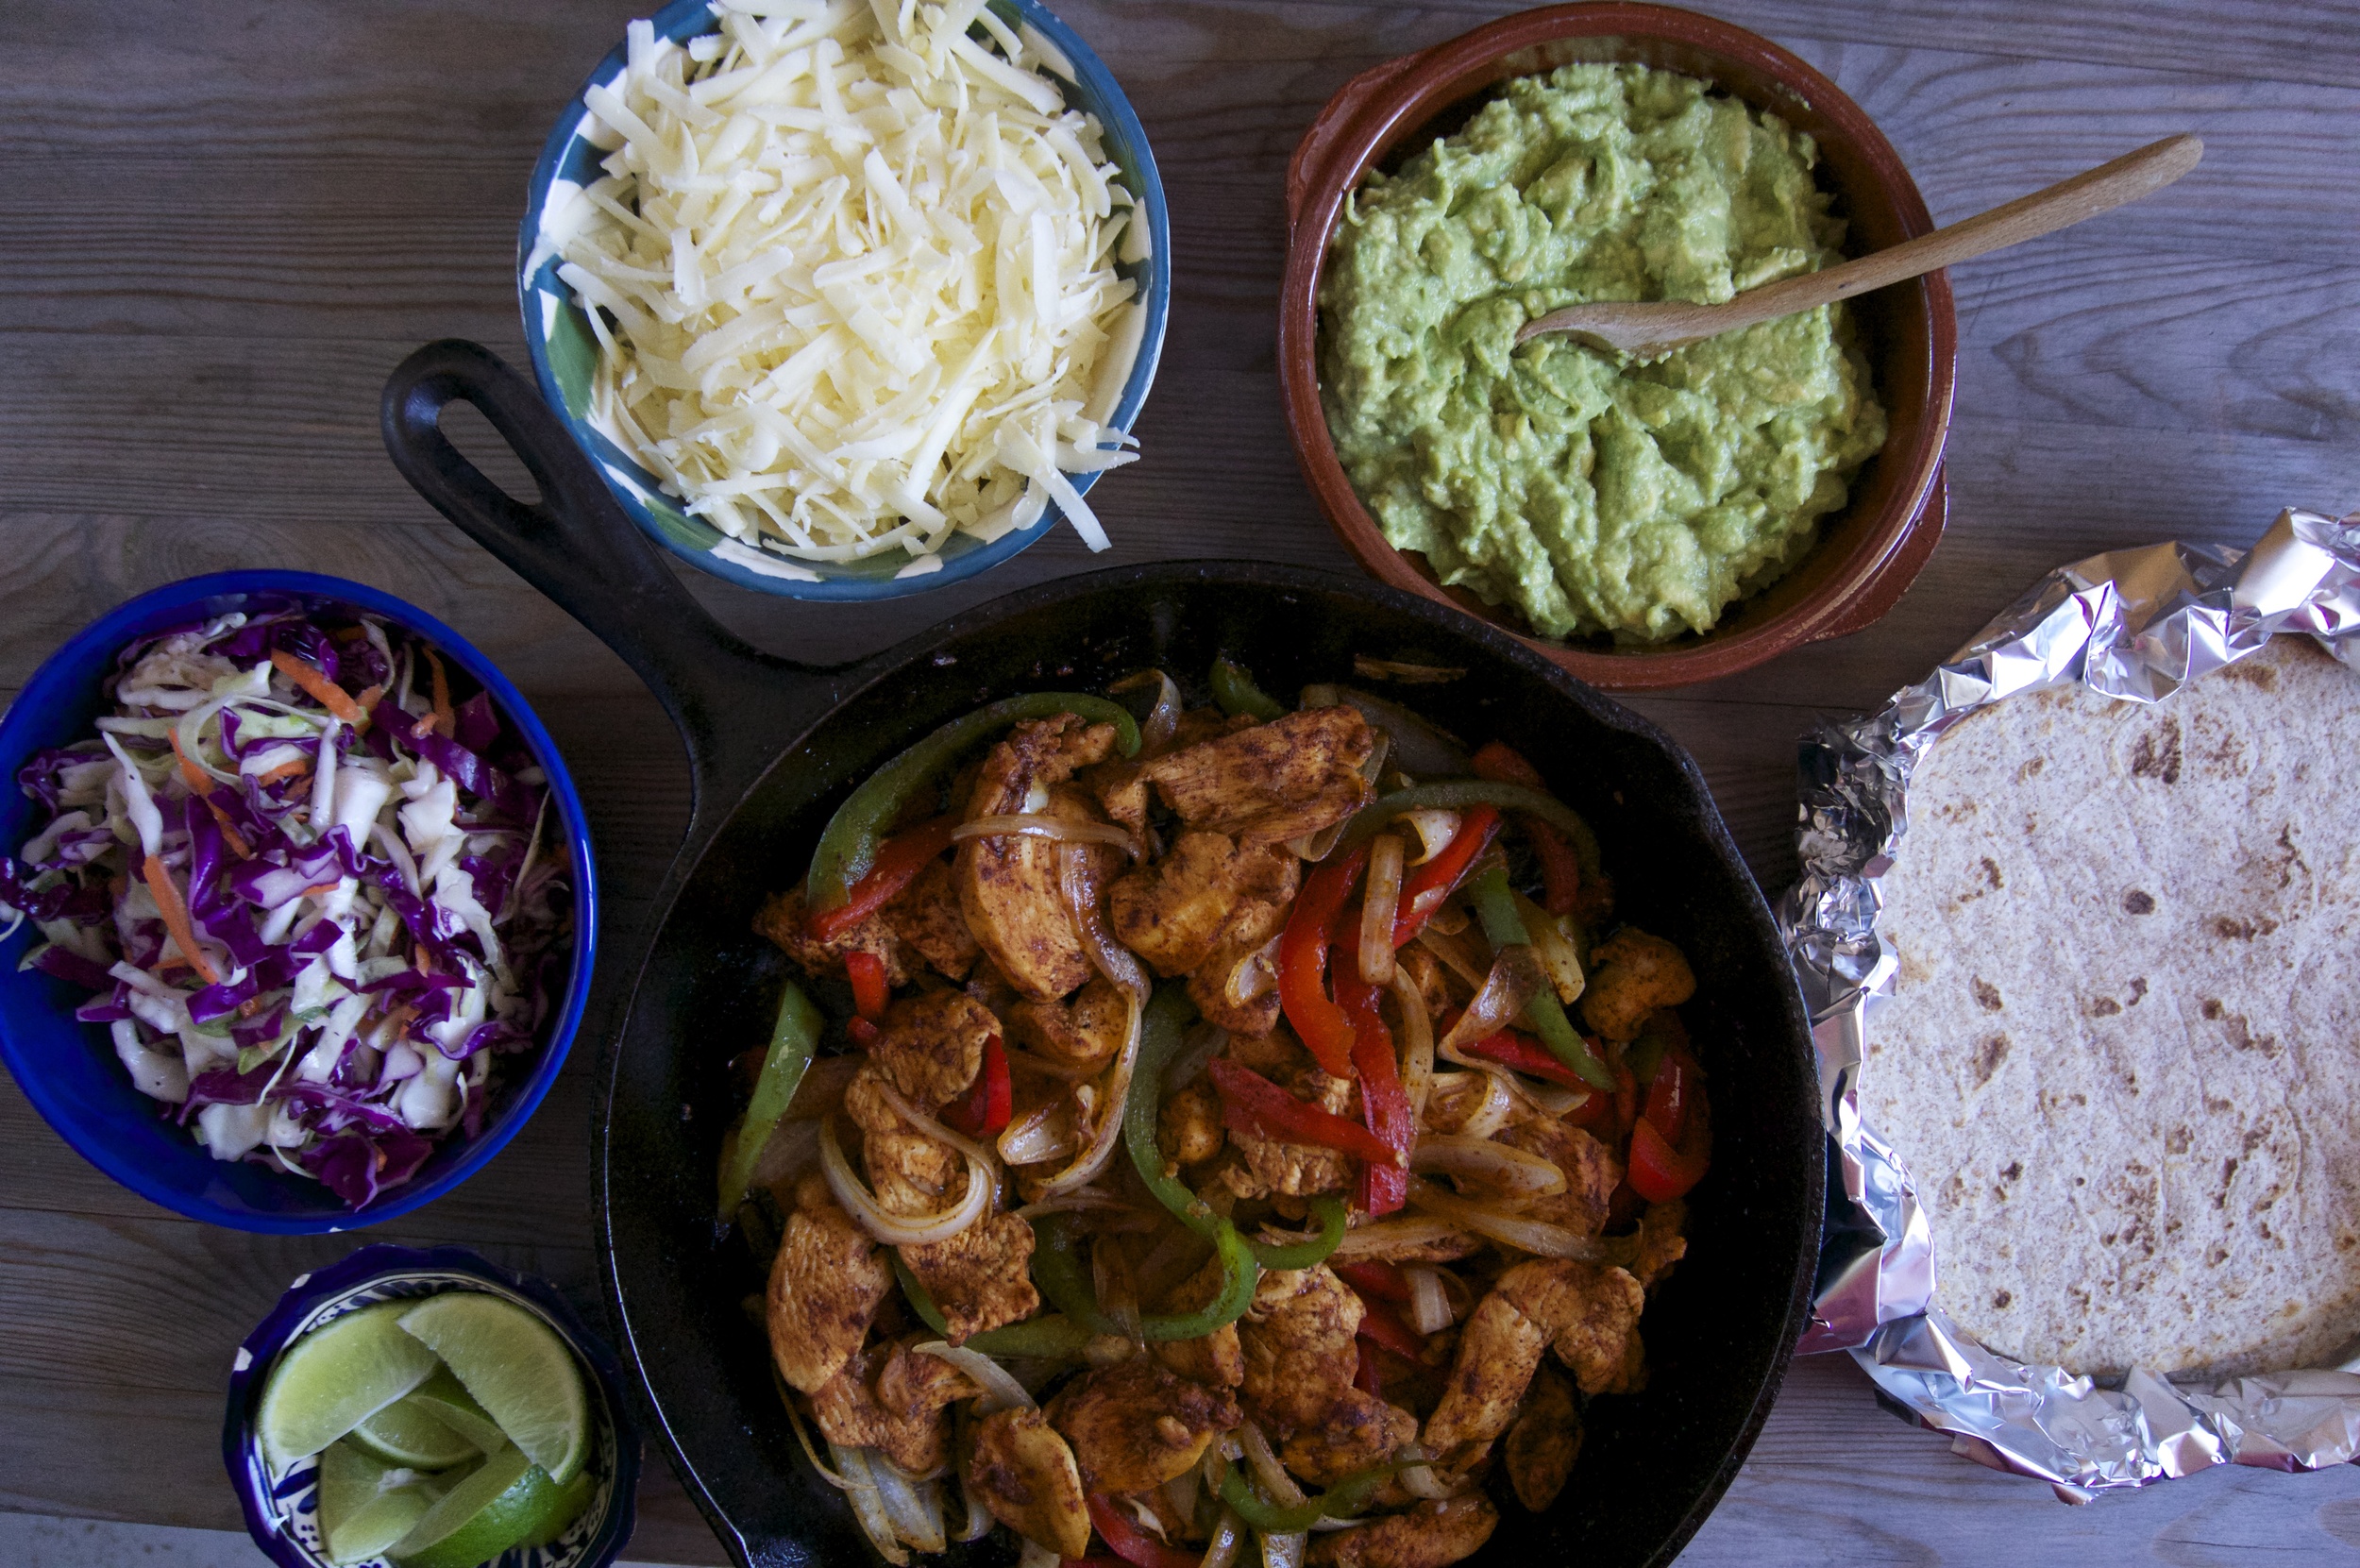
Keep it simple or go all out. Why fight the crowds on Cinco de Mayo when you can celebrate at home? Pick your playlist and get ready for some festive kitchen fun! Here’s a sneak peek at a smart, delicious recipe from my family to yours. Smoky chicken fajitas in your cast iron skillet, no charcoal required. Squeeze on some fresh lime, dress them up the way you like. Easy enough for a weeknight, just be sure to recruit many hands to assemble the festive buffet! Ole!

All the fixings for a homemade fiesta.

All the fixings for a homemade fiesta.

Fajita Fiesta

  • 1 tablespoon olive oil
  • 1/2 red bell pepper, sliced into thin strips
  • 1/2 green bell pepper, sliced into thin strips
  • 1 medium onion, thinly sliced
  • 1 pound boneless chicken breast, thinly sliced crosswise
  • 2 cloves garlic, crushed or minced
  • 1 tablespoon Anc ho chile powder
  • 1/4 teaspoon Chipotle chile powder (optional)
  • 1 teaspoon ground cumin
  • 1 teaspoon salt
  • ground pepper
  • juice of 1 lime

For serving:

Warm flour tortillas, shredded cheese, guacamole (recipe follows, here’s where the hands come in), jalapeno slices, lime wedges, sour cream,  ribbons of shredded colorful cabbage

HEAT oil in large skillet over medium heat.

ADD red and green bell peppers and onion and stir fry for 5 minutes until beginning to soften.

TRANSFER to a large bowl using tongs and return skillet to heat.

ADD chicken, garlic, ancho chile and optional chipotle powder, ground cumin and salt and pepper and stir-fry a few minutes until chicken is opaque.

ADD the cooked pepper mixture to the chicken and continue cooking until chicken is done, and peppers are heated through.

SQUEEEZE in the juice of 1 lime and toss to combine.

SERVE, buffet style, spooning chicken and peppers into tortillas, and topping as desired.


Classic Guacamole

No fiesta would be complete without the company of this wildly popular festive dip. Have the kids scoop the soft green goodness right from its shell and into a bowl and start smashing.  The hardest part of perfect guacamole is having your avocados ‘just right’ They are ripe when they are just softening when lightly pressed near the stem end and the skin begins to turn black-ish. They usually need a few days on the counter to ripen—to speed this up, place in a small paper bag along with a ripe banana and the process happens more quickly.

  • 2 medium avocados, ripened/soft
  • juice of 1 lime
  • 1/2 teaspoon coarse salt
  • CUT the avocados in half, running your knife around the pit from stem to blossom end and back up again.

TWIST the halves in opposite directions to free the pit, and pull the halves apart.

DISLODGE the pit, then scoop the avocado out of the ‘shell’ into a medium bowl.

MASH the avocado with a large fork or potato masher, and stir in the lime juice and salt.

SERVE, or if not using immediately, cover with plastic wrap pressed directly on the surface of the guacamole and refrigerate for up to 2 days.

Green Adobo Sauce

Home sweet home, there’s no place like it. July has been a swirl of travel and as wonderful as it’s been, I long to see friends, hug the house, and cook for my family. Plus, there’s a new cookbook waiting for its inaugural staining.

Imagine my glee to say yes please when neighbors shouted ‘welcome back!’ and offered gorgeous summer bounty from their garden. I’ll play in the kitchen while my husband fires up the grill.

All the ingredients ready to go for a delicious adobo verde.

All the ingredients ready to go for a delicious adobo verde.

After unveiling the garden gifts–bunches of freshest cilantro and parsley, firm bulbs of garlic, and a handful of hot chiles–I cracked open our new Rick Bayless cookbook and whipped up a blender-full of green adobo.

A quick spin in the blender is all it takes!

A quick spin in the blender is all it takes!

As with all things Rick, the sauce is as tasty and versatile as promised. We slathered it on grilled chicken and dreamed up some fun things to pair with this vibrant spicy sauce.

Tomorrow night we’ll make a potato salad in the style of green and still have enough adobo to savor and share. I’ll send a jar across the street.

As you tumble in from vacation, be sure your neighbor’s know you made it home. They, too, might welcome you back with something good from the garden.

Green Chile Adobo(Adobo de Chile Verde)

Blend vibrant fresh herbs with sweet roasted garlic and spicy chile into a refrigerator staple. I strayed slightly from the recipe, exchanging one roasted and peeled poblano chile for 2 of the serranos. Deep chile flavor with a more subtle spice. Adapted from More Mexican Every Day by Rick Bayless

  • 1/2 head garlic, separated into unpeeled cloves
  • 4 to 5 serrano chiles, stems removed
  • 1 bunch cilantro, thick bottom stems cut off, roughly chopped
  • 1 bunch flat-leaf parsley, thick bottom stems cut off, roughly chopped
  • 1 cup olive oil
  • 2 teaspoons coarse salt

SET a large skillet over medium heat.

LAY in the garlic and chiles and roast, turning regularly, until soft and browned in spots, about 10 minutes for the chiles and 15 for the garlic.

COOL until handleable, then slip off the garlic’s papery husks. Roughly chop the garlic and chiles and transfer to a blender or food processor.

ADD the cilantro, parsley, olive oil, and salt to the blender and process, scraping down the sides as needed, until nearly smooth (it will look a little like pesto).

TRANSFER to a pint-size jar and store, covered, in the refrigerator, where it will last a month or so.

Note:The oil will rise to the top which will preserve color and freshness. After removing a spoonful of the solids to stir into your eggs or toss with pasta, make sure to smear the oily part flat again to re-create that protective coating.